ASP.NET 简洁论坛源码分析之 - EntityEngine流程分析 转
ASP.NET 简洁论坛源码最新版本下载地址:
http://files.cnblogs.com/netfocus/forum.rar
演示地址:
隔了很长时间,终于又有时间可以坐下来写写文章了。按照大纲的顺序,今天介绍整个实体引擎(EntityEngine)的设计,以及如何使用它来完成各种数据库操作。首先来看一下EntityEngine引擎中相关的几个关键的类。
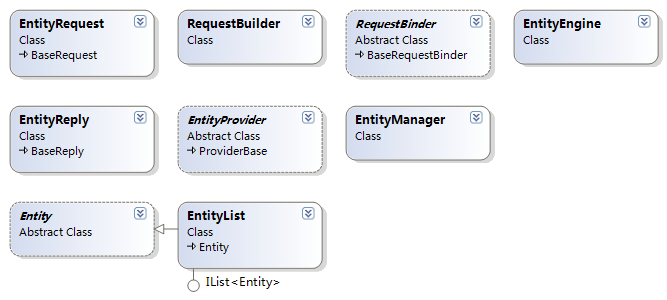
当用户要对数据库做某个操作时,需要先创建一个EntityRequest实例,然后将该实例传给RequestBuilder,RequestBuilder会对该实例做进一步的一些通用的初始化操作,比如设置请求的类型。EntityRequest创建完成后,根据该EntityRequest实例进一步创建一个RequestBinder实例,该实例的作用是将当前的EntityRequest实例和一个EntityReply实例绑定起来。然后框架就会把这个RequestBinder实例发送传给EntityEngine引擎,EntityEngine引擎调用EntityManager来处理请求,而EntityManager则调用一个EntityProvider实例来真正操作数据库。请求执行完成后,会更新EntityReply实例,EntityReply中包含了一个Entity实例,这个Entity实例可以是任意数据,可以是单个实体,也可以是一个集合。以上就是EntityEngine引擎的大致执行流程。
下面再明确列一下这几个类的主要职责或作用:
EntityRequest:提供一个类,用来表示用户的请求,存放请求的一切相关数据;
RequestBuilder:设置请求类型,或者根据一些参数来创建一个请求(EntityRequest);
RequestBinder:将请求和一个回复(EntityReply)捆绑,即建立对应关系;
EntityEngine:发送一个请求,当然实际上发送的是RequestBinder;
EntityManager:一个实体管理类,提供如CRUD等操作,它内部调用一个EntityProvider实例来完成真正的数据库操作;
EntityProvider:它是一个Provider实例,提供了操作数据库的统一接口,该类会调用ADO.NET完成数据库的操作;
EntityReply:表示请求的回复,一个EntityRequest对应一个EntityReply;EntityReply中包含了请求的所有结果信息;
Entity:一个抽象类,一个应用中所有的真实实体类都继承自它,它能表示单个实体对象,也能表示一个集合对象;
EntityList:表示一个包含多个Entity的集合,但它也是集成自Entity的;
好了,了解了EntityEngine引擎的大致流程以及每个关键类的功能后,我想就可以举个简单的例子来说明具体应该如何来使用这些类。就以发表帖子这个功能来举例吧:
1.在ThreadAdd.cs文件中,当用户点击发帖按钮后,会执行SaveThread方法,该函数首先创建一个Thread实例,即创建一个帖子实例,然后设置帖子的相关信息,然后调用BusinessManager.CreateThread方法来创建帖子到数据库。代码如下:


 }
} }
}
2. BusinessManager.cs文件:
2 public static void CreateThread(Thread thread)
3 {
4 entityEngine.ExecuteRequest(RequestHelper.BuildAddThreadRequest(thread));
5 }
该方法的实现非常简单,就是调用RequestHelper创建一个RequestBinder实例,然后直接调用一个静态的EntityEngine实例的ExecuteRequest静态方法。前面说过,EntityEngine主要负责接收并发送RequestBinder。接下来再看看RequestHelper是如何创建一个RequestBinder的?
3. RequestHelper.cs文件:
这个函数也非常简单,首先将刚才创建的Thread实例传给RequstBuilder类的静态方法BuildAddEntityRequest方法,然后该方法就返回一个EntityRequest的实例,然后再把这个实例传给RequestBinder的构造函数,最终创建出一个RequestBinder实例;下面在看看RequestBuilder的BuildAddEntityRequest做了什么呢?
4. RequestBuilder.cs文件:
由于用到了泛型,所以根据动态传入进来的类型创建一个EntityRequest实例,在这个例子中就是ThreadRequest。另外由于是新增的操作,所以还要再将该Request标记为Add,然后就是将要保存的Thread实例保存到EntityRequest中,以便告诉框架要保存的信息。好,现在对EntityRequest是如何创建出来的应该有所了解了,先看接下去看看这个Request是如何被发送和执行的。接下来转到EntityEngine的ExecuteRequest方法,该方法负责接收和发送Request。
5. EntityEngine.cs文件:
2 /// 同步发送单个给定的请求,并直接返回请求结果.
3 /// </summary>
4 public BaseReply ExecuteRequest(BaseRequestBinder requestBinder)
5 {
6 return requestBinder.ExecuteRequest();
7 }
该方法的实现非常简单,就是直接调用RequestBinder的ExecuteRequest方法发送Request。
6. RequestBinder.cs文件:
2 {
3 return Request.Send( this );
4 }
前面分析过,一个RequestBinder会将一个Request和一个Reply进行捆绑。所以它自然会至少包含对这两个实例的引用。
而它的ExecuteRequest方法也非常简单,直接调用Request实例的Send方法去发送Request,当然发送时需要将RequestBinder实例的引用传递进去,因为在EntityManager处理一个Request的时候,会把相应的返回信息保存到当前Request对应的Reply中。下面看看EntityRequest是如何发送请求的。
7. EntityRequest.cs文件:
2 {
3 BaseReply reply = requestBinder.Reply;
4 SqlResult result;
5
6 switch (Operation)
7 {
8 case OperationType.Get:
9 reply.Reply = EntityManager.GetEntity(requestBinder);
10 break ;
11 case OperationType.Add:
12 result = EntityManager.CreateEntity(requestBinder);
13 reply.Status = result.Status;
14 reply.Log = result.Message;
15 break ;
16 case OperationType.Update:
17 result = EntityManager.UpdateEntity(requestBinder);
18 reply.Status = result.Status;
19 reply.Log = result.Message;
20 break ;
21 case OperationType.Delete:
22 result = EntityManager.DeleteEntity(requestBinder);
23 reply.Status = result.Status;
24 reply.Log = result.Message;
25 break ;
26 }
27
28 return reply;
29 }
从代码中可以清晰的看到,首先根据当前Request的请求类型,如添加、删除、修改、查询等,来决定该调用EntityManager的哪个接口来处理请求。这里可以看到EntityManager提供了四个简单明了的接口分别用来查询单个实体、添加单个实体、更新单个实体、删除单个实体。在这个例子中,我们会进入Add的分支,也就是调用CreateEntity接口。下面就来看看CreateEntity接口如何实现的。
8. EntityManager.cs文件:
2 public static SqlResult CreateEntity(BaseRequestBinder requestBinder)
3 {
4 return entityProvider.CreateEntity(requestBinder);
5 }
完全跟前面分析流程的一致,EntityManager直接调用EntityProvider的CreateEntity来真正去删除一个实体,在这个例子中就是去添加一个帖子到数据库;接下来转到EntityProvider中去看看CreateEntity接口是如何实现的。
9. SqlEntityProvider.cs文件:
2 {
3 return CreateEntity(GetConnection(), requestBinder);
4 }
该方法也非常简单,仅仅一句话。所有的代码都交给了CreateEntity的一个私有方法来完成,下面继续看看该私有方法:
2 {
3 SqlResult result = new SqlResult();
4
5 EntityRequest request = requestBinder.Request as EntityRequest;
6
7 if (request != null )
8 {
9 if ( ! string .IsNullOrEmpty(request.CommandIdent))
10 {
11 result = ExecuteRequest(connection, transaction,
12 Configuration.Instance.GetCommand(request.CommandIdent), requestBinder, request);
13 }
14 else if (request.Entity != null )
15 {
16 result = ExecuteRequest(connection, transaction,
17 Configuration.Instance.GetCreateCommand(request.Entity.GetType()), requestBinder, request.Entity);
18 }
19 }
20 return result;
21 }
该方法看上去有些复杂,但可以看的出来,它还不是真正执行数据库操作的地方,真正执行数据库操作的都由ExecuteRequest私有方法来完成了。但需要简单介绍下的是,这里有一个判断,就是判断当前Request是否提供了一个CommandIdent,如果有提供就进入上面的分支,如果未提供就进入下面的分支。这个判断的意思是:如果提供了CommandIdent,则说明告诉框架需要去调用一个存储过程来执行该请求,CommandIdent标识了该存储过程对应的一个映射的名称;如果未提供,则调用框架提供的默认的新增实体的方法去将该实体插入到表中。上面代码中的GetCommand和GetCreateCommand会利用预先配置好的ORMapping映射信息去获取一个存储过程的所有信息,并把当前Request中的数据设置到存储过程的参数中。这一切都是自动的,因为所有对应关系都已经在一个ORMapping.xml的配置文件中配置好了。下面继续看看ExecuteRequest这个私有函数做了什么?
2 BaseRequestBinder requestBinder, object commandData)
3 {
4 SqlResult result = new SqlResult();
5
6 try
7 {
8 SqlCommand sqlCommand = new SqlCommand(command.CommandName, connection);
9
10 sqlCommand.Transaction = transaction;
11 sqlCommand.CommandType = CommandType.StoredProcedure;
12
13 SetCommandParameters(command, sqlCommand);
14
15 SqlParameter parameter = new SqlParameter();
16 parameter.ParameterName = " @ReturnValue " ;
17 parameter.SqlDbType = SqlDbType.Int;
18 parameter.Size = 4 ;
19 parameter.Direction = ParameterDirection.ReturnValue;
20 sqlCommand.Parameters.Add(parameter);
21
22 if (commandData is Entity)
23 {
24 SetParameterValues(command, sqlCommand, (Entity)commandData);
25 }
26 else if (commandData is EntityRequest)
27 {
28 SetParameterValues(command, sqlCommand, (EntityRequest)commandData);
29 }
30 else
31 {
32 throw new Exception( " Command Data invalid type. " );
33 }
34
35 sqlCommand.ExecuteNonQuery();
36
37 if (commandData is Entity)
38 {
39 SetOutputParameterValues(command, sqlCommand, (Entity)commandData);
40 }
41 else if (commandData is EntityRequest)
42 {
43 SetOutputParameterValues(command, sqlCommand, (EntityReply)requestBinder.Reply);
44 }
45
46 if (parameter.Value != null && parameter.Value != DBNull.Value)
47 {
48 result.Status = ( int )parameter.Value;
49 }
50 }
51 catch (Exception ex)
52 {
53 result = new SqlResult();
54 result.Message = ex.Message;
55 }
56 finally
57 {
58 if (transaction == null )
59 {
60 CloseConnection(connection);
61 }
62 }
63
64 return result;
65 }
果然如此,这个函数的代码一目了然,就是一些简单的常用的ADO.NET操作的代码。首先实例化一个SqlCommand,然后设置该SqlCommand的参数信息,然后执行该SqlCommand,然后将Output的参数设置到EntityReply中,如果有的话。最后关闭数据库连接。
好,到这里位置,当前请求算是执行完成了,接下来看看如何获取Reply,以及如何判断当前请求执行是否成功。因为当前这个例子是发表帖子,所以我们优势常常不会去判断是否成功。因为如果默认没有发生异常的话,就简单的认为已经成功了。当然如果你真的想获取这些信息的话,就从Reply中去获取吧。下面再来看看最初发表帖子时的代码:
2 {
3 // 检查版块是否存在
4 if (section == null )
5 {
6 throw new Exception( " 请确认您所在的版块是存在的。 " );
7 }
8
9 // 获取当前帖子
10 Thread thread = new Thread();
11
12 // 设置帖子属性
13 thread.GroupId.Value = section.GroupId.Value;
14 thread.SectionId.Value = section.EntityId.Value;
15 thread.Subject.Value = subjectTextBox.Value;
16 thread.ThreadMarks.Value = int .Parse(threadMarksTextBox.Value);
17 thread.Body.Value = bodyEditor.Value;
18 thread.ThreadStatus.Value = ( int )ThreadStatus.Normal;
19 thread.AuthorId.Value = CurrentUser.EntityId.Value;
20 thread.Author.Value = CurrentUser.NickName.Value == null ? "" : CurrentUser.NickName.Value;
21 thread.CreateDate.Value = DateTime.Now;
22 thread.UpdateDate.Value = DateTime.Now;
23 thread.StickDate.Value = DateTime.Parse( " 1753-01-01 " );
24 thread.TotalViews.Value = 0 ;
25
26 // 添加帖子
27 BusinessManager.CreateThread(thread);
28
29 // 返回列表页面
30 Page.Response.Redirect(SiteUrls.Instance.GetThreadsUrl(( int )ThreadOrderType.UpdateDate,
31 ( int )ThreadStatus.Normal, ( int )ThreadReleaseStatus.Open, section.EntityId.Value));
32 }
可以看到,我在调用BusinessManager的CreateThread方法创建帖子的时候,并没有关心其返回值,我这里偷懒了,我想真正的网站不应该如此,应该如下面这样:
2 {
3 // 检查版块是否存在
4 if (section == null )
5 {
6 throw new Exception( " 请确认您所在的版块是存在的。 " );
7 }
8
9 // 获取当前帖子
10 Thread thread = new Thread();
11
12 // 设置帖子属性
13 thread.GroupId.Value = section.GroupId.Value;
14 thread.SectionId.Value = section.EntityId.Value;
15 thread.Subject.Value = subjectTextBox.Value;
16 thread.ThreadMarks.Value = int .Parse(threadMarksTextBox.Value);
17 thread.Body.Value = bodyEditor.Value;
18 thread.ThreadStatus.Value = ( int )ThreadStatus.Normal;
19 thread.AuthorId.Value = CurrentUser.EntityId.Value;
20 thread.Author.Value = CurrentUser.NickName.Value == null ? "" : CurrentUser.NickName.Value;
21 thread.CreateDate.Value = DateTime.Now;
22 thread.UpdateDate.Value = DateTime.Now;
23 thread.StickDate.Value = DateTime.Parse( " 1753-01-01 " );
24 thread.TotalViews.Value = 0 ;
25
26 // 添加帖子
27 BaseReply reply = BusinessManager.CreateThread(thread);
28
29 if (reply.Status != 0 )
30 {
31 // 这里,我们可以将错误信息做任何处理,如保存到日志或显示给用户。
32 throw new Exception(reply.Log);
33 }
34 else
35 {
36 // 返回列表页面
37 Page.Response.Redirect(SiteUrls.Instance.GetThreadsUrl(( int )ThreadOrderType.UpdateDate,
38 ( int )ThreadStatus.Normal, ( int )ThreadReleaseStatus.Open, section.EntityId.Value));
39 }
40 }
好了,真个发表帖子的流程分析完了。各位有什么体会呢?是不是觉得为什么要搞出这么多层次结构的类,为什么不直接调用EntityProvider来实现功能呢?呵呵,当然如果你要这样做也可以,除非你愿意一直不断重复并且容易出错的写ADO.NET相关的代码。你可以发现,基于这一套框架,你做任何操作,都不必在代码中写SQL语句,你所要做的,仅仅是定义一些非常简单直观的实体类、定义好ORMapping配置文件、定义这些实体类相关的Request,然后再写几个业务相关的接口,这样,整个数据访问层就好了。
其实,添加、删除、修改,以及根据主键去获取单个实体,这些操作都是非常简单的。我觉得最复杂的是多条件组合查询,或者是多个请求组合起来一起执行的情况。如果我一次性全部讲清楚可能文章会非常长,所以我准备留到下面几篇,重点介绍其他很多细节但又非常关键,或者说最能体现这个实用类库价值的一些设计。
转载自:http://www.cnblogs.com/netfocus/archive/2009/11/05/1596655.html