AngularJs + ASP.NET MVC
【AngularJs + ASP.NET MVC】使用AntularJs快速建立ASP.NET MVC SPA網站
這幾天接觸到了AngularJs的美麗,讓饅頭有點躍躍欲試使用AngularJs來做一個SPA(單頁式網站),沒想到使用AngularJs來製作SPA網站這麼簡單!相信你看完這次的分享,你也想動手試一試!
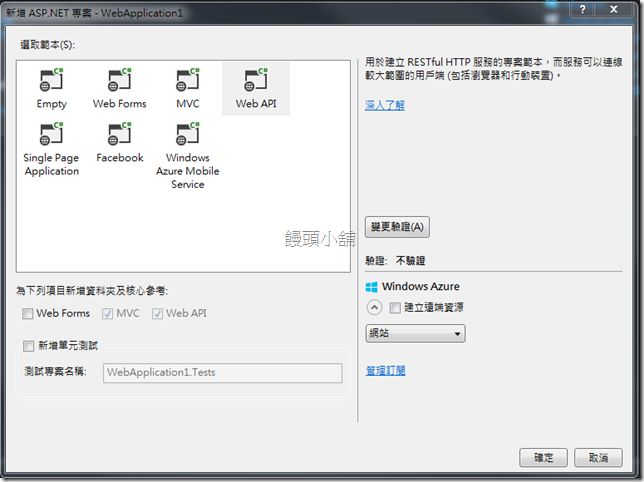
在Visual Studio中有一個專案範本Single Page Application,不過這個專案範本預設是使用knockout.js來建立的,所以饅頭這邊是使用Web API的專案來開始製作
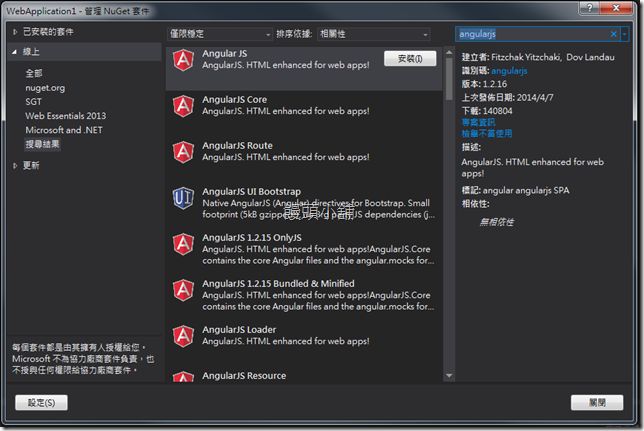
選擇了Web API專案後,這個專案中本身沒有AngularJs,所以我們要透過Nuget來取得AngularJs(當然,也可以從官方網站下載),在右上角打上AngularJs後就可以找到!我們可以安裝第一個nuget package,這個package預設會幫我們安裝整個AngularJs的Javascript Library
安裝AgnularJs完成後,我們要把Javascript放置到頁面中,當然我們使用MVC中提供的Bundle的功能
1 |
bundles.Add(new ScriptBundle("~/bundles/AgnularJs").Include( |
2 |
"~/Scripts/angular.js", |
3 |
"~/Scripts/angular*")); |
接下來我們把整個(或相關檔案)AngularJs放置到頁面中吧!
這邊要注意一下,angular.js這個檔案要放在最上頭,否則您開啟瀏覽器的開發工具會看到滿江紅喔!
設定Bundle結束後,我們到View\Shared資料夾下的_Layout.cshtml在檔案的下方加入我們剛剛設定的Bundle package
1 |
@Scripts.Render("~/bundles/AgnularJs") |
以及在html的tag上加上ng-app的屬性,最後的Layout會長的樣這樣
01 |
<!DOCTYPE html> |
02 |
<html ng-app="SPA"> |
03 |
<head> |
04 |
<meta http-equiv="Content-Type" content="text/html; charset=utf-8"/> |
05 |
<meta charset="utf-8" /> |
06 |
<meta name="viewport" content="width=device-width" /> |
07 |
<title>@ViewBag.Title</title> |
08 |
@Styles.Render("~/Content/css") |
09 |
@Scripts.Render("~/bundles/modernizr") |
10 |
</head> |
11 |
<meta http-equiv="Content-Type" content="text/html; charset=utf-8"/> |
12 |
<body> |
13 |
<div class="navbar navbar-inverse navbar-fixed-top"> |
14 |
<div class="container"> |
15 |
<div class="navbar-header"> |
16 |
<button type="button" class="navbar-toggle" data-toggle="collapse" data-target=".navbar-collapse"> |
17 |
<span class="icon-bar"></span> |
18 |
<span class="icon-bar"></span> |
19 |
<span class="icon-bar"></span> |
20 |
</button> |
21 |
@Html.ActionLink("應用程式名稱", "Index", "Home", new { area = "" }, new { @class = "navbar-brand" }) |
22 |
</div> |
23 |
<div class="navbar-collapse collapse"> |
24 |
<ul class="nav navbar-nav"> |
25 |
<li>@Html.ActionLink("首頁", "Index", "Home", new { area = "" }, null)</li> |
26 |
<li>@Html.ActionLink("API", "Index", "Help", new { area = "" }, null)</li> |
27 |
</ul> |
28 |
</div> |
29 |
</div> |
30 |
</div> |
31 |
<div class="container body-content"> |
32 |
@RenderBody() |
33 |
<hr /> |
34 |
<footer> |
35 |
<p>© @DateTime.Now.Year - 我的 ASP.NET 應用程式</p> |
36 |
</footer> |
37 |
</div> |
38 |
39 |
@Scripts.Render("~/bundles/jquery") |
40 |
@Scripts.Render("~/bundles/AgnularJs") |
41 |
@Scripts.Render("~/bundles/bootstrap") |
42 |
43 |
@RenderSection("scripts", required: false) |
44 |
</body> |
45 |
</html> |
接下來,我們在Script的資料夾下新增一個Javascrpt檔案,饅頭這邊命名為angular.SPADemo.js
angular.SPADemo.js檔案中我們在這邊設定SPA的路由,饅頭這邊將第一個頁面放置在Home/SPApage1中
01 |
var SPA = angular.module("SPA", ["ngRoute"]); |
02 |
//SPA路由設定,可在此往下新增路由 |
03 |
SPA.config(['$routeProvider', "$locationProvider", |
04 |
function ($routeProvider, $locationProvider) { |
05 |
$routeProvider |
06 |
.when("/", { |
07 |
templateUrl: '/Home/SPApage1', |
08 |
controller: 'Main' |
09 |
}) |
10 |
}]) |
所以我們要在HomeController中新增一個ActionResult,名為SPApage1,並且回傳PartialView
1 |
//Controller |
2 |
public ActionResult SPApage1() |
3 |
{ |
4 |
return PartialView("_SPApage1"); |
5 |
} |
並且將原先在Index頁面中的Html 搬移到該頁面中
01 |
@*新增一個div,並加上一個angularjs的Controller*@ |
02 |
<div ng-controller="Main"> |
03 |
@*原先在Home/Index頁面中的Html*@ |
04 |
<div class="jumbotron"> |
05 |
<h1>ASP.NET</h1> |
06 |
<p class="lead">ASP.NET is a free web framework for building great Web sites and Web applications using HTML, CSS, and JavaScript.</p> |
07 |
<p><a href="http://asp.net" class="btn btn-primary btn-lg">Learn more »</a></p> |
08 |
</div> |
09 |
<div class="row"> |
10 |
<div class="col-md-4"> |
11 |
<h2>Getting started</h2> |
12 |
<p> |
13 |
ASP.NET Web API is a framework that makes it easy to build HTTP services that reach |
14 |
a broad range of clients, including browsers and mobile devices. ASP.NET Web API |
15 |
is an ideal platform for building RESTful applications on the .NET Framework. |
16 |
</p> |
17 |
<p><a class="btn btn-default" href="http://go.microsoft.com/fwlink/?LinkId=301870">Learn more »</a></p> |
18 |
</div> |
19 |
<div class="col-md-4"> |
20 |
<h2>Get more libraries</h2> |
21 |
<p>NuGet is a free Visual Studio extension that makes it easy to add, remove, and update libraries and tools in Visual Studio projects.</p> |
22 |
<p><a class="btn btn-default" href="http://go.microsoft.com/fwlink/?LinkId=301871">Learn more »</a></p> |
23 |
</div> |
24 |
<div class="col-md-4"> |
25 |
<h2>Web Hosting</h2> |
26 |
<p>You can easily find a web hosting company that offers the right mix of features and price for your applications.</p> |
27 |
<p><a class="btn btn-default" href="http://go.microsoft.com/fwlink/?LinkId=301872">Learn more »</a></p> |
28 |
</div> |
29 |
</div> |
30 |
</div> |
我們將Index的頁面,改為
1 |
<div ng-view></div> |
這樣我們就可以完成SPA了!(其他頁面依樣畫葫蘆就可以了)
其他的頁面可以繼續在路由新增,然後填上MVC中相對的位置,要記得把畫面的部分移除Layout喔!
PS. 若在Layout有設定Section的CSS或JS的Render,會無法載入喔!所以可以考慮在畫面一開始時,載入所有的JS跟CSS!但這樣的情況要請大家把JS模組化,並且盡可能的重用,否則光載入JS檔案就要等到天荒地老了...
https://code.msdn.microsoft.com/CRUD-Operations-in-MVC-5-d4ff2263/sourcecode?fileId=119238&pathId=457841343

