YOLOv8目标检测结果分析
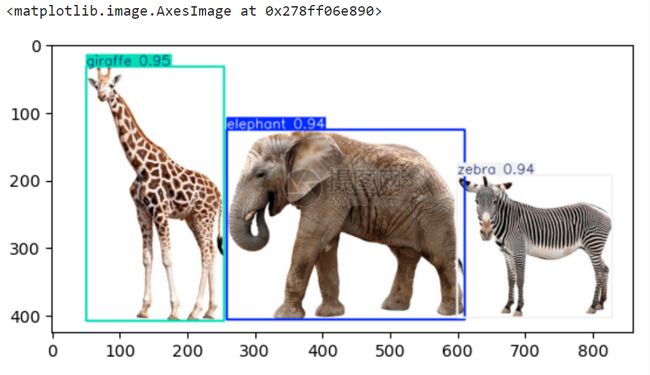
使用YOLOv8 检测图片中的动物
import cv2
from ultralytics import YOLO
model = YOLO(model="yolov8n.pt")
results = model(source="animal2.jpg")
result = results[0]
img = result.plot()

from matplotlib import pyplot as plt
plt.imshow(X=img[:,:,::-1])
- 检测框
boxes = result.boxes
print(boxes.data)
tensor([[ 51.4046, 33.7802, 255.3551, 408.0295, 0.9497, 23.0000],
[600.6371, 193.3751, 829.2948, 403.7835, 0.9403, 22.0000],
[259.3028, 126.7250, 611.3724, 406.4635, 0.9386, 20.0000]], device=‘cuda:0’)
- 类别
print(boxes.cls)
tensor([23., 22., 20.], device=‘cuda:0’)
- 置信度
print(boxes.conf)
tensor([0.9497, 0.9403, 0.9386], device=‘cuda:0’)
- 检测框三种形式
print(boxes.xywh)  # 中心点 + 宽高
print(boxes.xyxy)  # 左上角点 + 右下角点
print(boxes.xywhn) # xywh归一化之后的结果,
tensor([[153.3799, 220.9049, 203.9506, 374.2493],
[714.9659, 298.5793, 228.6577, 210.4083],
[435.3376, 266.5942, 352.0696, 279.7385]], device=‘cuda:0’)
tensor([[ 51.4046, 33.7802, 255.3551, 408.0295],
[600.6371, 193.3751, 829.2948, 403.7835],
[259.3028, 126.7250, 611.3724, 406.4635]], device=‘cuda:0’)
tensor([[0.1783, 0.5198, 0.2372, 0.8806],
[0.8314, 0.7025, 0.2659, 0.4951],
[0.5062, 0.6273, 0.4094, 0.6582]], device=‘cuda:0’)
