大模型推理框架 RTP-LLM 架构解析

RTP-LLM 是阿里巴巴智能引擎团队推出的大模型推理框架,支持了包括淘宝、天猫、闲鱼、菜鸟、高德、饿了么、AE、Lazada 等多个业务的大模型推理场景。RTP-LLM 与当前广泛使用的多种主流模型兼容,使用高性能的 CUDA kernel, 包括 PagedAttention、FlashAttention、FlashDecoding 等,支持多模态、LoRA、P-Tuning、以及 WeightOnly 动态量化等先进功能,已在众多 LLM 场景中得到实际应用与检验。
本篇文章介绍了 RTP-LLM 的整体架构,并着重分析了模型加载过程中的核心部分:模型的权重和配置文件。本文主要由社区用户 mingming 贡献,特此感谢其对项目的支持。
一、架构介绍
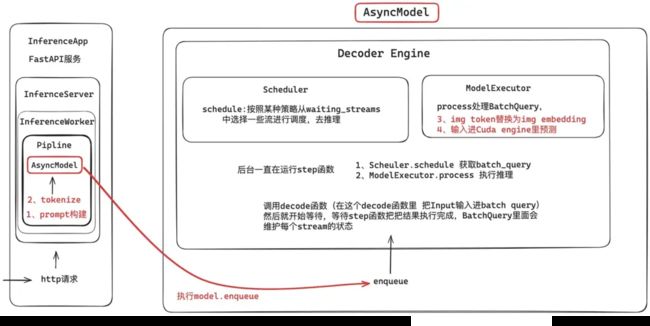
我们首先对 RTP-LLM,该系统由多个层次组成,从最外层的 InferenceApp 到最内层的 AsyncModel,每一层都有特定的职责。
1.1 InferenceApp 和 FastAPI 服务
最外层是 InferenceApp,其核心是一个基于 FastAPI 的异步服务。这一层负责接受外部的 HTTP 请求,并将请求传递给内部的推理服务器。
1.2 InferenceServer 和 InferenceWorker
InferenceServer 是实际处理推理请求的服务器,内部有多个 InferenceWorker 负责具体的任务。每个 InferenceWorker 包含一个 Pipeline,包含了用于处理请求的异步模型 AsyncModel。
二、异步模型 AsyncModel 的工作流程
AsyncModel 是整个系统的核心组件,负责具体的推理任务。它包含两个主要部分:Scheduler 和 ModelExecutor。
2.1 接收请求
当 HTTP 请求到达时,系统会依次进行以下处理:
-
Prompt 构建:根据请求内容,构建推理所需的 prompt。
-
Tokenize:将 prompt 转换为模型可以理解的 token。
2.2 任务排队
处理完请求后,系统会将任务通过 model.enqueue 放入队列中,准备进行后续处理。
2.3 Decoder Engine
Decoder Engine 是异步推理的核心,包含两个部分:Scheduler 和 ModelExecutor。
Scheduler
Scheduler 负责调度任务,它会从 waiting_streams 中选择需要处理的任务,并安排执行。在后台,Scheduler 会不断运行 step 函数:
-
Scheduler.schedule获取 batch_query。 -
ModelExecutor.process执行推理任务。
ModelExecutor
ModelExecutor 负责实际的模型执行过程:
-
Process BatchQuery:处理 batch_query。
-
Token Embedding:将 img token 转换为 img embedding。
-
CUDA 预测:将输入数据送入 CUDA 引擎进行预测。
2.4 执行推理
Decoder 函数会调用 step 函数,将输入数据放入 batch_query,然后开始等待 step 函数完成推理,并将结果返回。
三、模型配置加载
该框架在模型的加载过程中,通常包含两个核心部分:模型的权重和配置文件。本小节将通过一个具体案例——添加对新模型(如 OPT 模型)的支持,来详细探讨如何加载模型的配置文件。
3.1 完整实现
首先给出一个最终的配置加载的实现如下, 具体逻辑为将模型的配置对应到框架的配置上, 因为每个模型的配置文件的变量的名字都不尽相同,比如表示 transformer 模型多头注意力机制的 head num 的变量名,有的模型可能叫 num_attention_heads(opt),有的模型可能叫 n_head(starcoder),所以需要对应到框架统一的变量体系下。
class Opt(GPT):"""Opt"""@classmethoddef _create_config(cls, ckpt_path: str):offset = 2config_dict = get_config_from_path(ckpt_path)config = GptInitModelParameters(head_num=config_dict['num_attention_heads'],size_per_head=config_dict['hidden_size'] // config_dict['num_attention_heads'],layer_num=config_dict.get('num_hidden_layers', 12),vocab_size=config_dict['vocab_size'],max_seq_len=config_dict['max_position_embeddings'] + offset)config.layernorm_type = 'pre_layernorm'config.norm_type = "layernorm"config.has_post_decoder_layernorm = Trueconfig.hidden_size = config_dict['hidden_size']config.inter_size = config_dict["ffn_dim"]config.has_positional_encoding = Trueconfig.activation_type = 'relu'config.add_special_tokens = Trueconfig.special_tokens.eos_token_id = config_dict.get('eos_token_id', 2)config.special_tokens.pad_token_id = config_dict.get('pad_token_id', 1)config.special_tokens.bos_token_id = config_dict.get('bos_token_id', 2)config.head_num_kv = config.head_numreturn config
3.2 实现解析
在这个框架中,常用的 config 变量名及其对应的含义如下:
-
head_num: 在 Transformer 模型的自注意力(Self-Attention)机制中,表示注意力机制被分割成的头的数量。每个头负责学习输入数据的不同表示子空间。
-
head_num_kv: 指定了在自注意力机制中用于处理键(Key)和值(Value)的注意力头的数量。在标准的 Transformer 模型中,查询(Query)、键和值通常使用相同数量的注意力头进行处理。然而,某些模型(如 llama2 70B)可能设计为使用不同数量的头来处理键和值。
-
size_per_head: 表示每个注意力头的维度大小。通常,模型的总隐藏层维度(hidden_size)被平均分配给所有的头。例如,如果hidden_size是 512 且head_num是 8,那么size_per_head将是 64。
-
layer_norm_type: 指定了模型中使用的层归一化(Layer Normalization)的类型或位置。例如,'pre_layernorm'表示归一化操作在每个子层(如注意力层或前馈网络层)之前进行;而'post_layernorm'则表示归一化操作在每个子层之后进行。
-
vocab_size: 表示词表的大小。
-
max_seq_len: 表示模型能够处理的最长序列长度。
-
norm_type: 指定模型使用的归一化技术,如“Layernorm”或“RMSNorm”。
-
has_post_decoder_layernorm: 表示模型是否在解码器的最后添加了额外的层归一化层。
-
hidden_size: 表示隐藏层的维度。
-
inter_size: 表示 FFN 中间层的维度。在 LLM 的 FFN 中,会先进行 up_proj,然后进行 down_proj,这里的inter_size就是 up_proj 后的维度。
-
has_positional_encoding: 表示模型是否使用位置编码,且位置编码是否通过nn.embedding得到
-
activation_type: 指定激活函数的类型,如 relu、gelu 或 swiglu。
-
add_special_tokens: 表示是否在模型的词汇表中添加特殊标记,如 EOS(结束标记)、PAD(填充标记)和 BOS(开始标记)。
-
special_tokens: 包含模型使用的特殊标记的 ID,如eos_token_id、pad_token_id和bos_token_id。
在加载配置文件后,框架会根据这些参数去加载权重等。例如,如果has_positional_encoding为 True,框架会初始化nn.embedding(config.max_seq_len, config.hidden_dim)。当然,还有很多其他操作,这里就不展开了。如果要添加新模型,可以通过对比框架参数和 Hugging Face 模型文件下的config.json参数来进行编写。
3.3 注意事项
1)在编写完新模型的支持代码并加载了模型文件配置之后, 需要确认一下模型是不是按照参数的正常含义去使用的。OPT 模型就不是,它有着自己独特的位置编码(Positional Encoding)实现方式, 无论是position_ids还是nn.embedding,它都统一增加了一个偏移量,让人好一通 debug,一直以为是模型权重没加载对,没想到是位置编码出了问题。
因此,当我们要为一个大模型添加新的支持时,要注意他的独特之处,比如位置编码的实现方式、权重的初始化方法、或者是某些特定的层结构。
class OPTLearnedPositionalEmbedding(nn.Embedding):
    """
    This module learns positional embeddings up to a fixed maximum size.
    """

    def __init__(self, num_embeddings: int, embedding_dim: int):
        # OPT is set up so that if padding_idx is specified then offset the embedding ids by 2
        # and adjust num_embeddings appropriately. Other models don't have this hack
        self.offset = 2
        super().__init__(num_embeddings + self.offset, embedding_dim)

    def forward(self, attention_mask: torch.LongTensor, past_key_values_length: int = 0):
        """`input_ids_shape` is expected to be [bsz x seqlen]."""
        attention_mask = attention_mask.long()

        # create positions depending on attention_mask
        positions = (torch.cumsum(attention_mask, dim=1).type_as(attention_mask) * attention_mask).long() - 1

        # cut positions if `past_key_values_length` is > 0
        positions = positions[:, past_key_values_length:]

return super().forward(positions + self.offset)2)inter_size是一个必须传递的参数,因为它在底层 CUDA GEMM 算子的执行中起着关键作用。如果忽略了这个参数,底层 CUDA GEMM 算子将会报错。
四、模型权重加载
在本小节中,我们以相同的案例(添加对新模型如的支持),来展开如何加载模型的权重。
4.1 完整实现
首先给出一个最终的模型权重加载的实现如下, 和模型的配置是差不多的,具体逻辑就是将模型的权重参数名对应到框架的权重参数名上, 因为每个模型的权重参数名定义每个都不一样,所以需要对应到框架统一的变量体系下。
class OptWeightInfo(ModelDeployWeightInfo):

    def _get_weight_info(self):
        layer_weights = [
            # * Attention之前 layer_norm部分
            WeightInfo(W.pre_ln_gamma, [CkptWeightInfo('model.decoder.layers.{i}.self_attn_layer_norm.weight', identity)], identity),
            WeightInfo(W.pre_ln_beta, [CkptWeightInfo('model.decoder.layers.{i}.self_attn_layer_norm.bias', identity)], identity),

            # *  Attention
            WeightInfo(W.attn_qkv_w, [
                CkptWeightInfo('model.decoder.layers.{i}.self_attn.q_proj.weight', identity),
                CkptWeightInfo('model.decoder.layers.{i}.self_attn.k_proj.weight', identity),
                CkptWeightInfo('model.decoder.layers.{i}.self_attn.v_proj.weight', identity),
                ], functools.partial(merge_qkv_hf)),

            WeightInfo(W.attn_qkv_b,[
                CkptWeightInfo('model.decoder.layers.{i}.self_attn.q_proj.bias', identity),
                CkptWeightInfo('model.decoder.layers.{i}.self_attn.k_proj.bias', identity),
                CkptWeightInfo('model.decoder.layers.{i}.self_attn.v_proj.bias', identity),
                ], functools.partial(merge_qkv_b)),

            WeightInfo(W.attn_o_w,[CkptWeightInfo('model.decoder.layers.{i}.self_attn.out_proj.weight', identity)], transpose),
            WeightInfo(W.attn_o_b,[CkptWeightInfo('model.decoder.layers.{i}.self_attn.out_proj.bias', identity)], identity),

            # * Attention之后 layer_norm部分 FFN之前
            WeightInfo(W.post_ln_gamma,[CkptWeightInfo('model.decoder.layers.{i}.final_layer_norm.weight', identity)], identity),
            WeightInfo(W.post_ln_beta,[CkptWeightInfo('model.decoder.layers.{i}.final_layer_norm.bias', identity)], identity),

            # * FFN部分
            WeightInfo(W.ffn_w3,[CkptWeightInfo('model.decoder.layers.{i}.fc1.weight', identity)], transpose),
            WeightInfo(W.ffn_b3,[CkptWeightInfo('model.decoder.layers.{i}.fc1.bias', identity)], identity),
            WeightInfo(W.ffn_w2,[CkptWeightInfo('model.decoder.layers.{i}.fc2.weight', identity)], transpose),
            WeightInfo(W.ffn_b2,[CkptWeightInfo('model.decoder.layers.{i}.fc2.bias', identity)], identity),
        ]

        weights = [
            WeightInfo(W.embedding, [CkptWeightInfo('model.decoder.embed_tokens.weight', concat_0)], identity),
            WeightInfo(W.positional_embedding,[CkptWeightInfo('model.decoder.embed_positions.weight', identity)], identity),
            WeightInfo(W.final_ln_gamma,[CkptWeightInfo('model.decoder.final_layer_norm.weight', identity)], identity),
            WeightInfo(W.final_ln_beta,[CkptWeightInfo('model.decoder.final_layer_norm.bias', identity)], identity),
            WeightInfo(W.lm_head,[CkptWeightInfo('lm_head.weight', identity)], identity),
        ]

        return ModelWeightInfo(layer_weights=layer_weights, weights=weights)#, tp_strategy=self._get_gpt_style_tp_strategy())


class OPT_125M(GPT):

    @staticmethod
    def get_weight_cls():
        return OptWeightInfo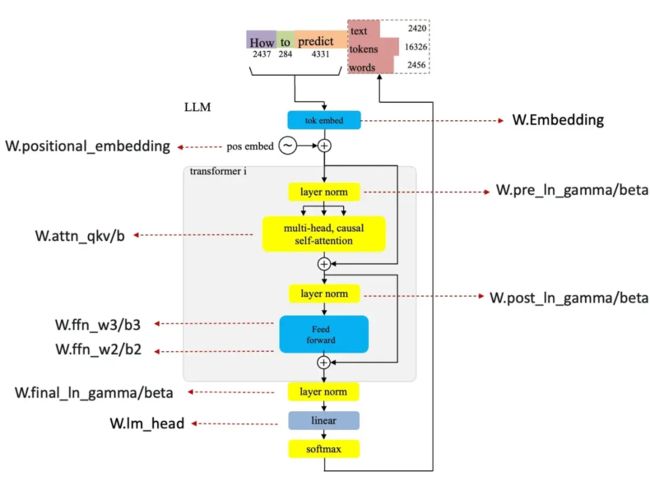
框架中对于权重信息分为了 layer weights(对应的是 decoder layer 的权重参数)和 weights(对应的是 decoder layer 之外的权重参数,比如 lm_head、token embedding 部分 ), 上图中是框架的参数和模型结构的一个对应,首先我们需要看一下 pytorch.bin.index 里面的参数名称,然后和框架中的参数名对应上,比如:
WeightInfo(W.pre_ln_gamma, [CkptWeightInfo('model.decoder.layers.{i}.self_attn_layer_norm.weight', identity)], identity),这里 W.pre_ln_gamma 表示的是 Attention 和 FFN 层之前的 Layer Norm 层,而在 OPT 模型中,参数名称为 model.decoder.layers.
WeightInfo(W.embedding, [CkptWeightInfo('model.decoder.embed_tokens.weight', concat_0)], identity),这里 W.embedding 表示的是 token 的 embedding 层,在 OPT 模型中参数名 model.decoder.embed_tokens.weight。
参考链接
[01] RTP-LLM 项目地址:
https://github.com/alibaba/rtp-llm
[02] 原作者博客:
https://www.zhihu.com/people/66-34-28-46-64/posts
[03] OPT 模型:
https://link.zhihu.com/?target=https%3A//github.com/huggingface/transformers/blob/main/src/transformers/models/opt/modeling_opt.py%23L566