Python计算机视觉编程 第三章 图像到图像的映射
目录
- 单应性变换
-
- 直接线性变换算法
- 仿射变换
- 图像扭曲
-
- 图像中的图像
- 分段仿射扭曲
- 创建全景图
-
- RANSAC
- 拼接图像
单应性变换
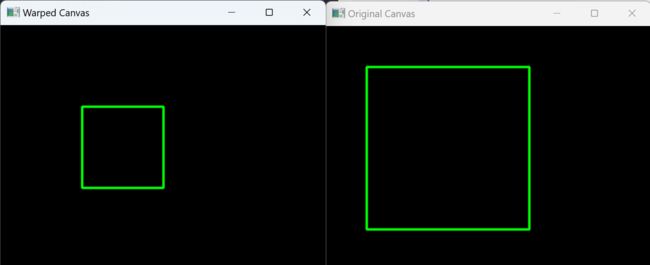
单应性变换是将一个平面内的点映射到另一个平面内的二维投影变换。在这里,平面是指图像或者三维中的平面表面。单应性变换具有很强的实用性,比如图像配准、图像纠正和纹理扭曲,以及创建全景图像。
单应性变换本质上是一种二维到二维的映射,可以将一个平面内的点映射到另一个平面上的对应点。
代码如下:
import cv2
import numpy as np

# 创建一个空白画布
width, height = 400, 400
canvas = np.zeros((height, width, 3), dtype=np.uint8)

# 定义源图像中的四个角点
src_points = np.float32([[50, 50], [250, 50], [250, 250], [50, 250]])

# 定义目标图像中的四个角点
dst_points = np.float32([[100, 100], [200, 100], [200, 200], [100, 200]])

# 计算单应性矩阵
H, _ = cv2.findHomography(src_points, dst_points)

# 使用单应性矩阵对整个画布进行透视变换
warped_canvas = cv2.warpPerspective(canvas, H, (width, height))

# 绘制原始矩形区域
cv2.polylines(canvas, [np.int32(src_points)], True, (0, 255, 0), 2)

# 绘制变换后的矩形区域
cv2.polylines(warped_canvas, [np.int32(dst_points)], True, (0, 255, 0), 2)

# 显示原图和变换后的图
cv2.imshow('Original Canvas', canvas)
cv2.imshow('Warped Canvas', warped_canvas)
cv2.waitKey(0)
cv2.destroyAllWindows()
直接线性变换算法
单应性矩阵可以由两幅图像(或者平面)中对应点对计算出来。一个完全射影变换具有8个自由度。根据对应点约束,每个对应点对可以写出两个方程,分别对应于x和y坐标。因此,计算单应性矩阵H需要4个对应点对。
DLT(Direct Linear Transformation,直接线性变换)是给定4个或者更多对应点对矩阵,来计算单应性矩阵H的算法。将单应性矩阵H作用在对应点对上,重新写出该方程,我们可以得到下面的方程: [ − x 1 − y 1 − 1 0 0 0 x 1 x 1 ′ y 1 x 1 ′ x 1 ′ 0 0 0 − x 1 − y 1 − 1 x 1 y 1 ′ y 1 y 1 ′ y 1 ′ − x 2 − y 2 − 1 0 0 0 x 2 x 2 ′ y 2 x 2 ′ x 2 ′ 0 0 0 − x 2 − y 2 − 1 x 2 y 2 ′ y 2 y 2 ′ y 2 ′ ⋮ ⋮ ⋮ ⋮ ] [ h 1 h 2 h 3 h 4 h 5 h 6 h 7 h 8 h 9 ] = 0 \left[\begin{array}{ccccccccc}-x_{1} & -y_{1} & -1 & 0 & 0 & 0 & x_{1} x_{1}^{\prime} & y_{1} x_{1}^{\prime} & x_{1}^{\prime} \\0 & 0 & 0 & -x_{1} & -y_{1} & -1 & x_{1} y_{1}^{\prime} & y_{1} y_{1}^{\prime} & y_{1}^{\prime} \\-x_{2} & -y_{2} & -1 & 0 & 0 & 0 & x_{2} x_{2}^{\prime} & y_{2} x_{2}^{\prime} & x_{2}^{\prime} \\0 & 0 & 0 & -x_{2} & -y_{2} & -1 & x_{2} y_{2}^{\prime} & y_{2} y_{2}^{\prime} & y_{2}^{\prime} \\& \vdots & & \vdots & & \vdots & & \vdots &\end{array}\right]\left[\begin{array}{l}h_{1} \\h_{2} \\h_{3} \\h_{4} \\h_{5} \\h_{6} \\h_{7} \\h_{8} \\h_{9}\end{array}\right]=\mathbf{0} −x10−x20−y10−y20⋮−10−100−x10−x2⋮0−y10−y20−10−1⋮x1x1′x1y1′x2x2′x2y2′y1x1′y1y1′y2x2′y2y2′⋮x1′y1′x2′y2′ h1h2h3h4h5h6h7h8h9 =0
或者 A h = 0 Ah=0 Ah=0,其中A是一个具有对应点对二倍数量行数的矩阵。将这些对应点对方程的系数堆叠到一个矩阵中,我们可以使用SVD(Singular Value Decomposition,奇异值分解)算法找到H的最小二乘解。以下是该算法的代码:
import cv2
import numpy as np

#假设我们有两组对应的点
src_points = np.array([
    [50, 50],
    [250, 50],
    [250, 250],
    [50, 250]
], dtype=np.float32)

dst_points = np.array([
    [100, 100],
    [200, 100],
    [200, 200],
    [100, 200]
], dtype=np.float32)

#构建A矩阵
A = []
for i in range(4):
    x, y = src_points[i]
    u, v = dst_points[i]
    A.append([x, y, 1, 0, 0, 0, -u * x, -u * y, -u])
    A.append([0, 0, 0, x, y, 1, -v * x, -v * y, -v])

A = np.array(A)

#求解最小二乘问题
U, S, Vt = np.linalg.svd(A)
H = Vt[-1, :].reshape(3, 3)

#归一化H
H /= H[2, 2]

print("Homography Matrix H:")
print(H)

#验证单应性矩阵是否正确
src_points_homo = np.hstack([src_points, np.ones((4, 1))]).T
dst_points_pred = np.dot(H, src_points_homo).T
dst_points_pred /= dst_points_pred[:, 2].reshape(-1, 1)

print("\nPredicted Transformed Points:")
print(dst_points_pred[:, :2])
仿射变换
由于仿射变换具有6个自由度,因此我们需要三个对应点对来估计矩阵H。通过将最后两个元素设置为0,即h7 =h8=0,仿射变换可以用上面的DLT算法估计得出。
其算法核心代码如下:
def Haffine_from_points(fp,tp):
  """ 计算 H,仿射变换,使得tp是fp经过仿射变换H得到的"""
  if fp.shape != tp.shape:
    raise RuntimeError('number of points do not match')
  #对点进行归一化
  # --- 映射起始点--
  m = mean(fp[:2], axis=1)
  maxstd = max(std(fp[:2], axis=1)) + 1e-9
  C1 = diag([1/maxstd, 1/maxstd, 1])
  C1[0][2] = -m[0]/maxstd
  C1[1][2] = -m[1]/maxstd
  fp_cond = dot(C1,fp)
  # --- 映射对应点--
  m = mean(tp[:2], axis=1)
  C2 = C1.copy() # 两个点集,必须都进行相同的缩放
  C2[0][2] = -m[0]/maxstd
  C2[1][2] = -m[1]/maxstd
  tp_cond = dot(C2,tp)
  #因为归一化后点的均值为0,所以平移量为0
  A = concatenate((fp_cond[:2],tp_cond[:2]), axis=0)
  U,S,V = linalg.svd(A.T)
  #如Hartley 和Zisserman 著的Multiple View Geometry in Computer, Scond Edition 所示,
  #创建矩阵B和C
  tmp = V[:2].T
  B = tmp[:2]
  C = tmp[2:4]

  tmp2 = concatenate((dot(C,linalg.pinv(B)),zeros((2,1))), axis=1)
  H = vstack((tmp2,[0,0,1]))
  #反归一化
  H = dot(linalg.inv(C2),dot(H,C1))

  return H / H[2,2]
图像扭曲
对图像块应用仿射变换,我们将其称为图像扭曲(或者仿射扭曲)。 该操作不仅经常应用在计算机图形学中,而且经常出现在计算机视觉算法中。扭曲操作可以使用SciPy 工具包中的ndimage包来简单完成。
下面是代码:
import cv2
import numpy as np

# 读取图像
image_path = 'E:\PycharmProjects\BookStudying\OIP-C.jpg'  # 替换为你的图像文件路径
img = cv2.imread(image_path)

if img is None:
    print("Error: 图像未正确加载")
    exit()

# 获取图像的尺寸
height, width = img.shape[:2]

# 定义源图像中的四个角点
src_points = np.float32([
    [50, 50],
    [width - 50, 50],
    [width - 50, height - 50],
    [50, height - 50]
])

# 定义目标图像中的四个角点
dst_points = np.float32([
    [100, 100],
    [width - 100, 100],
    [width - 100, height - 100],
    [100, height - 100]
])

# 计算单应性矩阵
H, _ = cv2.findHomography(src_points, dst_points)

# 应用单应性变换
warped_img = cv2.warpPerspective(img, H, (width, height))

# 显示原图和扭曲后的图像
cv2.imshow('Original Image', img)
cv2.imshow('Warped Image', warped_img)
cv2.waitKey(0)
cv2.destroyAllWindows()
实验结果如下:
左边为原图像,右边是扭曲的图像。在右图当中有些部分像素丢失,用零来填充,所以显示黑色。
图像中的图像
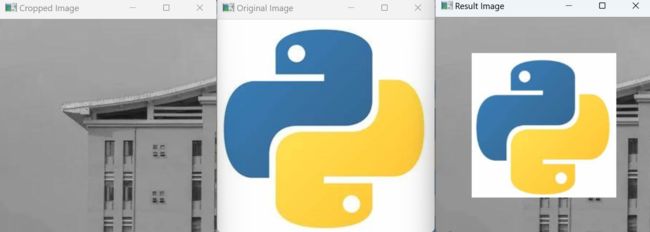
仿射扭曲的一个简单例子是,将图像或者图像的一部分放置在另一幅图像中,使得它们能够和指定的区域或者标记物对齐。
import cv2
import numpy as np

# 读取图像
image_path_1 = 'E:\PycharmProjects\BookStudying\python.jpg'  # 第一幅图像的路径
image_path_2 = 'E:\PycharmProjects\BookStudying\jmu_crop.jpg'  # 第二幅图像的路径

img1 = cv2.imread(image_path_1)
img2 = cv2.imread(image_path_2)

if img1 is None or img2 is None:
    print("Error: 至少有一张图像未正确加载")
    exit()

# 获取图像的尺寸
height1, width1 = img1.shape[:2]
height2, width2 = img2.shape[:2]

# 定义源图像中的三个对应点
src_points = np.float32([
    [0, 0],
    [width1, 0],
    [0, height1]
])

# 定义目标图像中的三个对应点
dst_points = np.float32([
    [50, 50],  # 目标图像中的左上角
    [width2 - 50, 50],  # 目标图像中的右上角
    [50, height2 - 50]  # 目标图像中的左下角
])

# 计算仿射变换矩阵
M = cv2.getAffineTransform(src_points, dst_points)

# 应用仿射变换
warped_img = cv2.warpAffine(img1, M, (width2, height2))

# 将两幅图像合并
result = np.where(warped_img != 0, warped_img, img2)

# 显示结果
cv2.imshow('Result', result)
cv2.waitKey(0)
cv2.destroyAllWindows()
分段仿射扭曲
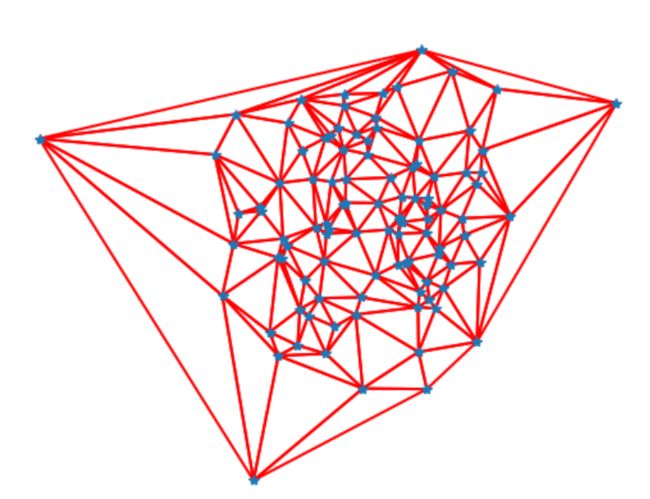
对应点对集合之间最常用的扭曲方式:分段仿射扭曲。给定任意图像的标记点,通过将这些点进行三角剖分,然后使用仿射扭曲来扭曲每个三角形,我们可以将图像和另一幅图像的对应标记点扭曲对应。对于任何图形和图像处理库来说,这些都是最基本的操作。
为了三角化这些点,我们经常使用狄洛克三角剖分方法。在Matplotlib(但是不在PyLab 库中)中有狄洛克三角剖分,我们可以用下面的方式使用它:
import numpy as np
import matplotlib.pyplot as plt
from matplotlib.tri import Triangulation

# 生成随机数据
x, y = np.array(np.random.standard_normal((2, 100)))

# 计算 Delaunay 三角剖分
tri = Triangulation(x, y)

# 绘制图形
plt.figure()

# 绘制三角形
for t in tri.triangles:
    t_ext = [t[0], t[1], t[2], t[0]]  # 将第一个点加入到最后
    plt.plot(x[t_ext], y[t_ext], 'r')

# 绘制散点
plt.plot(x, y, '*')

# 关闭坐标轴
plt.axis('off')

# 显示图形
plt.show()
创建全景图
RANSAC
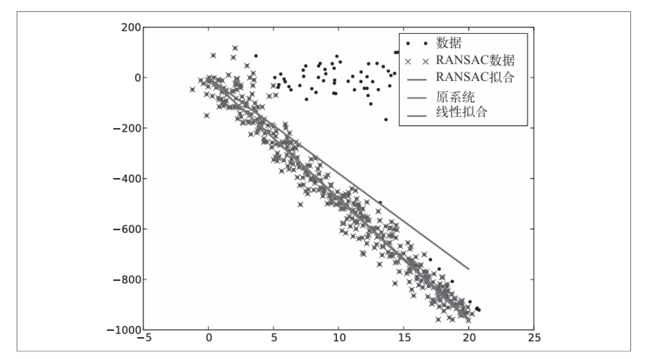
RANSAC是“RANdom SAmple Consensus”( 随 机 一 致 性 采 样 )的缩写 。该方法是用来找到正确模型来拟合带有噪声数据的迭代方法。给定一个模型,例如点集之间的单应性矩阵,RANSAC基本的思想是,数据中包含正确的点和噪声点,合理的模型应该能够在描述正确数据点的同时摒弃噪声点。下面是其典型例子

用一条直线拟合带有噪声数据的点集。简单的最小二乘在该例子中可能会失效,但是RANSAC能够挑选出正确的点,然后获取能够正确拟合的直线。
拼接图像
估计出图像间的单应性矩阵(使用RANSAC算法),现在我们需要将所有的图像扭曲到一个公共的图像平面上。一种方法是创建一个很大的图像,比如图像中全部填充0,使其和中心图像平行,然后将所有的图像扭曲到上面。下面是代码:
def panorama(H,fromim,toim,padding=2400,delta=2400):
  """ 使用单应性矩阵H(使用RANSAC健壮性估计得出),协调两幅图像,创建水平全景图像。结果
为一幅和toim具有相同高度的图像。padding指定填充像素的数目,delta指定额外的平移量"""
#检查图像是灰度图像,还是彩色图像
  is_color = len(fromim.shape) == 3
  # 用于geometric_transform() 的单应性变换
  def transf(p):
    p2 = dot(H,[p[0],p[1],1])
    return (p2[0]/p2[2],p2[1]/p2[2])
  if H[1,2]<0: # fromim 在右边
    print 'warp - right'
    # 变换fromim
    if is_color:
      # 在目标图像的右边填充0
      toim_t = hstack((toim,zeros((toim.shape[0],padding,3))))
      fromim_t = zeros((toim.shape[0],toim.shape[1]+padding,toim.shape[2]))
      for col in range(3):
        fromim_t[:,:,col] = ndimage.geometric_transform(fromim[:,:,col],
                    transf,(toim.shape[0],toim.shape[1]+padding))
  else:
    # 在目标图像的右边填充0
    toim_t = hstack((toim,zeros((toim.shape[0],padding))))
    fromim_t = ndimage.geometric_transform(fromim,transf,
                  (toim.shape[0],toim.shape[1]+padding))
  else:
    print 'warp - left'
    # 为了补偿填充效果,在左边加入平移量
    H_delta = array([[1,0,0],[0,1,-delta],[0,0,1]])
    H = dot(H,H_delta)
    # fromim 变换
    if is_color:
    # 在目标图像的左边填充0
    toim_t = hstack((zeros((toim.shape[0],padding,3)),toim))
    fromim_t = zeros((toim.shape[0],toim.shape[1]+padding,toim.shape[2]))
    for col in range(3):
      fromim_t[:,:,col] = ndimage.geometric_transform(fromim[:,:,col],
                  transf,(toim.shape[0],toim.shape[1]+padding))
    else:
    # 在目标图像的左边填充0
    toim_t = hstack((zeros((toim.shape[0],padding)),toim))
    fromim_t = ndimage.geometric_transform(fromim,
     transf,(toim.shape[0],toim.shape[1]+padding))
  # 协调后返回(将fromim放置在toim上)
  if is_color:
    # 所有非黑色像素
    alpha = ((fromim_t[:,:,0] * fromim_t[:,:,1] * fromim_t[:,:,2] ) > 0)
    for col in range(3):
      toim_t[:,:,col] = fromim_t[:,:,col]*alpha + toim_t[:,:,col]*(1-alpha)
  else:
    alpha = (fromim_t > 0)
    toim_t = fromim_t*alpha + toim_t*(1-alpha)
  return toim_t
对于通用的geometric_transform() 函数,我们需要指定能够描述像素到像素间映射的函数。在这个例子中,transf()函数就是该指定的函数。该函数通过将像素和H相乘,然后对齐次坐标进行归一化来实现像素间的映射。通过查看H中的平移量,我们可以决定应该将该图像填补到左边还是右边。当该图像填补到左边时,由于目标图像中点的坐标也变化了,所以在“左边”情况中,需要在单应性矩阵中加入平
移。简单起见,我们同样使用0像素的技巧来寻找alpha图。代码如下:
# 扭曲图像
delta = 2000 # 用于填充和平移
im1 = array(Image.open(imname[1]))
 im2 = array(Image.open(imname[2]))
 im_12 = warp.panorama(H_12,im1,im2,delta,delta)
 im1 = array(Image.open(imname[0]))
 im_02 = warp.panorama(dot(H_12,H_01),im1,im_12,delta,delta)
 im1 = array(Image.open(imname[3]))
 im_32 = warp.panorama(H_32,im1,im_02,delta,delta)
 im1 = array(Image.open(imname[j+1]))
 im_42 = warp.panorama(dot(H_32,H_43),im1,im_32,delta,2*delta)


