Windows Phone 7 Beta: How do I save an image to the Pictures Hub
If you started playing with the Windows Phone 7 beta you may be aware that the only storage you have to play with is isolated storage. However, what happens if you take a photo in your application (ie using the CameraCaptureTask) that you then want to be available in other applications. Clearly by the virtue of it being “isolated” you can’t simply share access to isolated storage. Instead what you can do is to save the image to the Pictures Hub.
Let’s start by taking a photo:
CameraCaptureTask camera = new CameraCaptureTask();
public MainPage(){
InitializeComponent();
camera.Completed += new EventHandler<PhotoResult>(camera_Completed);
}
byte[] imageBits;
void camera_Completed(object sender, PhotoResult e){
imageBits = new byte[(int)e.ChosenPhoto.Length];
e.ChosenPhoto.Read(imageBits, 0, imageBits.Length);
e.ChosenPhoto.Seek(0, System.IO.SeekOrigin.Begin);
var bitmapImage = PictureDecoder.DecodeJpeg(e.ChosenPhoto);
this.PhotoImage.Source = bitmapImage;
}
private void TakePictureButton_Click(object sender, RoutedEventArgs e){
camera.Show();
}
Now for the interesting part. Let’s add this to the Pictures hub. We do this by creating an instance of the MediaLibrary class (you will need to add a reference to Microsoft.Xna.Framework.dll to your project). Then you simply call SavePicture, passing in either a byte array (in our case imageBits) or an image stream.
private void SaveToHubButton_Click(object sender, RoutedEventArgs e){
var library = new MediaLibrary();
library.SavePicture("My Photo",imageBits);
}
And that’s it for saving. You can also view all saved images via the SavedPictures property on the MediaLibrary instance.
private void SavedPicturesButton_Click(object sender, RoutedEventArgs e){
var library = new MediaLibrary();
var photos = (from p in library.SavedPictures
select new ImageWrapper(p)).ToArray();
SavedPhotosList.ItemsSource = photos;
}
public class ImageWrapper{
public Picture Picture { get; set; }
public ImageWrapper(Picture picture){
Picture = picture;
}
public ImageSource Image{
get{
var image = new WriteableBitmap(100,100);
image.SetSource(Picture.GetThumbnail());
return image;
}
}
}
You might be wondering why I’m wrapping the Picture in an ImageWrapper. This is so that I can easily data bind to a listbox. My xaml is the following:
<Grid x:Name="ContentGrid" Grid.Row="1">
<Button Content="Take Picture" Height="72" HorizontalAlignment="Left" Name="TakePictureButton"
VerticalAlignment="Top" Width="293" Click="TakePictureButton_Click" />
<Image Height="135" HorizontalAlignment="Left" Margin="314,6,0,0" Name="PhotoImage" Stretch="Fill"
VerticalAlignment="Top" Width="154" />
<Button Content="Save to Pictures Hub" Height="72" HorizontalAlignment="Left" Margin="0,69,0,0"
Name="SaveToHubButton" VerticalAlignment="Top" Width="293" Click="SaveToHubButton_Click" />
<ListBox Height="396" HorizontalAlignment="Left" Margin="0,221,0,0" Name="SavedPhotosList"
VerticalAlignment="Top" Width="480" >
<ListBox.Resources>
<DataTemplate x:Key="ImageTemplate">
<Border Height="100" Width="100" Padding="5" >
<Image Source="{Binding Image}"/>
</Border>
</DataTemplate>
</ListBox.Resources>
<ListBox.ItemTemplate>
<StaticResource ResourceKey="ImageTemplate"/>
</ListBox.ItemTemplate>
</ListBox>
<Button Content="Saved Pictures" Height="72" HorizontalAlignment="Left" Margin="0,143,0,0"
Name="SavedPicturesButton" VerticalAlignment="Top" Width="293" Click="SavedPicturesButton_Click" />
</Grid>
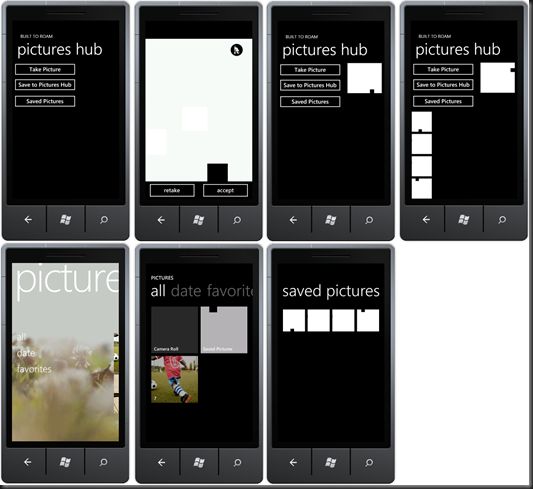
Ok, so you might be wondering what this looks like in action…. (note that I’m using the hacked emulator build to do this so that you can see the pictures hub)
Across the top we have the stages of the application. Use clicks the Take Picture button that launches the camera capture task. When this returns the photo is applied to the image (top right of image three). The user clicks the Save to Pictures Hub button to save the image. Then when they click the Saved Pictures button the list of images in the Saved Pictures folder on the Pictures hub are displayed.
The bottom line illustrates where to find the images in the Pictures hub – All > Saved Pictures.
