C++设计模式学习
文章目录
-
- 1. 什么是设计模式
- 2. 设计模式分类
-
- 2.1 创建型模式
- 2.2 结构型模式
- 2.3 行为型模式
- 3. 设计模式七大原则(OOP原则)
-
- 3.1 开闭原则
- 3.2 里氏替换原则
- 3.3 依赖倒置原则
- 3.4 单一职责原则
- 3.5 接口隔离原则
- 3.6 迪米特法则
- 3.7 合成复用原则
- 4. 常用设计模式例子
-
- 4.1 工厂模式
- 4.2 单例模式
- 4.3 策略模式
- 4.4 适配器模式
- 4.5 模板方法模式
- 4.6 外观模式
- 4.7 桥接模式
- 4.8 代理模式
- 5. 总结
- 参考文献
1. 什么是设计模式
设计模式是一种经验总结,它描述了在特定环境中经常出现的问题,并提供了问题解决方案的模板。设计模式就像是一套编程阵法,让你在编程世界中更加游刃有余,掌握了这些阵法,你的代码将更加健壮,逻辑清晰,方便维护。通过学习设计模式,你可以实现代码组件间的高度解耦和协同,让你的应用变得更加稳定和可扩展。
例如:
使用工厂模式,你可以将对象的创建过程与具体类解耦,让代码更加灵活;
使用策略模式,你可以根据不同情境灵活切换算法;
使用单例模式,确保一个类只有一个实例,并提供全局访问点;
使用观察者模式,你可以在对象之间建立一对多的依赖关系,当一个对象的状态发生改变时,其依赖者会自动更新;
使用组合模式,可以将对象组合成树形结构以表示部分整体的层次关系,并允许对单个对象和组合对象进行一致的操作;
2. 设计模式分类
根据问题出现的频率和解决方案的通用性,设计模式可以大致分为以下三类:创建型模式、结构型模式和行为型模式。
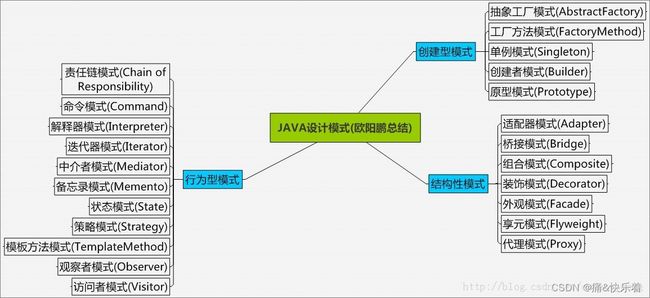
2.1 创建型模式
创建型模式主要关注对象的创建过程,通常涉及如何通过创建对象来优化资源的利用率和系统的性能。其中,单例模式是使用频率最高的一种。此外,工厂模式和构建者模式也属于这一类。
创建型模式共计5种:单例模式、工厂方法模式、抽象工厂模式、创建者模式、原型模式。
单例模式: 某个类智能有一个实例,提供一个全局的访问点。
工厂方法模式: 一个工厂类根据传入的参量决定创建出哪一种产品类的实例。
抽象工厂模式: 创建相关或依赖对象的家族,而无需明确指定具体类。
建造者模式: 封装一个复杂对象的创建过程,并可以按步骤构造。
原型模式: 通过复制现有的实例来创建新的实例。
2.2 结构型模式
结构型模式关注如何通过对象的组合和排列来形成更为复杂的系统。这类模式主要包括适配器模式、装饰器模式、代理模式和组合模式等。
结构型模式共计7种:适配器模式、代理模式、装饰器模式、外观模式、桥接模式、组合模式、享元模式。
装饰器模式: 动态的给对象添加新的功能。
代理模式: 为其它对象提供一个代理以便控制这个对象的访问。
桥接模式: 将抽象部分和它的实现部分分离,使它们都可以独立的变化。
适配器模式: 将一个类的方法接口转换成客户希望的另一个接口。
组合模式: 将对象组合成树形结构以表示“部分-整体”的层次结构。
外观模式: 对外提供一个统一的方法,来访问子系统中的一群接口。
享元模式: 通过共享技术来有效的支持大量细粒度的对象。
2.3 行为型模式
行为型模式关注对象之间的交互以及对象的行为。这类模式包括观察者模式、策略模式、模板方法模式和访问者模式等。
行为型模式共计11种:策略模式、模板方法模式、观察者模式、迭代子模式、责任链模式、命令模式、备忘录模式、状态模式、访问者模式、中介者模式、解释器模式。
策略模式: 定义一系列算法,把他们封装起来,并且使它们可以相互替换。
模板方法模式: 定义一个算法结构,而将一些步骤延迟到子类实现。
命令模式: 将命令请求封装为一个对象,使得可以用不同的请求来进行参数化。
迭代器模式: 一种遍历访问聚合对象中各个元素的方法,不暴露该对象的内部结构。
观察者模式: 对象间的一对多的依赖关系。
仲裁者模式: 用一个中介对象来封装一系列的对象交互。
备忘录模式: 在不破坏封装的前提下,保持对象的内部状态。
解释器模式: 给定一个语言,定义它的文法的一种表示,并定义一个解释器。
建造者模式: 允许一个对象在其对象内部状态改变时改变它的行为。
责任链模式: 将请求的发送者和接收者解耦,使的多个对象都有处理这个请求的机会。
访问者模式: 不改变数据结构的前提下,增加作用于一组对象元素的新功能。
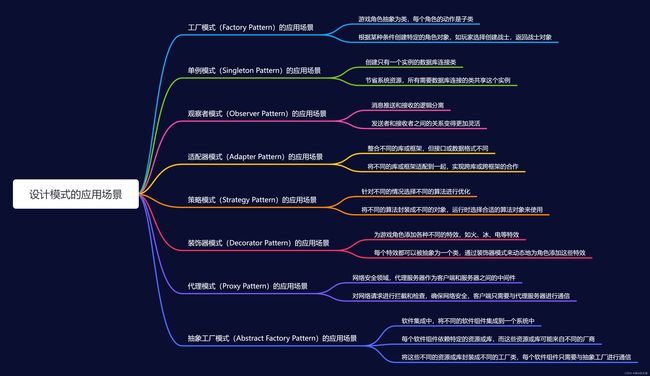
其中,常用的设计模式有:单例模式、工厂方法模式、抽象工厂模式、代理模式、装饰器模式、观察者模式和责任链模式。
3. 设计模式七大原则(OOP原则)
3.1 开闭原则
(1)对于扩展是开放的(Open for extension)。这意味着模块的行为是可以扩展的。当应用的需求改变时,我们可以对模块进行扩展,使其具有满足那些改变的新行为。也就是说,我们可以改变模块的功能。
(2)对于修改是关闭的(Closed for modification)。对模块行为进行扩展时,不必改动模块的源代码或者二进制代码。模块的二进制可执行版本,无论是可链接的库、DLL或者.EXE文件,都无需改动。
3.2 里氏替换原则
不要破坏继承体系,子类重写方法功能发生改变,不应该影响父类方法的含义。
3.3 依赖倒置原则
要面向接口编程,不要面向实现编程。
3.4 单一职责原则
控制类的粒度大小、将对象解耦、提高其内聚性。
3.5 接口隔离原则
要为各个类建立它们需要的专用接口。
3.6 迪米特法则
一个类应该保持对其它对象最少的了解,降低耦合度。
3.7 合成复用原则
尽量先使用组合或者聚合等关联关系来实现,其次才考虑使用继承关系来实现。
实际上,七大原则的目的只有一个:降低对象之间的耦合,增加程序的可复用性、可扩展性和可维护性。
4. 常用设计模式例子
4.1 工厂模式
实例化对象不是用new,用工厂方法替代。将选择实现类,创建对象统一管理和控制。从而将调用者跟我们的实现类解耦。
以下是一个基于工厂模式的C++伪代码示例,用于创建游戏中的角色和动作:
// 定义角色基类
class Role {
public:
    virtual void attack() = 0; // 纯虚函数,子类必须实现
    virtual void defense() = 0; // 纯虚函数,子类必须实现
};

// 定义战士子类
class Warrior : public Role {
public:
    void attack() override {
        // 战士的攻击逻辑
    }

    void defense() override {
        // 战士的防御逻辑
    }
};

// 定义法师子类
class Mage : public Role {
public:
    void attack() override {
        // 法师的攻击逻辑
    }

    void defense() override {
        // 法师的防御逻辑
    }
};

// 定义角色工厂类
class RoleFactory {
public:
    static Role* createRole(const std::string& roleType) {
        if (roleType == "Warrior") {
            return new Warrior();
        } else if (roleType == "Mage") {
            return new Mage();
        } else {
            return nullptr;
        }
    }
};

// 客户端代码
int main() {
    // 通过工厂创建角色
    Role* role = RoleFactory::createRole("Warrior");
    if (role != nullptr) {
        // 下达攻击命令
        role->attack();
        // 下达防御命令
        role->defense();
        // 释放角色内存
        delete role;
    }

    return 0;
}
4.2 单例模式
确保一个类只有一个实例,并提供一个全局访问点。实现单例模式必须注意一下几点:
- 单例类只能由一个实例化对象。
- 单例类必须自己提供一个实例化对象。
- 单例类必须提供一个可以访问唯一实例化对象的接口。
class Singleton {
public:
    static Singleton& getInstance() {
        static Singleton instance;
        return instance;
    }

    void showMessage() {
        std::cout << "Hello, I am a singleton!" << std::endl;
    }

private:
    Singleton() {} // 私有构造函数
    Singleton(const Singleton&) = delete;
    Singleton& operator=(const Singleton&) = delete;
};

int main() {
    Singleton& singleton = Singleton::getInstance();
    singleton.showMessage();
    return 0;
}
4.3 策略模式
策略模式是指定义一系列的算法,把它们单独封装起来,并且使它们可以互相替换,使得算法可以独立于使用它的客户端而变化,也是说这些算法所完成的功能类型是一样的,对外接口也是一样的,只是不同的策略为引起环境角色表现出不同的行为。使用策略模式可以降低复杂度,使得代码更容易维护。
在下面的例子中,使用智能指针对内存进行管理,不用手动释放。
#include 4.4 适配器模式
适配器模式是一种结构型设计模式,它允许现有的类在不修改其内部结构的情况下在其他类中可用。它使用适配器来将不兼容的接口转换成用于目标类的接口。适配器模式使客户端能够调用他们正在使用的接口,而实际上正在使用另一个接口,这个新接口已经与客户端的要求匹配。
#include 4.5 模板方法模式
模板方法模式是指定义一个操作中算法的框架,而将算法的一些步骤延迟到子类中实现。模板方法模式使得子类可以不改变算法的结构即可重定义算法的某些特定步骤。 它是一种行为设计模式,它定义一个算法的模板,将一些计算步骤推迟到子类中。
当多个类有相同的方法,并且逻辑相同,只是细节上有差异时,可以考虑使用模板模式。具体的实现上可以将相同的核心算法设计为模板方法,具体的实现细节有子类实现。
缺点: 每一个不同的实现都需要一个子类来实现,导致类的个数增加,使得系统更加庞大。
//Base class
template <class T>
class Base
{
public:
  void templateMethod()
  {
    step1();
    step2();
    step3();
    step4();
  }
  virtual void step1() = 0;
  virtual void step2() = 0;
  virtual void step3() = 0;
  virtual void step4() = 0;
};
 //Derived class
template <class T>
class Derived : public Base<T>
{
public:
  Derived(T data):m_data(data) {}
  virtual void step1()
  {
    std::cout<<"Step 1 with the data: "<< m_data <<std::endl;
  }
  virtual void step2()
  {
    std::cout<<"Step 2 with the data: "<< m_data <<std::endl;
  }
  virtual void step3()
  {
    std::cout<<"Step 3 with the data: "<< m_data <<std::endl;
  }
  virtual void step4()
  {
    std::cout<<"Step 4 with the data: "<< m_data <<std::endl;
  }
private:
  T m_data;
};
 //Client
int main()
{
  Base<int> *b = new Derived<int>(10);
  b->templateMethod();
  delete b;
  return 0;
}
4.6 外观模式
为子系统中的一组接口定义一个一致的界面;外观模式提供一个高层的接口,这个接口使得这一子系统更加容易被使用;对于复杂的系统,系统为客户端提供一个简单的接口,把负责的实现过程封装起来,客户端不需要连接系统内部的细节。
以下情形建议考虑外观模式:
- 设计初期阶段,应有意识的将不同层分离,层与层之间建立外观模式。
- 开发阶段,子系统越来越复杂,使用外观模式提供一个简单的调用接口。
- 一个系统可能已经非常难易维护和扩展,但又包含了非常重要的功能,可以为其开发一个外观类,使得新系统可以方便的与其交互。
优点:
- 实现了子系统与客户端之间的松耦合关系。
- 客户端屏蔽了子系统组件,减少了客户端所需要处理的对象数据,使得子系统使用起来更方便容易。
- 更好的划分了设计层次,对于后期维护更加的容易。
//Facade模式
class ComputerFacade
{
    private:
        CPU *cpu;
        Memory *mem;
        HardDrive *hd;
     public:
        ComputerFacade()
        {
            cpu = new CPU();
            mem = new Memory();
            hd = new HardDrive();
        }
         ~ComputerFacade()
        {
            delete cpu;
            delete mem;
            delete hd;
        }
        void startComputer()
        {
            cpu->freeze();
            mem->load(BOOT_ADDRESS, hd->read(BOOT_SECTOR, SECTOR_SIZE));
            cpu->execute();
        }
};
4.7 桥接模式
将抽象部分与它的实现部分分离,使它们都可以独立地变化。桥接模式通过组合而不是继承来实现扩展。
// Bridge Pattern – C++
#include #include 4.8 代理模式
代理模式(Proxy Pattern)是一种结构型设计模式,它为另外一个对象提供一个替代或占位符。当客户无法直接访问另外一个对象时,代理就可以担任中间人的角色,这样,客户就可以通过代理对象访问那个对象了。C++ 可以使用代理模式来实现对象的访问控制,可以使用该模式来管理对象的生命周期,也可以使用该模式来控制对象的访问,以及在跨平台上实现方法调用。
优点:
- 代理模式用于在不直接访问一个对象的情况下提供访问方式。
- 它通常由真实对象和代理对象代表,其中真实对象处理实际工作,而代理对象只是提供其接口。
#include 5. 总结
设计模式是一套被反复使用、多数人知晓的、经过分类编目的、代码设计经验的总结。它提供了解决特定问题的通用方法,有助于提高代码的可读性、复用性和扩展性。在算法架构中,设计模式的应用同样至关重要,它们可以帮助开发人员构建高效、灵活且可维护的算法系统。具体应用到自己项目时,可能会结合多种设计模式使用。
参考文献
[1] C++常用的11种设计模式解释及示例
[2] C++设计模式(全23种)
[3] C++ 常用设计模式(学习笔记)
[4] 七种常用的设计模式
[5] 设计模式23模式介绍
[6] https://www.zhihu.com/question/622155780/answer/3213570684