从0到1搭建SpringBoot整合Quartz定时任务框架(保姆级教学+Gitee源码)
前言:这边我自己从0到1搭建了一套简化版的Quartz定时任务纯后端框架,把搭建的整个过程中的逻辑都在这篇博客写下来了,用于开源分享,干货满满!
目录
一、Quartz简介
二、项目整体结构图
三、代码实现
3.1、导入pom.xml依赖
3.2、ScheduleConstants常量类
3.3、SysJob实体类
3.4、SpringUtils工具类
3.5、核心配置类
3.5.1、JobExecuteUtils执行定时任务方法类
3.5.2、AbstractQuartzJob抽象类
3.5.3、QuartzJobExecution/QuartzDisallowConcurrentExecution开启/禁止并发执行任务类
3.5.4、ScheduleUtils定时任务工具类
3.5.5、SysJobService定时任务调度信息接口
3.5.6、SysJobServiceImpl定时任务调度信息接口实现类
四、运行测试
4.1、撰写任务一
4.2、撰写任务二
4.3、启动
五、Gitee源码地址
六、总结
一、Quartz简介
Quartz是一个完全由Java编写的开源作业调度框架,在Java应用程序中进行作业调度提供了强大功能,以下是Quartz的四个核心概念。
1、Job(接口):它只有一个execute方法需要被重写,重写的内容就是咱们需要执行的具体内容。
2、JobDetail(调度信息):表示一个具体的可执行的调度程序,Job是这个可执行调度程序中所需要执行的具体内容,另外JobDetail还包含了这个任务的调度方案和策略。
3、Trigger(触发器):代表一个调度参数的配置,动态去执行咱们的定时任务。
4、Scheduler(任务调度器):Scheduler就是任务调度控制器,需要把JobDetail和Trigger注册到Schedule中,才可以执行。
咱们废话不多说,直接上代码!
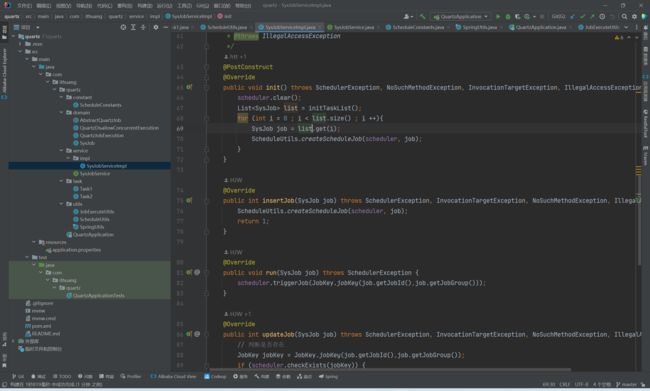
二、项目整体结构图
这边我先把我整个从0到1搭建好的框架先展示出来。
三、代码实现
下面我会详细阐述这个项目是如何完整的一步步搭建起来的。
3.1、导入pom.xml依赖
            org.springframework.boot
            spring-boot-starter-web


            org.springframework.boot
            spring-boot-starter-quartz


            org.apache.commons
            commons-lang3


            org.projectlombok
            lombok
            true


            org.springframework.boot
            spring-boot-starter-test
            test
3.2、ScheduleConstants常量类
Misfire解释:周期性任务需要在某个规定的时间执行,但是由于某种原因导致任务未执行,称为MisFire。
这边主要定义了五种常量:
1、TASK_PARAMS:用于存放和获取定时任务参数的KEY值。
2、MISFIRE_DEFAULT(默认):等价于MISFIRE_FIRE_AND_PROCEED。
3、MISFIRE_IGNORE_MISFIRES(立即执行):错过多少次,初次执行的时候,所有未触发的都会一次性立即执行,然后按照原规律进行正常后续调度。
4、MISFIRE_FIRE_AND_PROCEED(执行一次):无论错过多少次,初次运行的时候,立即执行第一个错过的并丢弃其他的,后续的执行仍按照原规律进行执行。
5、MISFIRE_DO_NOTHING(放弃执行):无论错过多少次,均忽略,后续的执行仍按照原规律进行执行。
三种执行策略详解:
假设有个任务从9点开始,每隔一个小时就会执行。
立即执行(withMisfireHandlingInstructionIgnoreMisfires):所有misfire的任务会马上执行,如果9点misfire了,在10:15系统恢复之后,9点,10点的misfire会马上执行,然后执行下一个周期的任务。
执行一次(WithMisfireHandlingInstructionFireAndProceed):会合并部分的misfire,正常执行下一个周期的任务,假设9,10的任务都misfire了,系统在10:15分起来了。只会执行9点的misfire,10点的misfire被丢弃,下次正点执行任务。
放弃执行(withMisfireHandlingInstructionDoNothing):所有的misfire不管,执行下一个周期的任务。
package com.ithuang.quartz.constant;


/**
 * 常量
 * @author HTT
 */
public class ScheduleConstants
{
    /**
     * 参数
     */
    public static final String TASK_PARAMS = "PARAMS";

    /** 默认 */
    public static final String MISFIRE_DEFAULT = "0";

    /**
     * 忽略错过的执行,按新 Cron 继续运行。
     */
    public static final String MISFIRE_IGNORE_MISFIRES = "1";

    /**
     * 补偿错过的执行,然后继续运行。
     */
    public static final String MISFIRE_FIRE_AND_PROCEED = "2";

    /**
     * 错过的执行不做任何处理,等待下一次 Cron 触发。
     */
    public static final String MISFIRE_DO_NOTHING = "3";

}
3.3、SysJob实体类
这边我只列举了一些必须会用到的字段,其他字段可以根据实际需求来进行扩展。
package com.ithuang.quartz.domain;

import com.ithuang.quartz.constant.ScheduleConstants;
import lombok.Data;

/**
 * 定时任务调度表 sys_job
 *
 * @author HTT
 */
@Data
public class SysJob
{

    /**
     * 定时任务ID
     */
    private String jobId;

    /**
     * 定时任务名称
     */
    private String jobName;

    /**
     * 定时任务组
     */
    private String jobGroup;

    /**
     * 目标bean名
     */
    private String beanTarget;

    /**
     * 目标bean的方法名
     */
    private String beanMethodTarget;

    /**
     * 执行表达式
     */
    private String cronExpression;

    /**
     * 是否并发
     * 0代表允许并发执行
     * 1代表不允许并发执行
     */
    private String concurrent;

    /**
     * 计划策略
     */
    private String misfirePolicy = ScheduleConstants.MISFIRE_DEFAULT;


}
3.4、SpringUtils工具类
1、实现BeanFactoryPostProcessor接口,重写postProcessBeanFactory()方法,在所有Bean初始化之前就会被执行,因此可以在此处获取到最主要的BeanFactory。
2、通过beanFactory对象提供的API实现获取 Bean功能。
package com.ithuang.quartz.utils;

import org.springframework.aop.framework.AopContext;
import org.springframework.beans.BeansException;
import org.springframework.beans.factory.NoSuchBeanDefinitionException;
import org.springframework.beans.factory.config.BeanFactoryPostProcessor;
import org.springframework.beans.factory.config.ConfigurableListableBeanFactory;
import org.springframework.context.ApplicationContext;
import org.springframework.context.ApplicationContextAware;
import org.springframework.stereotype.Component;

/**
 * 获取Bean的工具类
 * @author HTT
 */
@Component
public final class SpringUtils implements BeanFactoryPostProcessor
{
    /** Spring应用上下文环境 */
    private static ConfigurableListableBeanFactory beanFactory;


    @Override
    public void postProcessBeanFactory(ConfigurableListableBeanFactory beanFactory) throws BeansException
    {
        SpringUtils.beanFactory = beanFactory;
    }

    /**
     * 获取对象
     *
     * @param name
     * @return Object 一个以所给名字注册的bean的实例
     * @throws BeansException
     *
     */
    @SuppressWarnings("unchecked")
    public static  T getBean(String name) throws BeansException
    {
        return (T) beanFactory.getBean(name);
    }


}
3.5、核心配置类
在讲解之前,我先简单梳理一些每个实体类的大致作用,以及它们之间的联系和执行逻辑。
1、JobExecuteUtils:任务执行的工具类,通过反射调用目标Bean的方法。
2、AbstractQuartzJob:抽象QuartzJob类,实现了execute方法,在执行任务前后做了trycatch。
3、QuartzJobExecution:任务执行类,继承AbstractQuartzJob,在doExecute方法中调用JobExecuteUtils、executeMethod执行目标方法。
4、QuartzDisallowConcurrentExecution:禁止并发执行的任务执行类,也继承自AbstractQuartzJob,执行逻辑同QuartzJobExecution。
5、ScheduleUtils:任务调度的工具类,根据SysJob创建JobDetail和CronTrigger,调度任务。
6、SysJobService:任务管理业务接口,定义了初始化、增加、修改、删除任务等方法。
7、SysJobServiceImpl:任务管理业务接口实现类。
执行逻辑:
1、初始化时,SysJobServiceImpl从数据库加载定时任务,调度到调度器。
2、调度器根据CronTrigger触发时间启动JobDetail。
3、JobDetail执行时调用对应Job类的execute方法。
4、AbstractQuartzJob实现了execute方法,在其中调用子类doExecute。
5、子类QuartzJobExecution的doExecute通过JobExecuteUtils反射执行目标方法。
6、这样就完成了定时任务的执行。
3.5.1、JobExecuteUtils执行定时任务方法类
1、我们通过jobExecutionContext.getMergedJobDataMap().get(TASK_PARAMS);这个方法去获取咱们的SysJob参数信息。
2、默认获取的是Object类型,所以我们需要通过BeanUtils.copyProperties(param,sysJob);这个方法进行实体类的转换和拷贝,注意参数顺序别写反了。
3、然后我们通过SpringUtils封装好的getBean方法,通过拷贝好的实体类中的参数去动态进行获取被Spring托管的Bean。
4、获取到Bean之后通过bean.getClass().getMethod(sysJob.getBeanMethodTarget());这个代码去获取Bean中需要执行的方法。
5、最后通过method.invoke(bean);进行执行Bean中对应的方法内容。
    public static void executeMethod(JobExecutionContext jobExecutionContext) throws NoSuchMethodException, InvocationTargetException, IllegalAccessException {
        Object param = jobExecutionContext.getMergedJobDataMap().get(TASK_PARAMS);
        SysJob sysJob = new SysJob();
        BeanUtils.copyProperties(param,sysJob);
        Object bean = SpringUtils.getBean(sysJob.getBeanTarget());
        Method method = bean.getClass().getMethod(sysJob.getBeanMethodTarget());
        method.invoke(bean);
    }
完整代码:
package com.ithuang.quartz.utils;

import com.ithuang.quartz.domain.SysJob;
import org.quartz.JobExecutionContext;
import org.springframework.beans.BeanUtils;

import java.lang.reflect.InvocationTargetException;
import java.lang.reflect.Method;

import static com.ithuang.quartz.constant.ScheduleConstants.TASK_PARAMS;

/**
 * 执行定时任务的方法
 * @author HTT
 */
public class JobExecuteUtils {

    /**
     * 获取bean并执行对应的方法
     * @param jobExecutionContext
     * @throws NoSuchMethodException
     * @throws InvocationTargetException
     * @throws IllegalAccessException
     */
    public static void executeMethod(JobExecutionContext jobExecutionContext) throws NoSuchMethodException, InvocationTargetException, IllegalAccessException {
        Object param = jobExecutionContext.getMergedJobDataMap().get(TASK_PARAMS);
        SysJob sysJob = new SysJob();
        BeanUtils.copyProperties(param,sysJob);
        Object bean = SpringUtils.getBean(sysJob.getBeanTarget());
        Method method = bean.getClass().getMethod(sysJob.getBeanMethodTarget());
        method.invoke(bean);
    }
}
3.5.2、AbstractQuartzJob抽象类
定义了一个抽象类并实现了Job接口,同时重写execute方法
    @Override
    public void execute(JobExecutionContext jobExecutionContext) throws JobExecutionException {
        try {
            doExecute(jobExecutionContext);
        } catch (Exception e) {
            throw new RuntimeException(e);
        }
}这个方法是定时任务执行的核心方法,其次在这个抽象类当中我们还定义了一个doExecute方法
protected abstract void doExecute(JobExecutionContext jobExecutionContext) throws NoSuchMethodException, InvocationTargetException, IllegalAccessException;主要就是为了写我们定时任务的执行逻辑,这边巧妙的用到了Java的设计模式-模板方法模式,关于什么是模板方法模式,可以看我前几期的博客。
完整代码:
package com.ithuang.quartz.domain;

import org.quartz.Job;
import org.quartz.JobExecutionContext;
import org.quartz.JobExecutionException;

import java.lang.reflect.InvocationTargetException;

/**
 * 抽象quartz调用
 * 这里我采用了设计模式中的模板方法模式
 * @author HTT
 */
public abstract class AbstractQuartzJob implements Job {

    @Override
    public void execute(JobExecutionContext jobExecutionContext) throws JobExecutionException {
        try {
            doExecute(jobExecutionContext);
        } catch (Exception e) {
            throw new RuntimeException(e);
        }
    }

    protected abstract void doExecute(JobExecutionContext jobExecutionContext) throws NoSuchMethodException, InvocationTargetException, IllegalAccessException;
}
3.5.3、QuartzJobExecution/QuartzDisallowConcurrentExecution开启/禁止并发执行任务类
这边我们继承了上述的抽象类,通过@DisallowConcurrentExecution这个注解来禁止咱们的定时任务的并发执行,如果不加则是默认允许并发执行,最后我们重写了doExecute方法去执行我们定时任务的处理逻辑。
例如有个定时任务每隔5秒执行一次,不过这个任务做完可能需要20秒。
允许并发执行:
在这处理的20秒钟,肯定需要处理下一个任务了,如果设置了允许并发执行,不会等到上一个任务执行完毕才会执行下一个任务,只要每隔5s就会执行下一个任务。
完整代码:
package com.ithuang.quartz.domain;

import com.ithuang.quartz.utils.JobExecuteUtils;
import com.ithuang.quartz.utils.SpringUtils;
import org.quartz.JobExecutionContext;
import org.springframework.beans.BeanUtils;

import java.lang.reflect.InvocationTargetException;
import java.lang.reflect.Method;

import static com.ithuang.quartz.utils.JobExecuteUtils.executeMethod;
import static org.springframework.beans.BeanUtils.*;

/**
 * 定时任务处理(允许并发执行)
 * @author HTT
 */
public class QuartzJobExecution extends AbstractQuartzJob
{
    @Override
    protected void doExecute(JobExecutionContext jobExecutionContext) throws NoSuchMethodException, InvocationTargetException, IllegalAccessException {
        executeMethod(jobExecutionContext);
    }
}
允许并发执行体现在任务一中。
不允许并发执行(@DisallowConcurrentExecution):
在这处理的20秒钟,肯定需要处理下一个任务了,如果设置了不允许并发执行,会必须等到上一个任务执行完毕才会执行下一个任务。
完整代码:
package com.ithuang.quartz.domain;

import com.ithuang.quartz.utils.SpringUtils;
import org.quartz.DisallowConcurrentExecution;
import org.quartz.JobExecutionContext;

import java.lang.reflect.InvocationTargetException;
import java.lang.reflect.Method;

import static com.ithuang.quartz.utils.JobExecuteUtils.executeMethod;


/**
 * 定时任务处理(禁止并发执行)
 * @author HTT
 */
@DisallowConcurrentExecution
public class QuartzDisallowConcurrentExecution extends AbstractQuartzJob
{
    @Override
    protected void doExecute(JobExecutionContext jobExecutionContext) throws NoSuchMethodException, InvocationTargetException, IllegalAccessException {
        executeMethod(jobExecutionContext);
    }
}
不允许并发执行体现在任务二中。
3.5.4、ScheduleUtils定时任务工具类
这边我一共封装了三个方法,
getQuartzJobClass这个方法是主要通过SysJob实体类当中会通过动态参数获取任务类并决定当前任务是否并发执行(0代表并发执行,1代表禁止并发执行)。
    private static Class getQuartzJobClass(SysJob sysJob)
    {
        boolean isConcurrent = "0".equals(sysJob.getConcurrent());
        return isConcurrent ? QuartzJobExecution.class : QuartzDisallowConcurrentExecution.class;
}handleCronScheduleMisfirePolicy这个方法主要设置待执行任务的执行策略。
    public static CronScheduleBuilder handleCronScheduleMisfirePolicy(SysJob job, CronScheduleBuilder cb) {

        switch (job.getMisfirePolicy())
        {
            case ScheduleConstants.MISFIRE_DEFAULT:
                return cb;
            case ScheduleConstants.MISFIRE_IGNORE_MISFIRES:
                return cb.withMisfireHandlingInstructionIgnoreMisfires();
            case ScheduleConstants.MISFIRE_FIRE_AND_PROCEED:
                return cb.withMisfireHandlingInstructionFireAndProceed();
            case ScheduleConstants.MISFIRE_DO_NOTHING:
                return cb.withMisfireHandlingInstructionDoNothing();
            default:
                throw new RuntimeException("策略异常");
        }
}createScheduleJob方法也就是我们最主要的方法了,它的逻辑总共7个步骤如下:
1、得到任务类(是否并发执行)
2、构建job信息
3、构件表达式调度构建器
4、配置执行策略
5、按新的cronExpression表达式构建一个新的trigger
6、放入参数,运行时的方法可以获取
7、执行调度任务
public static void createScheduleJob(Scheduler scheduler, SysJob job) throws SchedulerException, NoSuchMethodException, InvocationTargetException, IllegalAccessException {

        //获取任务类型
        Class jobClass = getQuartzJobClass(job);

        // 构建job信息
        String cornExpression = job.getCronExpression();
        JobDetail jobDetail = JobBuilder.newJob(jobClass).withIdentity(job.getJobId(),job.getJobGroup()).build();

        // 表达式调度构建器
        CronScheduleBuilder cronScheduleBuilder = CronScheduleBuilder.cronSchedule(cornExpression);

        //配置执行策略
        cronScheduleBuilder = handleCronScheduleMisfirePolicy(job,cronScheduleBuilder);

        // 按新的cronExpression表达式构建一个新的trigger
        CronTrigger trigger = TriggerBuilder.newTrigger().withIdentity(job.getJobId(),job.getJobGroup())
                .withSchedule(cronScheduleBuilder).build();

        // 放入参数,运行时的方法可以获取
        jobDetail.getJobDataMap().put(TASK_PARAMS, job);

        // 执行调度任务
        scheduler.scheduleJob(jobDetail, trigger);

    }
完整代码:
package com.ithuang.quartz.utils;

import com.ithuang.quartz.constant.ScheduleConstants;
import com.ithuang.quartz.domain.QuartzDisallowConcurrentExecution;
import com.ithuang.quartz.domain.QuartzJobExecution;
import com.ithuang.quartz.domain.SysJob;
import org.quartz.*;
import org.springframework.stereotype.Component;

import java.lang.reflect.InvocationTargetException;

import static com.ithuang.quartz.constant.ScheduleConstants.TASK_PARAMS;

/**
 * 定时任务工具类
 * @author HTT
 */
@Component
public class ScheduleUtils {

    /**
     * 得到quartz任务类
     *
     * @param sysJob 执行计划
     * @return 具体执行任务类
     */
    private static Class getQuartzJobClass(SysJob sysJob)
    {
        boolean isConcurrent = "0".equals(sysJob.getConcurrent());
        return isConcurrent ? QuartzJobExecution.class : QuartzDisallowConcurrentExecution.class;
    }

    /**
     * 创建定时任务
     */
    public static void createScheduleJob(Scheduler scheduler, SysJob job) throws SchedulerException, NoSuchMethodException, InvocationTargetException, IllegalAccessException {

        //获取任务类型
        Class jobClass = getQuartzJobClass(job);

        // 构建job信息
        String cornExpression = job.getCronExpression();
        JobDetail jobDetail = JobBuilder.newJob(jobClass).withIdentity(job.getJobId(),job.getJobGroup()).build();

        // 表达式调度构建器
        CronScheduleBuilder cronScheduleBuilder = CronScheduleBuilder.cronSchedule(cornExpression);

        //配置执行策略
        cronScheduleBuilder = handleCronScheduleMisfirePolicy(job,cronScheduleBuilder);

        // 按新的cronExpression表达式构建一个新的trigger
        CronTrigger trigger = TriggerBuilder.newTrigger().withIdentity(job.getJobId(),job.getJobGroup())
                .withSchedule(cronScheduleBuilder).build();

        // 放入参数,运行时的方法可以获取
        jobDetail.getJobDataMap().put(TASK_PARAMS, job);

        // 执行调度任务
        scheduler.scheduleJob(jobDetail, trigger);

    }

    /**
     * 设置定时任务策略
     */
    public static CronScheduleBuilder handleCronScheduleMisfirePolicy(SysJob job, CronScheduleBuilder cb) {

        switch (job.getMisfirePolicy())
        {
            case ScheduleConstants.MISFIRE_DEFAULT:
                return cb;
            case ScheduleConstants.MISFIRE_IGNORE_MISFIRES:
                return cb.withMisfireHandlingInstructionIgnoreMisfires();
            case ScheduleConstants.MISFIRE_FIRE_AND_PROCEED:
                return cb.withMisfireHandlingInstructionFireAndProceed();
            case ScheduleConstants.MISFIRE_DO_NOTHING:
                return cb.withMisfireHandlingInstructionDoNothing();
            default:
                throw new RuntimeException("策略异常");
        }
    }

}
3.5.5、SysJobService定时任务调度信息接口
撰写定时任务调度的接口,主要分为初始化所有任务、新增任务,立即执行任务、更新任务、暂停任务,恢复任务和删除任务,代码如下,这个不多说,主要详细讲解一下它的实现类。
package com.ithuang.quartz.service;

import com.ithuang.quartz.domain.SysJob;
import org.quartz.SchedulerException;

import java.lang.reflect.InvocationTargetException;

/**
 * 定时任务调度信息
 * @author HTT
 */
public interface SysJobService {

    /**
     * 项目启动时,初始化定时器
     */
    void init() throws SchedulerException, NoSuchMethodException, InvocationTargetException, IllegalAccessException;

    /**
     * 新增任务
     *
     * @param job 调度信息
     * @return 结果
     */
    public int insertJob(SysJob job) throws SchedulerException, InvocationTargetException, NoSuchMethodException, IllegalAccessException;

    /**
     * 立即运行任务
     *
     * @param job 调度信息
     * @return 结果
     */
    public void run(SysJob job) throws SchedulerException;

    /**
     * 更新任务
     *
     * @param job 调度信息
     * @return 结果
     */
    public int updateJob(SysJob job) throws SchedulerException, InvocationTargetException, NoSuchMethodException, IllegalAccessException;

    /**
     * 暂停任务
     *
     * @param job 调度信息
     * @return 结果
     */
    public int pauseJob(SysJob job) throws SchedulerException;

    /**
     * 恢复任务
     *
     * @param job 调度信息
     * @return 结果
     */
    public int resumeJob(SysJob job) throws SchedulerException;

    /**
     * 删除任务后,所对应的trigger也将被删除
     *
     * @param job 调度信息
     * @return 结果
     */
    public int deleteJob(SysJob job) throws SchedulerException;

}
3.5.6、SysJobServiceImpl定时任务调度信息接口实现类
1、首先initTaskList这个方法我这边做了偷懒,直接写了一个List集合在项目中,正确的配置应该是从数据库去查询一共有哪些定时任务需要程序去执行的,以及对应的配置信息应该如何去执行。
    public List initTaskList(){
        List list = new ArrayList<>();
        SysJob job = new SysJob();
        job.setJobId(UUID.randomUUID().toString());
        job.setJobGroup("system");
        job.setConcurrent("0");
        job.setCronExpression("0/5 * * * * ?");
        job.setBeanTarget("task1");
        job.setBeanMethodTarget("handle");
        list.add(job);
        job = new SysJob();
        job.setJobId(UUID.randomUUID().toString());
        job.setJobGroup("system");
        job.setConcurrent("1");
        job.setCronExpression("0/50 * * * * ?");
        job.setBeanTarget("task2");
        job.setBeanMethodTarget("handle");
        job.setMisfirePolicy(MISFIRE_IGNORE_MISFIRES);
        list.add(job);
        return list;
} 2、其次在init方法中,@PostConstruct这个注解会在项目启动的时候帮我们进行初始化,其次我调用了clear方法进行先清空定时任务,使用循环获取到需要所有定时任务集合,通过createScheduleJob方法去创建。
    @Resource
    private Scheduler scheduler;

    @PostConstruct
    @Override
    public void init() throws SchedulerException, NoSuchMethodException, InvocationTargetException, IllegalAccessException {
        scheduler.clear();
        List list = initTaskList();
        for (int i = 0 ; i < list.size() ; i ++){
            SysJob job = list.get(i);
            ScheduleUtils.createScheduleJob(scheduler, job);
        }
    }
完整代码:
package com.ithuang.quartz.service.impl;

import com.ithuang.quartz.domain.SysJob;
import com.ithuang.quartz.service.SysJobService;
import com.ithuang.quartz.utils.ScheduleUtils;
import org.quartz.JobKey;
import org.quartz.Scheduler;
import org.quartz.SchedulerException;
import org.springframework.stereotype.Service;

import javax.annotation.PostConstruct;
import javax.annotation.Resource;
import java.lang.reflect.InvocationTargetException;
import java.util.ArrayList;
import java.util.List;
import java.util.UUID;

import static com.ithuang.quartz.constant.ScheduleConstants.MISFIRE_IGNORE_MISFIRES;

/**
 * 定时任务调度服务
 * @author HTT
 */
@Service
public class SysJobServiceImpl implements SysJobService {

    @Resource
    private Scheduler scheduler;

    /**
     * 模拟从数据库获取数据,这边偷懒了
     * @return
     */
    public List initTaskList(){
        List list = new ArrayList<>();
        SysJob job = new SysJob();
        job.setJobId(UUID.randomUUID().toString());
        job.setJobGroup("system");
        job.setConcurrent("0");
        job.setCronExpression("0/5 * * * * ?");
        job.setBeanTarget("task1");
        job.setBeanMethodTarget("handle");
        list.add(job);
        job = new SysJob();
        job.setJobId(UUID.randomUUID().toString());
        job.setJobGroup("system");
        job.setConcurrent("1");
        job.setCronExpression("0/50 * * * * ?");
        job.setBeanTarget("task2");
        job.setBeanMethodTarget("handle");
        job.setMisfirePolicy(MISFIRE_IGNORE_MISFIRES);
        list.add(job);
        return list;
    }

    /**
     * 初始化定时任务
     * @throws SchedulerException
     * @throws NoSuchMethodException
     * @throws InvocationTargetException
     * @throws IllegalAccessException
     */
    @PostConstruct
    @Override
    public void init() throws SchedulerException, NoSuchMethodException, InvocationTargetException, IllegalAccessException {
        scheduler.clear();
        List list = initTaskList();
        for (int i = 0 ; i < list.size() ; i ++){
            SysJob job = list.get(i);
            ScheduleUtils.createScheduleJob(scheduler, job);
        }
    }

    @Override
    public int insertJob(SysJob job) throws SchedulerException, InvocationTargetException, NoSuchMethodException, IllegalAccessException {
        ScheduleUtils.createScheduleJob(scheduler, job);
        return 1;
    }

    @Override
    public void run(SysJob job) throws SchedulerException {
        scheduler.triggerJob(JobKey.jobKey(job.getJobId(),job.getJobGroup()));
    }

    @Override
    public int updateJob(SysJob job) throws SchedulerException, InvocationTargetException, NoSuchMethodException, IllegalAccessException {
        // 判断是否存在
        JobKey jobKey = JobKey.jobKey(job.getJobId(),job.getJobGroup());
        if (scheduler.checkExists(jobKey)) {
            scheduler.deleteJob(jobKey);
        }
        ScheduleUtils.createScheduleJob(scheduler, job);
        return 1;
    }

    @Override
    public int pauseJob(SysJob job) throws SchedulerException {
        scheduler.pauseJob(JobKey.jobKey(job.getJobId(),job.getJobGroup()));
        return 1;
    }

    @Override
    public int resumeJob(SysJob job) throws SchedulerException {
        scheduler.resumeJob(JobKey.jobKey(job.getJobId(),job.getJobGroup()));
        return 1;
    }

    @Override
    public int deleteJob(SysJob job) throws SchedulerException {
        scheduler.deleteJob(JobKey.jobKey(job.getJobId(),job.getJobGroup()));
        return 1;
    }


}
四、运行测试
以上就是整个定时任务框架实现的核心逻辑,这边我们直接运行测试一下.
4.1、撰写任务一
task1就是我们任务一Bean的名称,handle就是任务二需要执行的具体方法。
package com.ithuang.quartz.task;

import org.springframework.stereotype.Component;

import java.util.Date;

@Component("task1")
public class Task1 {

    public void handle() throws InterruptedException {
        Date date = new Date();
        System.out.println("task1"+date+"开始");
        Thread.sleep(10000);
        System.out.println("task1"+date+"结束");
    }

}
4.2、撰写任务二
task2就是我们任务二Bean的名称,handle就是任务二需要执行的具体方法。
package com.ithuang.quartz.task;

import org.springframework.stereotype.Component;

import java.util.Date;

@Component("task2")
public class Task2 {

    public void handle(){
        Date date = new Date();
        System.out.println("task2"+date+"开始");
        try {
            Thread.sleep(1000);
        } catch (InterruptedException e) {
            throw new RuntimeException(e);
        }
        System.out.println("task2"+date+"结束");
    }

}
4.3、启动
这边我默认采用并发执行了,反正参数都可以动态进行配置 。

这是不采用并发执行的效果。
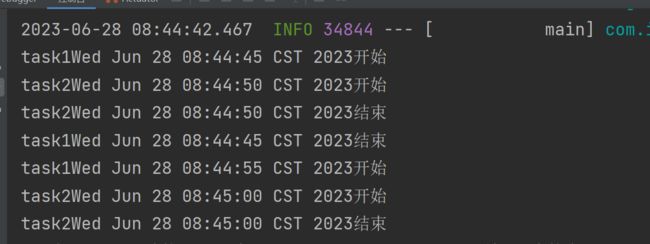
代码运行成功!
五、Gitee源码地址
SpringBoot整合Quartz定时任务框架
六、总结
这边就是我自己从0到1搭建了一个比较成熟的定时任务框架,参考的是目前主流的若依框架,我在他的框架上做了一些简化,不过也能应付大部分的场景了,非常的方便,功能也非常完善,整个项目的源码已经全部吃透,这边做一个总结,收获满满!