大模型WebUI:Gradio全解11——Chatbot:融合大模型的多模态聊天机器人(5)
大模型WebUI:Gradio全解11——Chatbot:融合大模型的多模态聊天机器人(5)
- 前言
- 本篇摘要
- 11. Chatbot:融合大模型的多模态聊天机器人
-
- 11.5 Chatbot的特殊Events
-
- 11.5.1 各事件总演示
- 11.5.2 详解.undo、.retry、.like和.edit事件
-
- 1. .undo:撤销
- 2. .retry:重试
- 3. .like:点赞
- 4. .edit:编辑
- 参考文献
前言
本系列文章主要介绍WEB界面工具Gradio。Gradio是Hugging Face发布的简易webui开发框架,它基于FastAPI和svelte,可以使用机器学习模型、python函数或API开发多功能界面和部署人工智能模型,是当前热门的非常易于展示机器学习大语言模型LLM及扩散模型DM的WebUI框架。
本系列文章分为前置概念、安装运行与部署、Gradio高级特性、基础功能实战和高级功能实战五部分。第一部分前置概念:先介绍Gradio的详细技术架构、历史、应用场景、与其他框架Gradio/NiceGui/StreamLit/Dash/PyWebIO的区别,然后详细介绍了著名的资源网站Hugging Face,因为Gradio演示中经常用到Hugging Face的models及某些场景需要部署在spaces,这里主要包括三类资源models/datasets/spaces的使用以及六类工具库transformers/diffusers/datasets/PEFT/accelerate/optimum实战。第二部分安装运行与部署:讲解多种不同的安装、运行和部署方式,安装包括Linux/Win/Mac三类系统安装,运行包括普通方式和热重载方式,部署包括本地部署、HuggingFace托管、FastAPI挂载和Gradio-Lite浏览器集成。第三部分Gradio高级特性:按照先整体再细节的逻辑,讲解Gradio的多种高级特性,包括三种Gradio Clients(python/javascript/curl)、Gradio Tools、Gradio的模块架构和环境变量等,方便读者对Gradio整体把握。第四部分基础功能实战:深入细节,也是本系列文章的核心,实践基础功能Interface、Blocks和Additional Features。第五部分高级功能实战:详解高级功能Chatbots、Data Science And Plots和Streaming。
本系列文章讲解细致,涵盖Gradio大部分组件和功能,代码均可运行并附有大量运行截图,方便读者理解并应用到开发中,Gradio一定会成为每个技术人员实现各种奇思妙想的最称手工具。
本系列文章目录如下:
- 《Gradio全解1——Gradio简介》
- 《Gradio全解1——Gradio的安装与运行》
- 《Gradio全解2——剖析Hugging Face:详解三类资源models/datasets/spaces》
- 《Gradio全解3——剖析Hugging Face:实战六类工具库transformers/diffusers/datasets/PEFT/accelerate/optimum》
- 《Gradio全解4——Gradio的3+1种部署方式实践》
- 《Gradio全解4——浏览器集成Gradio-Lite》
- 《Gradio全解5——Gradio Client:python客户端》
- 《Gradio全解5——Gradio Client:javascript客户端》
- 《Gradio全解5——Gradio Client:curl客户端》
- 《Gradio全解6——Gradio Tools:将Gradio用于LLM Agents》
- 《Gradio全解7——Gradio库的模块架构和环境变量》
- 《Gradio全解8——Interface:高级抽象界面类(上)》
- 《Gradio全解8——Interface:高级抽象界面类(下)》
- 《Gradio全解9——Blocks:底层区块类(上)》
- 《Gradio全解9——Blocks:底层区块类(下)》
- 《Gradio全解10——Additional Features:补充特性(上)》
- 《Gradio全解10——Additional Features:补充特性(下)》
- 《Gradio全解11——Chatbot:融合大模型的多模态聊天机器人(1)》
- 《Gradio全解11——Chatbot:融合大模型的多模态聊天机器人(2)》
- 《Gradio全解11——Chatbot:融合大模型的多模态聊天机器人(3)》
- 《Gradio全解11——Chatbot:融合大模型的多模态聊天机器人(4)》
- 《Gradio全解11——Chatbot:融合大模型的多模态聊天机器人(5)》
- 《Gradio全解11——Chatbot:融合大模型的多模态聊天机器人(6)》
- 《Gradio全解11——Chatbot:融合大模型的多模态聊天机器人(7)》
- 《Gradio全解11——Chatbot:融合大模型的多模态聊天机器人(8)》
- 《Gradio全解11——Chatbot:融合大模型的多模态聊天机器人(9)》
- 《Gradio全解系列12——Data Science And Plots:数据科学与绘图》
- 《Gradio全解13——Streaming:数据流(上)》
- 《Gradio全解13——Streaming:数据流(下)》
本篇摘要
本篇介绍如何使用Gradio创建聊天机器人,主要内容包括gr.ChatInterface快速创建Chatbot、与流行LLM库及API结合、组件Chatbot及消息格式ChatMessage、使用Blocks创建Chatbot、Chatbot的特殊Events、使用Agents和Tools智能代理工具、通过Gradio应用创建Discord Bot/Slack Bot/Website Widget。
11. Chatbot:融合大模型的多模态聊天机器人
本章介绍如何使用Gradio创建聊天机器人。聊天机器人是大型语言模型(LLMs)的一个流行应用,通过Gradio,我们可以轻松构建LLM演示并与其它用户分享,或者自己使用直观的聊天机器人界面进行开发尝试。本章主要内容包括gr.ChatInterface快速创建Chatbot、与流行LLM库及API结合、组件Chatbot及消息格式ChatMessage、使用Blocks创建Chatbot、Chatbot的特殊Events、使用Agents和Tools智能代理工具、通过Gradio应用创建Discord Bot/Slack Bot/Website Widget。
11.5 Chatbot的特殊Events
用户期望现代聊天机器人用户界面能够让他们轻松地与单个聊天消息进行交互:例如,用户可能希望重试消息生成、撤销消息,或点击点赞/点踩按钮来对生成的消息进行投票,或编辑生成的消息。
幸运的是,Gradio的Chatbot组件暴露了四个事件:.retry、.undo、.like和.edit,让我们可以将这些功能构建到应用程序中。作为应用程序开发者,我们可以将任意函数附加到这些事件中的任何一个,从而在触发事件时运行设置的Python函数。
11.5.1 各事件总演示
在本演示中,我们将构建一个实现这些事件的用户界面,并将各事件加入其中,其部署在Hugging Face Spaces上的地址为:https://huggingface.co/spaces/gradio/chatbot_retry_undo_like。我们将使用Hugging Face的InferenceClient,以便无需设置任何API密钥即可开始。
完整代码如下:
from huggingface_hub import InferenceClient
import gradio as gr

client = InferenceClient()

def respond(prompt: str, history):
    if not history:
        history = [{"role": "system", "content": "You are a friendly chatbot"}]
    history.append({"role": "user", "content": prompt})

    yield history

    response = {"role": "assistant", "content": ""}
    for message in client.chat_completion( # type: ignore
        history,
        temperature=0.95,
        top_p=0.9,
        max_tokens=512,
        stream=True,
        model="HuggingFaceH4/zephyr-7b-beta"
    ):
        response["content"] += message.choices[0].delta.content or ""
        yield history + [response]

def handle_undo(history, undo_data: gr.UndoData):
    return history[:undo_data.index], history[undo_data.index]['content']

def handle_retry(history, retry_data: gr.RetryData):
    new_history = history[:retry_data.index]
    previous_prompt = history[retry_data.index]['content']
    yield from respond(previous_prompt, new_history)

def handle_like(data: gr.LikeData):
    if data.liked:
        print("You upvoted this response: ", data.value)
    else:
        print("You downvoted this response: ", data.value)

def handle_edit(history, edit_data: gr.EditData):
    new_history = history[:edit_data.index]
    new_history[-1]['content'] = edit_data.value
    return new_history

with gr.Blocks() as demo:
    gr.Markdown("# Chat with Hugging Face Zephyr 7b ")
    chatbot = gr.Chatbot(
        label="Agent",
        type="messages",
        # 设置机器人小助手头像
        avatar_images=(
            None,
            "https://em-content.zobj.net/source/twitter/376/hugging-face_1f917.png",
        ),
    )
    prompt = gr.Textbox(max_lines=1, label="Chat Message")
    prompt.submit(respond, [prompt, chatbot], [chatbot])
    prompt.submit(lambda: "", None, [prompt])
    chatbot.undo(handle_undo, chatbot, [chatbot, prompt])
    chatbot.retry(handle_retry, chatbot, [chatbot])
    chatbot.like(handle_like, None, None)
    chatbot.edit(handle_edit, chatbot, chatbot)

if __name__ == "__main__":
    demo.launch()
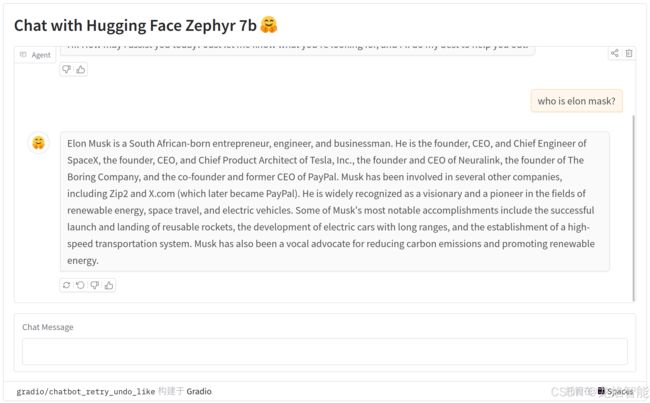
在jupyter notebook界面使用以下命令安装huggingface_hub:!pip install -q gradio huggingface_hub,然后运行代码,输入一段信息后界面如下:
提示:gr.ChatInterface会自动使用.retry和.undo事件,因此不熟悉的读者最好从这里开始,以便快速获得一个完全可用的应用程序。另外,由于网络禁令原因,自己运行时很可能出现超时:requests.exceptions.ConnectTimeout: (MaxRetryError("HTTPSConnectionPool(host=‘api-inference.huggingface.co’, port=443),此时可使用Hugging Face上的演示查看运行效果。
11.5.2 详解.undo、.retry、.like和.edit事件
本节逐一讲述.undo、.retry、.like和.edit事件的作用和用法。
1. .undo:撤销
撤销事件会将上一个用户消息填充到文本框中,并删除所有后续的助手响应。为了知道最后一个用户消息的索引,可以将gr.UndoData传递给事件处理函数,如下所示:
def handle_undo(history, undo_data: gr.UndoData):
  return history[:undo_data.index], history[undo_data.index]['content']
然后,我们将此函数传递给undo事件:
chatbot.undo(handle_undo, chatbot, [chatbot, prompt])
我们会注意到,现在每个机器人响应都会有一个“undo icon”,可以使用它来撤销响应。另外,也可以通过undo_data.value访问撤销消息的内容。
2. .retry:重试
重试事件的工作方式与撤销类似。我们将使用gr.RetryData获取上一个用户消息的索引,并从历史记录中删除所有后续消息;然后使用respond函数生成一个新的响应。我们也可以通过gr.RetryData.value属性获取上一个消息内容,通过history[retry_data.index][‘content’]获取上一条提示信息。代码如下:
def handle_retry(history, retry_data: gr.RetryData):
    new_history = history[:retry_data.index]
    previous_prompt = history[retry_data.index]['content']
    yield from respond(previous_prompt, new_history)
...
chatbot.retry(handle_retry, chatbot, chatbot)
我们会看到bot消息下有一个"retry"按钮,点击即可重新生成响应。需要注意的是,Hugging Face的推理API会缓存响应,因此在此演示中,重试按钮不会生成新的响应。
3. .like:点赞
我们应该早已见过点赞操作。在实现时,为了让用户点赞消息,我们将在聊天机器人中添加一个.like 事件,并传递一个接受gr.LikeData对象的函数。本例中,我们只是打印被点赞或点踩的消息,如下所示:
def handle_like(data: gr.LikeData):
    if data.liked:
        print("You upvoted this response: ", data.value)
    else:
        print("You downvoted this response: ", data.value)
...
chatbot.like(vote, None, None)
4. .edit:编辑
编辑监听器的思路也是一样的,通过设置gr.Chatbot(editable=True)可以捕获用户的编辑操作。gr.EditData对象会携带被编辑消息的索引以及消息的新文本。下面,我们使用此对象来编辑历史记录,并删除所有后续消息,代码如下:
def handle_edit(history, edit_data: gr.EditData):
    new_history = history[:edit_data.index]
    new_history[-1]['content'] = edit_data.value
    return new_history
...
chatbot.edit(handle_edit, chatbot, chatbot)
到此为止,我们应该知道了如何为聊天机器人实现撤销、重试、点赞和编辑事件。
参考文献
- Gradio - guides - Chatbots