Torchserve服务开发
Torchserve服务开发
文章目录
- Torchserve服务开发
- 0. Torchserve介绍
-
- 0.1. 背景
- 0.2. API类型
- 1. 开发使用
-
- 1.0. 环境部署
- 1.1. handler开发
-
- 1.1.1. context参数
- 1.1.2. data参数
- 1.2. handler调试
- 2. 配置文件
- 3. batch推理
0. Torchserve介绍
0.1. 背景
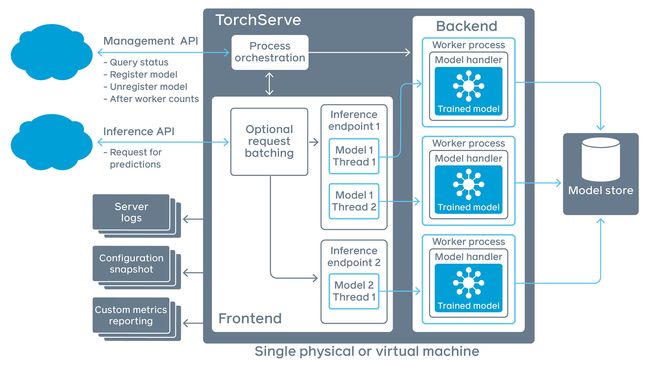
TorchServe 是 PyTorch 中推荐的模型部署解决方案,通过它可以将深度学习模型高效地部署到生产环境,其设计旨在提供性能卓越和可扩展性的工具,通过 HTTP 或 HTTPS API 将模型封装为服务。
TorchServe 的核心服务由 Java11 实现,负责多种任务,包括为部署模型分配 workers、处理客户端与服务器之间的通信等。
主要面向深度学习推理服务的 Python 后端负责处理推理服务,支持异步推理和多模型并发。
此外,TorchServe 的功能不仅限于将 PyTorch 模型部署为服务,它还能够将其他 Python 程序包装成服务,展现了其通用性和灵活性。
与传统的 Python 服务化框架如 Django 和 Flask 相比,TorchServe 提供了现成的多实例化、模型管理、热更新和健康状态监测等专业化功能。
项目地址为:https://github.com/pytorch/serve
0.2. API类型
TorchServe 使用 RESTful API 进行推理和管理调用。该 API 符合OpenAPI 规范 3.0,可以使用swagger codegen轻松生成Java、Scala、C#或Javascript的客户端代码。
TorchServe 启动时会启动两个网络服务,包括以下API:
- 推理API:监听 8080 端口,获取模型预测结果;
- 管理 API:监听端口为 8081,允许注册或取消注册并描述模型,允许用户增加或减少部署模型的 workers 的数量;
- METRICS API:在默认情况下监听 8082 端口,使用户可以监测正在部署的模型;
- 工作流推理 API
- 工作流管理 API
默认情况下,API 都只能从本地主机访问,要启用远程主机访问,请参阅TorchServe 配置。
1. 开发使用
首先部署环境,然后可以用torch-model-archiver工具将对应的python程序打包成torchserve要求的.mar模型,启动服务即可实现模型推理的服务化。
# 模型打包,下面命令执行结束后会在model_store下面生产打包文件test_model.mar
torch-model-archiver --model-name test_model --version 1.0 --handler handler/test_handler.py --export-path model_store --serialized-file handler/add_model.txt --model-file handler/add_model.txt --extra-files handler/extra1.txt,handler/extra2.txt
# 单模型启动
torchserve --start --ncs --model-store model_store --models test_model.mar
# model_store目录下所有模型启动
torchserve --start --ncs --model-store model_store --models all
# 服务停止
torchserve --stop
1.0. 环境部署
需要安装JAVA11。
# CUDA根据版本号可选
python ./ts_scripts/install_dependencies.py --cuda=cu121 # 从github上找这个脚本
pip install torchserve torch-model-archiver torch-workflow-archiver
“”“
# 目前支持以下版本的cuda
choices=[
    "cu92",
    "cu101",
    "cu102",
    "cu111",
    "cu113",
    "cu116",
    "cu117",
    "cu118",
    "cu121",
],
”“”
1.1. handler开发
通过编写 Python 脚本自定义 TorchServe 的行为。
官方提供了一些开箱即用的handler,多数情况下需要根据需求定制化开发hanlder。
通过定制化开发hanlder,可以实现python代码的服务化部署,不止限于pytorch模型。
可以通过继承基类BaseHandler实现功能,需要重点重写以下两个方法:
# 实现模型的初始化载入
def initialize(self, context):
    super().initialize(context)
    # 可以调用基类的初始化函数,实现对.pt .onnx等官方支持的模型的初始化
    # 也可以不调用基类初始化函数,自己实现模型的初始化

# 每次推理请求的入口函数
def handle(self, data, context):
    # 设置响应的content_type为application/json
    context.set_response_content_type(0, "application/json")
    model_input = self.preprocess(data)
    model_output = self.inference(model_input)
    return self.postprocess(model_output)
1.1.1. context参数
包含打包时输入的参数、模型配置等信息。
常用的属性有:
-
context.system_properties:{ 'model_dir': '/var/folders/zb/7k2lc0lx4q1g7ww2vnt031yr0000gn/T/models/eccfebb6a4fe414089dc64d29699b013', 'gpu_id': None, 'batch_size': 1, 'server_name': 'MMS', 'server_version': '0.9.0', 'limit_max_image_pixels': True } -
context.manifest:{ 'createdOn': '23/12/2023 17:24:11', 'runtime': 'python', 'model': { 'modelName': 'test_model', 'serializedFile': 'add_model.txt', 'handler': 'test_handler.py', 'modelFile': 'add_model.txt', 'modelVersion': '1.0' }, 'archiverVersion': '0.9.0' }
通过以下方法可以获取相关资源文件路径:
# 模型实际运行时的地址:
context.system_properties["model_dir"]
# 打包时设置的参数
context.manifest["model"]
# 获取模型文件路径
model_dir = context.system_properties["model_dir"]
serializedFile = context.manifest["model"]["serializedFile"]
model_path = os.path.join(model_dir, serializedFile)
1.1.2. data参数
一次处理获取到的数据,由请求体的数据组成,list类型。
长度为这一批数据的batch_size,默认batch_size为1。
- 请求体content_type为form_data时,data的数据元素类型为bytearray,如下:
[{'data': bytearray(b'2'), 'img': bytearray(b'4')}]
bytearray的图像数据需要转为图像类型,才能被模型处理:
image = Image.open(io.BytesIO(image))
- 请求体content_type为application/json时,data的数据元素类型为json可解析的对象(dict或list),如下:
[{'body': {'data': [1, 2, 3, 4, 5]}}]
- 请求体content_type为text/plain时,data的数据元素类型为字符串,如下:
[{'body': '{\n "a": 119.0,\n "b": "b"\n}'}]
handler最终返回的数据长度要和data的长度相同,否则会报错:
number of batch response mismatched, expect: 1, got: 2.
1.2. handler调试
参考如下链接:
https://github.com/pytorch/serve/blob/master/examples/image_classifier/resnet_18/README.md#debug-torchserve-backend
https://github.com/pytorch/serve/blob/master/examples/image_classifier/resnet_18/debugging_backend/test_handler.py
2. 配置文件
一般不用更改配置文件,需要更改时参考如下:
TorchServe uses a config.properties file to store configurations. TorchServe uses following, in order of priority, to locate this config.properties file:
If the TS_CONFIG_FILE environment variable is set, TorchServe loads the configuration from the path specified by the environment variable.
If --ts-config parameter is passed to torchserve, TorchServe loads the configuration from the path specified by the parameter.
If there is a config.properties in the folder where you call torchserve, TorchServe loads the config.properties file from the current working directory.
If none of the above is specified, TorchServe loads a built-in configuration with default values.
3. batch推理
是将多次请求合并成一次推理,推理结果又拆成多次响应进行返回。
需要使用管理API对模型进行配置,需要配置以下两个参数:
batch_size: 模型能处理的最大batch_size。max_batch_delay: 等待接收 "batch_size "请求数的最长延迟时间,单位为 “ms”。如果 TorchServe 在计时器计时结束前没有收到batch_size数量的请求,它就会将收到的请求发送给模型handler。
配置示例如下:
# The following command will register a model "resnet-152.mar" and configure TorchServe to use a batch_size of 8 and a max batch delay of 50 milliseconds.
curl -X POST "localhost:8081/models?url=resnet-152.mar&batch_size=8&max_batch_delay=50"
表示模型接受的最大batch_size为8,将50ms内的请求合并成一个batch_size
示例请求如下:
curl -X POST http://127.0.0.1:8080/predictions/u2net -T "{bike.jpg}" & curl -X POST http://127.0.0.1:8080/predictions/u2net -T "{boat.jpg}"