iOS7状态栏上有趣的渐变遮罩
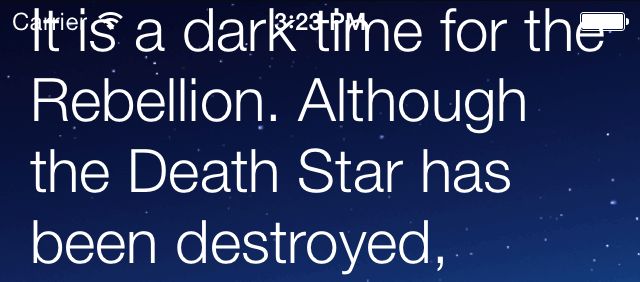
在iOS 7以前,设计师和开发者实际上并没有太多考虑到状态栏。它是存在于我们应用的框架frame之外的,而且仅仅占用了22像素高的空间。现在,一切都改变了。这个新的状态栏是在我们应用内的,我们作为应用制作者必须想出一种新的,有趣的方式来处理它。如果你曾经制作过一个有滚动内容的app,那么在某些滚动位置,你可能需要处理下面的情况:

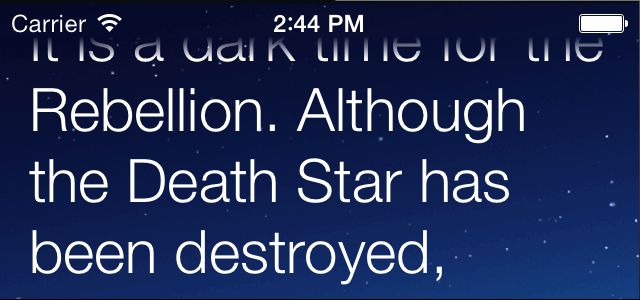
这好像不行,状态栏文本扰乱了我们的内容。有很多种方式来处理这种情况。我将展示给你一种非常酷的方式来处理这种情况,就是使用透明渐变遮罩和CAGradientLayer。下面是结果:

现在有些东西可以用Photoshop来完成。你可以把上面的背景独立创建一个图片,羽化下面和覆盖在上面。但是我将用代码来向你展示如何实现它。我假定你已经知道怎么设置一个UICollectionView了,如果没有,这里有一篇文章覆盖了全部的相关资源。
让我们开始吧。创建一个新的集合视图以及设置它的frame来充满整个屏幕。 让后用你的背景图片设置一个新的UIImageView并设为这个集合视图的backgroundView。
collectionView = [[UICollectionView alloc] initWithFrame:[[self view] bounds]];
// ... set delegate, datasource, etc.
[[self view] addSubview:collectionView];
[collectionView release];

// Set our "space" background image as the backgroundView.
UIImage *background = [UIImage imageNamed:@"space-background"];
UIImageView *backgroundView = [[UIImageView alloc] initWithImage:background];
[collectionView setBackgroundView:backgroundView];
[backgroundView release];
因为我们是通过代码来实现的,所以这里我们只需要这么一张图片即可。剩下的将用代码来实现。
下一步本质上是截背景的图,但仅仅是顶部的部分。我们可以使用CGImageCreateWithImageInRect来实现局部截图。这个函数将会从一张图片中意特定的矩形创建另一张图片。
// First get a reference to our background image
UIImage *background = [(id)[collectionView backgroundView] image];

// This is the rectangle of the image that the status bar is covering
// we also need to adjust it for scale.
CGRect barRect = CGRectMake(0.0f, 0.0f, 320.0f, 28.0f);
barRect.size.width *= [background scale];
barRect.size.height *= [background scale];

// Create an image from the barRect area and convert it to a UIImage
CGImageRef imageRef = CGImageCreateWithImageInRect([background CGImage], barRect);
UIImage *topImage = [UIImage imageWithCGImage:imageRef
                                    scale:[background scale]
                              orientation:UIImageOrientationUp];
CGImageRelease(imageRef);
如果你在 topImage那一行放置一个断点,你可以把鼠标放到上面来查看当前内存中的图片。

最后,我们需要用这张图片创建一个视图来放到集合视图上面,然后应用一个透明渐变遮罩给它。我们可以使用 CAGradientLayer,传递一个透明,一个不透明的颜色给它,而且通过startPoint endPoint来指定覆盖底部的一半。
// Create a gradient layer that goes transparent -> opaque
CAGradientLayer *alphaGradientLayer = [CAGradientLayer layer];
NSArray *colors = [NSArray arrayWithObjects:
               (id)[[UIColor colorWithWhite:0 alpha:0] CGColor],
               (id)[[UIColor colorWithWhite:0 alpha:1] CGColor],
               nil];
[alphaGradientLayer setColors:colors];

// Start the gradient at the bottom and go almost half way up.
[alphaGradientLayer setStartPoint:CGPointMake(0.0f, 1.0f)];
[alphaGradientLayer setEndPoint:CGPointMake(0.0f, 0.6f)];

// Create a image view for the topImage we created above and apply the mask
statusBarView = [[UIImageView alloc] initWithImage:topImage];
[alphaGradientLayer setFrame:[statusBarView bounds]];
[[statusBarView layer] setMask:alphaGradientLayer];

// Finally, add the masked image view on top of our collection view
[[self view] addSubview:statusBarView];
[statusBarView release];
这样就可以了。现在你运行你的应用,你将看到你的内容在上方绘模糊一些,你可以很方便地把这些代码应用到其它的应用中。
你可以在Github上找到完整的代码。