【RocketMQ 存储】ConsumeQueue 刷盘服务 FlushConsumeQueueService
文章目录
- 1. 前言
- 2. 为什么 ConsumeQueue 没有提交服务
- 3. FlushConsumeQueueService 刷盘服务
-
- 3.1 参数
- 3.2 run 方法
- 3.3 doFlush 方法刷盘
- 3.4 ConsumeQueue#flush 刷盘
- 3.5 MappedFileQueue#flush
- 4. 小结
本文章基于 RocketMQ 4.9.3
1. 前言
RocketMQ 存储部分系列文章:
- 【RocketMQ 存储】- RocketMQ存储类 MappedFile
- 【RocketMQ 存储】- 一文总结 RocketMQ 的存储结构-基础
- 【RocketMQ 存储】- broker 端存储单条消息的逻辑
- 【RocketMQ 存储】- broker 端存储批量消息的逻辑
- 【RocketMQ 存储】- 同步刷盘和异步刷盘
- 【RocketMQ 存储】- 同步刷盘服务 GroupCommitService
- 【RocketMQ 存储】- 异步刷盘服务 FlushRealTimeService
- 【RocketMQ 存储】- 异步提交服务 CommitRealTimeService
- 【RocketMQ 存储】RocketMQ 如何高效创建 MappedFile
- 【RocketMQ 存储】消息重放服务-ReputMessageService
- 【RocketMQ 存储】CommitLogDispatcherBuildConsumeQueue 构建 ConsumeQueue 索引
- 【RocketMQ 存储】CommitLogDispatcherBuildIndex 构建 IndexFile 索引
2. 为什么 ConsumeQueue 没有提交服务
ConsumeQueue 和 CommitLog 一样,最后都需要进行刷盘,但是和 CommitLog 不一样,ConsumeQueue 是不需要 commit 到 page cache,再 flush 刷盘的,因为 ConsumeQueue 在创建出来的时候并没有使用堆外缓存,我们来看下 ConsumeQueue 的构造器。
public ConsumeQueue(
    final String topic,
    final int queueId,
    final String storePath,
    final int mappedFileSize,
    final DefaultMessageStore defaultMessageStore) {
    // 存储路径(顶层路径),${home}/store/consumequeue
    this.storePath = storePath;
    // 单个文件大小,默认里面可以存储 30w 条数据,每一条数据是 20B
    this.mappedFileSize = mappedFileSize;
    // DefaultMessageStore
    this.defaultMessageStore = defaultMessageStore;

    // topic
    this.topic = topic;
    // 队列 id
    this.queueId = queueId;

    // 这个 ConsumeQueue 的具体路径 ${home}/store/consumequeue/${topic}/${queueId}/${fileName}
    String queueDir = this.storePath
        + File.separator + topic
        + File.separator + queueId;

    // ConsumeQueue 文件的具体存储,底层是一个 MappedFile 链表,一个文件是一个 MappedFile
    this.mappedFileQueue = new MappedFileQueue(queueDir, mappedFileSize, null);

    // 20 字节的 HeapByteBuffer,这个是一个临时的 ByteBuffer,当需要往 ConsumeQueue 中添加消息的时候会把消息临时存在 byteBufferIndex 中
    this.byteBufferIndex = ByteBuffer.allocate(CQ_STORE_UNIT_SIZE);

    // 判断是不是启动消息队列的扩展存储,默认是 false
    if (defaultMessageStore.getMessageStoreConfig().isEnableConsumeQueueExt()) {
        // ConsumeQueueExt 专门存储一些不太重要的消息,比如消息存储时间
        this.consumeQueueExt = new ConsumeQueueExt(
            topic,
            queueId,
            StorePathConfigHelper.getStorePathConsumeQueueExt(defaultMessageStore.getMessageStoreConfig().getStorePathRootDir()),
            defaultMessageStore.getMessageStoreConfig().getMappedFileSizeConsumeQueueExt(),
            defaultMessageStore.getMessageStoreConfig().getBitMapLengthConsumeQueueExt()
        );
    }
}
注意里面创建 MappedFileQueue 的逻辑。
// ConsumeQueue 文件的具体存储,底层是一个 MappedFile 链表,一个文件是一个 MappedFile
this.mappedFileQueue = new MappedFileQueue(queueDir, mappedFileSize, null);
这里面第三个参数是 allocateMappedFileService,这个参数就是用来创建 MappedFile 时提供堆外缓存的,还记得 MappedFile 在哪创建吗,我们回到创建 MappedFile 的服务 AllocateMappedFileService,AllocateMappedFileService 方法通过 putRequestAndReturnMappedFile 添加创建 MappedFile 请求,而调用这个方法的上层方法是MappedFileQueue#doCreateMappedFile,我们来看下这里的创建逻辑。
/**
 * 创建两个 MappedFile,对于 RocketMQ 会一次性创建两个 MappedFile,一个是同步创建用来返回本次使用,一个就是后台异步创建用于下次使用
 * @param nextFilePath       第一个文件
 * @param nextNextFilePath   第二个文件
 * @return
 */
protected MappedFile doCreateMappedFile(String nextFilePath, String nextNextFilePath) {
    MappedFile mappedFile = null;

    if (this.allocateMappedFileService != null) {
        // 这里提交创建 MappedFile 的请求到 requestTable 中,用于异步创建 MappedFile
        mappedFile = this.allocateMappedFileService.putRequestAndReturnMappedFile(nextFilePath,
                nextNextFilePath, this.mappedFileSize);
    } else {
        try {
            // 这里就是同步创建 nextFilePath
            mappedFile = new MappedFile(nextFilePath, this.mappedFileSize);
        } catch (IOException e) {
            log.error("create mappedFile exception", e);
        }
    }

    // 创建成功了
    if (mappedFile != null) {
        if (this.mappedFiles.isEmpty()) {
            // 看看是不是第一次创建 MappedFile,如果是就设置下标记位
            mappedFile.setFirstCreateInQueue(true);
        }
        // 把新建的 MappedFile 添加到 mappedFiles 列表中
        this.mappedFiles.add(mappedFile);
    }

    // 返回创建的 MappedFile
    return mappedFile;
}
可以看到这个方法里面判断如果 this.allocateMappedFileService 不为空才会提交创建请求到 AllocateMappedFileService 服务中,但是如果为空,就会直接同步创建,就是通过 new 的方式来创建。最终会调用到 MappedFile 的 init 方法。
/**
 * 初始化 MappedFile 的逻辑
 * @param fileName
 * @param fileSize
 * @throws IOException
 */
private void init(final String fileName, final int fileSize) throws IOException {
    // 文件名
    this.fileName = fileName;
    // 文件大小
    this.fileSize = fileSize;
    // 文件
    this.file = new File(fileName);
    // 文件起始偏移量,因为 MappedFile 文件名就是起始偏移量
    this.fileFromOffset = Long.parseLong(this.file.getName());
    boolean ok = false;
    // 确保文件所在的文件夹被创建出来
    ensureDirOK(this.file.getParent());

    try {
        // 配合 mappedByteBuffer 进行读写的文件通道
        this.fileChannel = new RandomAccessFile(this.file, "rw").getChannel();
        // 通过 mmap 映射出一块虚拟内存,映射的虚拟内存大小是 fileSize
        this.mappedByteBuffer = this.fileChannel.map(MapMode.READ_WRITE, 0, fileSize);
        // 总的映射的虚拟内存 + fileSize
        TOTAL_MAPPED_VIRTUAL_MEMORY.addAndGet(fileSize);
        // 总的 MappedFile 个数 + 1
        TOTAL_MAPPED_FILES.incrementAndGet();
        ok = true;
    } catch (FileNotFoundException e) {
        log.error("Failed to create file " + this.fileName, e);
        throw e;
    } catch (IOException e) {
        log.error("Failed to map file " + this.fileName, e);
        throw e;
    } finally {
        if (!ok && this.fileChannel != null) {
            // 这种就是有异常了,然后就关闭
            this.fileChannel.close();
        }
    }
}
在 init 方法中只会初始化 mappedByteBuffer,也就是说 ConsumeQueue 里面的消息都是直接通过 MappedByteBuffer 映射到 Page Cache 中的,所以不需要 commit,可以直接 flush 刷盘。
3. FlushConsumeQueueService 刷盘服务
3.1 参数
首先来看下这个类里面的结构,FlushConsumeQueueService 继承 ServiceThread,意味者这个服务也是一个线程。
class FlushConsumeQueueService extends ServiceThread {
	private static final int RETRY_TIMES_OVER = 3;
    private long lastFlushTimestamp = 0;

    ...
}
里面两个参数都比较熟悉了,在前面介绍 CommitLog 的提交和刷盘的时候参数基本都是差不多的,lastFlushTimestamp 是上一次刷盘的时间,RETRY_TIMES_OVER 不是重试次数,这个下面看代码再介绍。
3.2 run 方法
run 方法就是线程启动的逻辑,这里注意刷盘时间间隔是 1s,也就是说没有特殊情况下 1s 刷盘一次。waitForRunning 这个方法我之前讲解过了,就不多说,可以去看下前面的文章,或者主页直接搜 waitForRunning。
public void run() {
   DefaultMessageStore.log.info(this.getServiceName() + " service started");

   // 服务如果没有停止
   while (!this.isStopped()) {
       try {
           // 刷盘间隔 1s
           int interval = DefaultMessageStore.this.getMessageStoreConfig().getFlushIntervalConsumeQueue();
           this.waitForRunning(interval);
           // 刷盘
           this.doFlush(1);
       } catch (Exception e) {
           DefaultMessageStore.log.warn(this.getServiceName() + " service has exception. ", e);
       }
   }

   this.doFlush(RETRY_TIMES_OVER);

   DefaultMessageStore.log.info(this.getServiceName() + " service end");
}
当服务停止的时候,调用 doFlush 方法,传入 RETRY_TIMES_OVER 进行刷盘。
3.3 doFlush 方法刷盘
/**
* ConsumeQueue 刷盘服务,ConsumeQueue 是没有 commit 提交服务的,因为 ConsumeQueue 创建设置 MappedFileQueue 的时候
* 并没有设置 allocateMappedFileService,所以里面的 MappedFile 会在 MappedFileQueue#doCreateMappedFile 中通过
* new MappedFile(nextFilePath, this.mappedFileSize) 创建出来,也就是没有用到堆外缓存 writeBuffer,使用的是 MappedByteBuffer,
* 因此是不需要 commit,可以直接刷盘的
*/
class FlushConsumeQueueService extends ServiceThread {
   private static final int RETRY_TIMES_OVER = 3;
   private long lastFlushTimestamp = 0;

   private void doFlush(int retryTimes) {
       // 最小刷盘页,默认是 2
       int flushConsumeQueueLeastPages = DefaultMessageStore.this.getMessageStoreConfig().getFlushConsumeQueueLeastPages();

       // 算是一个标记吧,如果传的是 3,那么将最小刷盘页设置为 0,也就是说只要有脏数据就刷页
       if (retryTimes == RETRY_TIMES_OVER) {
           flushConsumeQueueLeastPages = 0;
       }

       long logicsMsgTimestamp = 0;

       // 刷盘最大时间间隔,默认 60s
       int flushConsumeQueueThoroughInterval = DefaultMessageStore.this.getMessageStoreConfig().getFlushConsumeQueueThoroughInterval();
       long currentTimeMillis = System.currentTimeMillis();
       // 如果当前时间距离上一次刷盘的时间超过了 60s,那么立刻开始刷盘
       if (currentTimeMillis >= (this.lastFlushTimestamp + flushConsumeQueueThoroughInterval)) {
           // 设置最新的刷盘时间
           this.lastFlushTimestamp = currentTimeMillis;
           // 设置最小刷盘页为 0,意思是只要有脏数据就能刷盘,不需要攒到 2 页才开始刷盘
           flushConsumeQueueLeastPages = 0;
           // 获取 StoreCheckpoint 中最新 ConsumeQueue 文件的最新刷盘时间戳
           logicsMsgTimestamp = DefaultMessageStore.this.getStoreCheckpoint().getLogicsMsgTimestamp();
       }

       // consumeQueueTable 队列集合,存储了 topic -> (queueId, ConsumeQueue) 的集合
       ConcurrentMap<String, ConcurrentMap<Integer, ConsumeQueue>> tables = DefaultMessageStore.this.consumeQueueTable;

       for (ConcurrentMap<Integer, ConsumeQueue> maps : tables.values()) {
           // 遍历所有 topic 下面的所有 ConsumeQueue
           for (ConsumeQueue cq : maps.values()) {
               boolean result = false;
               for (int i = 0; i < retryTimes && !result; i++) {
                   // 开始刷盘
                   result = cq.flush(flushConsumeQueueLeastPages);
               }
           }
       }

       // flushConsumeQueueLeastPages = 0 有两种情况
       // 1.当 FlushConsumeQueueService 停止的时候最后一次刷盘会设置为 0,表示剩下的脏数据全部刷盘
       // 2.当前刷盘时间距离上一次记录的刷盘时间超过了 60s
       if (0 == flushConsumeQueueLeastPages) {
           if (logicsMsgTimestamp > 0) {
               // 这里是第二种情况,会设置 StockCheckPoint 中 ConsumeQueue 文件的最新刷盘时间戳
               // 这里如果在刷盘期间有新数据写入,那么 logicsMsgTimestamp 会被修改,所以会提前记录 logicsMsgTimestamp
               // 刷盘后再赋值回去,也就是说在刷盘期间新写入的数据其实是没有导致这个变量更新的
               DefaultMessageStore.this.getStoreCheckpoint().setLogicsMsgTimestamp(logicsMsgTimestamp);
           }
           // 将 StockCheckPoint 中的几个最新的时间戳落盘
           DefaultMessageStore.this.getStoreCheckpoint().flush();
       }
   }
这个方法就是对 ConsumeQueue 进行刷盘的,来看下里面的逻辑。首先还是获取下最小刷盘页,如果外层传入的 retryTimes == RETRY_TIMES_OVER,那么将最小刷盘页设置为 0,意思就是只要有脏页就是刷盘,所以这里的逻辑分为两种情况:
- 服务没有停止的情况下,满足最小刷盘页才刷盘
- 服务停止的时候或者距离上一次刷盘超过了 60s,把剩余脏页罗盘
// 最小刷盘页,默认是 2
int flushConsumeQueueLeastPages = DefaultMessageStore.this.getMessageStoreConfig().getFlushConsumeQueueLeastPages();

// 算是一个标记吧,如果传的是 3,那么将最小刷盘页设置为 0,也就是说只要有脏数据就刷页
if (retryTimes == RETRY_TIMES_OVER) {
    flushConsumeQueueLeastPages = 0;
}
接着继续判断当前刷盘时间距离上一次刷盘距离了多久,如果超过了 60s,那么把最小脏页设置为 0,同时获取下StoreCheckpoint 中最新 ConsumeQueue 文件的最新刷盘时间戳。
// 刷盘最大时间间隔,默认 60s
int flushConsumeQueueThoroughInterval = DefaultMessageStore.this.getMessageStoreConfig().getFlushConsumeQueueThoroughInterval();
long currentTimeMillis = System.currentTimeMillis();
// 如果当前时间距离上一次刷盘的时间超过了 60s,那么立刻开始刷盘
if (currentTimeMillis >= (this.lastFlushTimestamp + flushConsumeQueueThoroughInterval)) {
   // 设置最新的刷盘时间
   this.lastFlushTimestamp = currentTimeMillis;
   // 设置最小刷盘页为 0,意思是只要有脏数据就能刷盘,不需要攒到 2 页才开始刷盘
   flushConsumeQueueLeastPages = 0;
   // 获取 StoreCheckpoint 中最新 ConsumeQueue 文件的最新刷盘时间戳
   logicsMsgTimestamp = DefaultMessageStore.this.getStoreCheckpoint().getLogicsMsgTimestamp();
}
logicsMsgTimestamp 是 StoreCheckpoint 中最新 ConsumeQueue 文件的最新消息提交的时间戳,用于启动恢复的。
这里还是要说一下,lastFlushTimestamp 是基本每 60s 记录一次,而我们这个服务是每 1s 跑一次,所以大家要记住这一点,不是说每跑一次 doFlush 方法就记录一下 lastFlushTimestamp。
刷盘方法里面需要对所有 ConsumeQueue 进行刷盘,如果说刷完所有盘之后,执行时间超过 60s 了,那么下一次执行的时候就会将 flushConsumeQueueLeastPages 设置为 0,意思是只要有脏页就刷盘,这样也是为了尽快刷盘,防止 doFlush 方法执行时间太久导致脏页越堆越多。
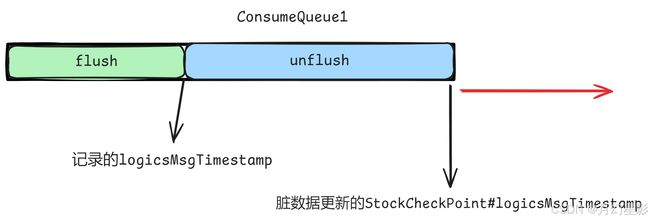
那么这里为什么又要记录下 logicsMsgTimestamp 呢?logicsMsgTimestamp 记录的是 ConsumeQueue 文件的最新消息提交的时间戳(这条索引在 Broker 端存储的时间戳),大家如果不知道这里是怎么设置的,可以去看消息重放服务的源码讲解,putMessagePositionInfoWrapper 就是在消息重放服务里面调用的,意思就是当调用 putMessagePositionInfoWrapper 方法往 ConsumeQueue 里面写入索引的时候,这里就会更新成写入的索引对应的消息在 Broker 端存储的时间戳。
这里记录 logicsMsgTimestamp 是因为在刷盘的时候,有可能会有消息继续往 ConsumeQueue 中写入,比如刷完 ConsumeQueue1,接下来刷盘 ConsumeQueue2,但是在刷盘 ConsumeQueue2 的时候可能有消息继续往 ConsumeQueue1 中写入,这部分数据没有刷盘的就是脏数据了,我们刚刚说过,消息往 ConsumeQueue 写入的时候,会修改 StockCheckPoint 中的这个值,而 RocketMQ 重启恢复的时候肯定要从已经刷盘的时间戳开始往前恢复,这些新的脏数据是不要的,所以这里就提前记录下 logicsMsgTimestamp,后面再设置回去,表示最新刷完盘的消息的时间戳。
long logicsMsgTimestamp = 0;

// 刷盘最大时间间隔,默认 60s
int flushConsumeQueueThoroughInterval = DefaultMessageStore.this.getMessageStoreConfig().getFlushConsumeQueueThoroughInterval();
long currentTimeMillis = System.currentTimeMillis();
// 如果当前时间距离上一次刷盘的时间超过了 60s,那么立刻开始刷盘
if (currentTimeMillis >= (this.lastFlushTimestamp + flushConsumeQueueThoroughInterval)) {
    // 设置最新的刷盘时间
    this.lastFlushTimestamp = currentTimeMillis;
    // 设置最小刷盘页为 0,意思是只要有脏数据就能刷盘,不需要攒到 2 页才开始刷盘
    flushConsumeQueueLeastPages = 0;
    // 获取 StoreCheckpoint 中最新 ConsumeQueue 文件的最新刷盘时间戳
    logicsMsgTimestamp = DefaultMessageStore.this.getStoreCheckpoint().getLogicsMsgTimestamp();
}
下面就要开始刷盘了,遍历所有 ConsumeQueueTable 集合,对所有的 topic 下面的所有 ConsumeQueue 进行刷盘。
// consumeQueueTable 队列集合,存储了 topic -> (queueId, ConsumeQueue) 的集合
ConcurrentMap<String, ConcurrentMap<Integer, ConsumeQueue>> tables = DefaultMessageStore.this.consumeQueueTable;

for (ConcurrentMap<Integer, ConsumeQueue> maps : tables.values()) {
    // 遍历所有 topic 下面的所有 ConsumeQueue
    for (ConsumeQueue cq : maps.values()) {
        boolean result = false;
        for (int i = 0; i < retryTimes && !result; i++) {
            // 开始刷盘
            result = cq.flush(flushConsumeQueueLeastPages);
        }
    }
}
下面刷盘之后,就判断要不要更新 logicsMsgTimestamp 以及需不需要对 StockCheckPoint 里面的几个时间戳进行刷盘。
if (0 == flushConsumeQueueLeastPages) {
   if (logicsMsgTimestamp > 0) {
       // 这里是第二种情况,会设置 StockCheckPoint 中 ConsumeQueue 文件的最新刷盘时间戳
       // 这里如果在刷盘期间有新数据写入,那么 logicsMsgTimestamp 会被修改,所以会提前记录 logicsMsgTimestamp
       // 刷盘后再赋值回去,也就是说在刷盘期间新写入的数据其实是没有导致这个变量更新的
       DefaultMessageStore.this.getStoreCheckpoint().setLogicsMsgTimestamp(logicsMsgTimestamp);
   }
   // 将 StockCheckPoint 中的几个最新的刷盘时间戳落盘
   DefaultMessageStore.this.getStoreCheckpoint().flush();
}
到这里我们可以总结下什么情况下会设置 flushConsumeQueueLeastPages 为 0
- 当
FlushConsumeQueueService服务停止了 - 当 当前时间距离上一次记录的
lastFlushTimestamp超过 60s
那么什么情况下 logicsMsgTimestamp 会大于 0 呢?
- 当 当前时间距离上一次记录的
lastFlushTimestamp超过 60s
所以我们就可以知道什么情况下会更新 StockCheckPoint 里面的 logicsMsgTimestamp 了
- 当 当前时间距离上一次记录的
lastFlushTimestamp超过 60s
而当 flushConsumeQueueLeastPages 为 0 的时候,会将 StockCheckPoint 中的几个最新的时间戳落盘。
当当前时间距离上一次记录 lastFlushTimestamp 没超过 60s,就是正常刷盘,然后退出。
3.4 ConsumeQueue#flush 刷盘
public boolean flush(final int flushLeastPages) {
    // ConsumeQueue 刷盘
    boolean result = this.mappedFileQueue.flush(flushLeastPages);
    if (isExtReadEnable()) {
        result = result & this.consumeQueueExt.flush(flushLeastPages);
    }

    return result;
}
3.5 MappedFileQueue#flush
这里就是刷盘逻辑了,其实这里 CommitLog 刷盘那里已经解析过了,所以这里就不详细说,直接给出代码。
/**
 * 刷盘逻辑
 * @param flushLeastPages
 * @return
 */
public boolean flush(final int flushLeastPages) {
    boolean result = true;
    // 首先根据刷到哪个位置了,去找到对应的 mappedFile
    // 如果 flushedWhere = 0,就表示还没有开始写入数据,这时候返回第一个文件
    MappedFile mappedFile = this.findMappedFileByOffset(this.flushedWhere, this.flushedWhere == 0);
    if (mappedFile != null) {
        // 存储时间
        long tmpTimeStamp = mappedFile.getStoreTimestamp();
        // 刷盘,这里返回结果判断逻辑如下
        // 1.如果没有使用读写分离,就获取 wrotePosition 的位置,就是 MappedByteBuffer 的 position
        // 2.如果使用了读写分离,就获取 committedPosition 的位置,因为使用读写分离,那么数据需要先写入
        //   堆外缓存,再刷盘,所以 committedPosition 就是写入堆外缓存的位置
        int offset = mappedFile.flush(flushLeastPages);
        // 因为一个 MappedFile 文件会映射一个 ByteBuffer,所以上面的 offset 在 MappedByteBuffer 中的偏移量
        // 而下面这个全局偏移量就是: mappedFile 的起始偏移量(文件名) + offset
        long where = mappedFile.getFileFromOffset() + offset;
        // result 就表示 flushedWhere 是不是最新的位点
        result = where == this.flushedWhere;
        // 更新 flushedWhere
        this.flushedWhere = where;
        if (0 == flushLeastPages) {
            // 如果最少刷盘页数为 0,就是说只要有数据就更新,那么更新存储时间戳
            // 如果最小刷盘页不为 0,就不会刷新这个参数
            this.storeTimestamp = tmpTimeStamp;
        }
    }

    return result;
}
4. 小结
好了,这里我们就介绍完 FlushConsumeQueueService 服务,这个服务里面就是专门对 ConsumeQueue 进行刷盘,同时更新 StockCheckPoint 里面的时间戳。要注意的是,FlushConsumeQueueService 里面的刷盘是对所有 ConsumeQueue 输盘,而不是单单对一个。
如有错误,欢迎指出!!!