- JSON 与 AJAX
Auscy
jsonajax前端
一、JSON(JavaScriptObjectNotation)1.数据类型与语法细节支持的数据类型:基本类型:字符串(需用双引号)、数字、布尔值(true/false)、null。复杂类型:数组([])、对象({})。严格语法规范:键名必须用双引号包裹(如"name":"张三")。数组元素用逗号分隔,最后一个元素后不能有多余逗号。数字不能以0开头(如012会被解析为12),不支持八进制/十六进制
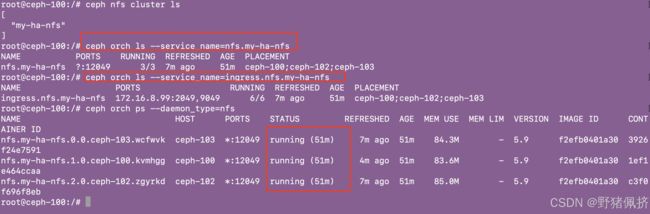
- k8s:安装 Helm 私有仓库ChartMuseum、helm-push插件并上传、安装Zookeeper
云游
dockerhelmhelm-push
ChartMuseum是Kubernetes生态中用于存储、管理和发布HelmCharts的开源系统,主要用于扩展Helm包管理器的功能核心功能集中存储:提供中央化仓库存储Charts,支持版本管理和权限控制。跨集群部署:支持多集群环境下共享Charts,简化部署流程。离线部署:适配无网络环境,可将Charts存储在本地或局域网内。HTTP接口:通过HTTP协议提供服务,用户
- JavaScript 树形菜单总结
Auscy
microsoft
树形菜单是前端开发中常见的交互组件,用于展示具有层级关系的数据(如文件目录、分类列表、组织架构等)。以下从核心概念、实现方式、常见功能及优化方向等方面进行总结。一、核心概念层级结构:数据以父子嵌套形式存在,如{id:1,children:[{id:2}]}。节点:树形结构的基本单元,包含自身信息及子节点(若有)。展开/折叠:子节点的显示与隐藏切换,是树形菜单的核心交互。递归渲染:因数据层级不固定,
- 精通Canvas:15款时钟特效代码实现指南
烟幕缭绕
本文还有配套的精品资源,点击获取简介:HTML5的Canvas是一个用于绘制矢量图形的API,通过JavaScript实现动态效果。本项目集合了15种不同的时钟特效代码,帮助开发者通过学习绘制圆形、线条、时间更新、旋转、颜色样式设置及动画效果等概念,深化对Canvas的理解和应用。项目中的CSS文件负责时钟的样式设定,而JS文件则包含实现各种特效的逻辑,通过不同的函数或类处理时间更新和动画绘制,提
- 深入剖析OpenJDK 18 GA源码:Java平台最新发展
想法臃肿
本文还有配套的精品资源,点击获取简介:OpenJDK18GA作为Java开发的关键里程碑,提供了诸多新特性和改进。本文章深入探讨了OpenJDK18GA源码,揭示其内部机制,帮助开发者更好地理解和利用这个版本。文章还涵盖了PatternMatching、SealedClasses、Records、JEP395、JEP406和JEP407等特性,以及HotSpot虚拟机、编译器、垃圾收集器、内存模型
- Java大厂面试实录:谢飞机的电商场景技术问答(Spring Cloud、MyBatis、Redis、Kafka、AI等)
Java大厂面试实录:谢飞机的电商场景技术问答(SpringCloud、MyBatis、Redis、Kafka、AI等)本文模拟知名互联网大厂Java后端岗位面试流程,以电商业务为主线,由严肃面试官与“水货”程序员谢飞机展开有趣的对话,涵盖SpringCloud、MyBatis、Redis、Kafka、SpringSecurity、AI等热门技术栈,并附详细解析,助力求职者备战大厂面试。故事设定谢
- 【超硬核】JVM源码解读:Java方法main在虚拟机上解释执行
HeapDump性能社区
java开发语言后端jvm
本文由HeapDump性能社区首席讲师鸠摩(马智)授权整理发布第1篇-关于Java虚拟机HotSpot,开篇说的简单点开讲Java运行时,这一篇讲一些简单的内容。我们写的主类中的main()方法是如何被Java虚拟机调用到的?在Java类中的一些方法会被由C/C++编写的HotSpot虚拟机的C/C++函数调用,不过由于Java方法与C/C++函数的调用约定不同,所以并不能直接调用,需要JavaC
- 算法学习笔记:17.蒙特卡洛算法 ——从原理到实战,涵盖 LeetCode 与考研 408 例题
在计算机科学和数学领域,蒙特卡洛算法(MonteCarloAlgorithm)以其独特的随机抽样思想,成为解决复杂问题的有力工具。从圆周率的计算到金融风险评估,从物理模拟到人工智能,蒙特卡洛算法都发挥着不可替代的作用。本文将深入剖析蒙特卡洛算法的思想、解题思路,结合实际应用场景与Java代码实现,并融入考研408的相关考点,穿插图片辅助理解,帮助你全面掌握这一重要算法。蒙特卡洛算法的基本概念蒙特卡
- (Python基础篇)字典的操作
EternityArt
基础篇python开发语言
一、引言在Python编程中,字典(Dictionary)是一种极具灵活性的数据结构,它通过“键-值对”(key-valuepair)的形式存储数据,如同现实生活中的字典——通过“词语(键)”快速查找“释义(值)”。相较于列表和元组的有序索引访问,字典的优势在于基于键的快速查找,这使得它在处理需要频繁通过唯一标识获取数据的场景中极为高效。掌握字典的操作,能让我们更高效地组织和管理复杂数据,是Pyt
- Java大厂面试故事:谢飞机的互联网音视频场景技术面试全纪录(Spring Boot、MyBatis、Kafka、Redis、AI等)
来旺
Java场景面试宝典JavaSpringBootMyBatisKafkaRedis微服务AI
Java大厂面试故事:谢飞机的互联网音视频场景技术面试全纪录(SpringBoot、MyBatis、Kafka、Redis、AI等)互联网大厂技术面试不仅考察技术深度,更注重业务场景与系统设计能力。本篇以严肃面试官与“水货”程序员谢飞机的对话,带你体验音视频业务场景下的Java面试全过程,涵盖主流技术栈,并附详细答案解析,助你面试无忧。故事场景设定谢飞机是一名有趣但技术基础略显薄弱的程序员,这次应
- 【前端】jQuery数组合并去重方法总结
在jQuery中合并多个数组并去重,推荐使用原生JavaScript的Set对象(高效简单)或$.unique()(仅适用于DOM元素,不适用于普通数组)。以下是完整解决方案:方法1:使用ES6Set(推荐)//定义多个数组constarr1=[1,2,3];constarr2=[2,3,4];constarr3=[3,4,5];//合并数组并用Set去重constmergedArray=[...
- php SPOF
贵哥的编程之路(热爱分享 为后来者)
PHP语言经典程序100题php开发语言
1.什么是单点故障(SPOF)?单点故障指的是系统中某个组件一旦失效,整个系统或服务就会不可用。常见的单点有:数据库、缓存、Web服务器、负载均衡、网络设备等。2.常见单点故障场景只有一台数据库服务器,宕机后所有业务不可用只有一台Redis缓存,挂掉后缓存全部失效只有一台Web服务器,挂掉后网站无法访问只有一个负载均衡节点,挂掉后流量无法分发只有一条网络链路,断开后所有服务失联3.消除单点故障的主
- php 高并发下日志量巨大,如何高效采集、存储、分析
贵哥的编程之路(热爱分享 为后来者)
PHP语言经典程序100题php开发语言
1.问题背景高并发系统每秒产生大量日志(如访问日志、错误日志、业务日志等)。单机写入、存储、分析能力有限,容易成为瓶颈。需要支持实时采集、分布式存储、快速检索与分析。2.主流架构方案一、分布式日志采集架构[应用服务器(PHP等)]|v[日志采集Agent(如Filebeat、Fluentd、Logstash)]|v[消息队列/缓冲(如Kafka、Redis、RabbitMQ)]|v[日志存储(如E
- Vue3+Vite+TS+Axios整合详细教程
老马聊技术
VueViteTSvue.js
1.Vite简介Vite是新一代的前端构建工具,在尤雨溪开发Vue3.0的时候诞生。类似于Webpack+Webpack-dev-server。其主要利用浏览器ESM特性导入组织代码,在服务器端按需编译返回,完全跳过了打包这个概念,服务器随起随用。生产中利用Rollup作为打包工具,号称下一代的前端构建工具。vite是一种新型的前端构建工具,能够显著的提升前端开发者的体验。它主要有俩部分组成:一个
- MySQL Explain 详解:从入门到精通,让你的 SQL 飞起来
引言:为什么Explain是SQL优化的“照妖镜”?在Java开发中,我们常常会遇到数据库性能瓶颈的问题。一条看似简单的SQL语句,在数据量增长到一定规模后,可能会从毫秒级响应变成秒级甚至分钟级响应,直接拖慢整个应用的性能。此时,你是否曾困惑于:为什么这条SQL突然变慢了?索引明明建了,为什么没生效?到底是哪里出了问题?答案就藏在MySQL的EXPLAIN命令里。EXPLAIN就像一面“照妖镜”,
- Java特性之设计模式【责任链模式】
Naijia_OvO
Java特性java设计模式责任链模式
一、责任链模式概述顾名思义,责任链模式(ChainofResponsibilityPattern)为请求创建了一个接收者对象的链。这种模式给予请求的类型,对请求的发送者和接收者进行解耦。这种类型的设计模式属于行为型模式在这种模式中,通常每个接收者都包含对另一个接收者的引用。如果一个对象不能处理该请求,那么它会把相同的请求传给下一个接收者,依此类推主要解决:职责链上的处理者负责处理请求,客户只需要将
- Linux操作系统磁盘管理
CZZDg
linux运维服务器
目录一.硬盘介绍1.硬盘的物理结构2.CHS编号3.磁盘存储划分4.开机流程5.要点6.磁盘存储数据的形式二.Linux文件系统1.根文件系统2.虚拟文件系统3.真文件系统4.伪文件系统三.磁盘分区与挂载1.磁盘分区方式2.分区命令3.查看与识别命令4.格式化命令5.挂载命令四.LVM逻辑卷1.概述2.管理命令五.磁盘配额1.概述usrquota:支持对用户的磁盘配额grpquota:支持对组的磁
- 日历插件-FullCalendar的详细使用
老马聊技术
JavaScript前端javascript
一、介绍FullCalendar是一个功能强大、高度可定制的JavaScript日历组件,用于在网页中显示和管理日历事件。它支持多种视图(月、周、日等),可以轻松集成各种框架,并提供丰富的事件处理功能。二、实操案例具体代码如下:FullCalendar日期选择body{font-family:Arial,sans-serif;margin:20px;}#calendar{max-width:900
- 基于Python的健身数据分析工具的搭建流程day1
weixin_45677320
python开发语言数据挖掘爬虫
基于Python的健身数据分析工具的搭建流程分数据挖掘、数据存储和数据分析三个步骤。本文主要介绍利用Python实现健身数据分析工具的数据挖掘部分。第一步:加载库加载本文需要的库,如下代码所示。若库未安装,请按照python如何安装各种库(保姆级教程)_python安装库-CSDN博客https://blog.csdn.net/aobulaien001/article/details/133298
- 小林渗透入门:burpsuite+proxifier抓取小程序流量
ξ流ぁ星ぷ132
小程序web安全安全性测试网络安全安全
目录前提:代理:proxifier:步骤:bp证书安装bp设置代理端口:proxifier设置规则:proxifier应用规则:结果:前提:在介绍这两个工具具体实现方法之前,有个很重要的技术必须要大概了解才行---代理。代理:个人觉得代理,简而言之,就是在你和服务器中间的一个中间人,来转达信息。那为什么要代理呢,因为这里的burpsuite要抓包,burpsuite只有做为中间代理人才可以进行拦截
- react-native android 环境搭建
环境:macjava版本:Java11最重要:一定要一定要一定要react涉及到很多的依赖下载,gradle和react相关的,第一次安装环境时有外网环境会快速很多。安装nodejs安装react-nativenpminstallreact-native-clinpminstallreact-native创建一个新项目react-nativeinitfirstReact替换gradle下载源rep
- Java 调用 HTTP 接口的 7 种方式:全网最全指南
Java调用HTTP接口的7种方式:全网最全指南在开发过程中,调用HTTP接口是最常见的需求之一。本文将详细介绍Java中7种主流的调用HTTP接口的方式,包括每种工具的优缺点和完整代码实现。1.使用RestTemplateRestTemplate是Spring提供的同步HTTP客户端,适用于传统项目。尽管从Spring5开始被标记为过时,它仍然是许多开发者的首选。示例代码importorg.sp
- 【目标检测】机场内部目标检测数据集4106张YOLO+VOC格式
数据集格式:VOC格式+YOLO格式压缩包内含:3个文件夹,分别存储图片、xml、txt文件JPEGImages文件夹中jpg图片总计:4106Annotations文件夹中xml文件总计:4106labels文件夹中txt文件总计:4106标签种类数:7标签名称:["Ground_vehicles","Horizontal_sign","Runaway_limit","Taxiway","Ver
- Java三年经验程序员技术栈全景指南:从前端到架构,对标阿里美团全栈要求
可曾去过倒悬山
java前端架构
Java三年经验程序员技术栈全景指南:从前端到架构,对标阿里美团全栈要求三年经验是Java程序员的分水岭,技术栈深度决定你成为“业务码农”还是“架构师候选人”。本文整合阿里、美团、滴滴等大厂招聘要求,为你绘制可落地的进阶路线。一、Java核心:从语法糖到JVM底层三年经验与初级的核心差异在于系统级理解,大厂面试常考以下能力:JVM与性能调优内存模型(堆外内存、元空间)、GC算法(G1/ZGC适用场
- docker0网卡没有ip一步解决
ξ流ぁ星ぷ132
tcp/ip网络服务器
正常查看ip的时候一直显示没有ip这里先删除docker0网卡iplinkdeletedocker0然后重启服务systemctlrestartdocker再次查看显示有ip了并且查看配置文件也是正常的cat/etc/docker/daemon.json{"registry-mirrors":["https://docker.m.daocloud.io","https://docker.imgdb
- javascript高级程序设计第3版——第12章 DOM2与DOM3
weixin_30687587
javascript数据结构与算法ViewUI
12章——DOM2与DOM3为了增强D0M1,DOM级规范定义了一些模块。DOM2核心:为不同的DOM类型引入了一些与XML命名空间有关的方法,还定义了以编程方式创建Document实例的方法;DOM2级样式:针对操作元素的样式而开发;其特性总结:1.每个元素都有一个关联的style对象,可用来确定和修改行内样式;2.要确定某个元素的计算样式,可使用getComgetComputedStyle()
- Java设计模式实战:高频场景解析与避坑指南
mckim_
笔记学习java设计模式
引言设计模式是软件开发的基石,但许多开发者面对23种模式时容易陷入“学完就忘”或“滥用模式”的困境。本文从工业级项目视角出发,精选10种高频设计模式,结合真实代码案例与主流框架应用,帮你建立模式思维,拒绝纸上谈兵。一、创建型模式:告别new的暴力美学1.工厂方法模式(FactoryMethod)核心痛点:对象创建逻辑散落各处,难以统一管理。场景案例:电商平台需要支持多种支付方式(支付宝、微信、银联
- JavaScript 基础09:Web APIs——日期对象、DOM节点
梦想当全栈
JavaScriptjavascript前端开发语言
JavaScript基础09:WebAPIs——日期对象、DOM节点进一步学习DOM相关知识,实现可交互的网页特效能够插入、删除和替换元素节点。能够依据元素节点关系查找节点。一、日期对象掌握Date日期对象的使用,动态获取当前计算机的时间。ECMAScript中内置了获取系统时间的对象Date,使用Date时与之前学习的内置对象console和Math不同,它需要借助new关键字才能使用。1.实例
- 系统迁移从CentOS7.9到Rocky8.9
我有两台阿里云上的服务器是CentOS7.9,由于CentOS7已经停止支持,后续使用的话会有安全漏洞,所以需要尽快迁移,个人使用的话目前兼容性好的还是RockyLinux8,很多脚本改改就能用了。一、盘点系统和迁移应用查看当前系统发行版版本cat/etc/os-release盘点迁移清单服务器应用部署方式docker镜像来源v1wordpressdockerdockerhubv1zdirdock
- 《Java前端开发全栈指南:从Servlet到现代框架实战》
前言在当今Web开发领域,Java依然是后端开发的主力语言,而随着前后端分离架构的普及,Java开发者也需要掌握前端技术栈。本文将全面介绍JavaWeb前端开发的核心技术,包括传统Servlet/JSP体系、现代前端框架集成方案,以及全栈开发的最佳实践。通过本文,您将了解如何构建现代化的JavaWeb应用前端界面。一、JavaWeb前端技术演进1.1传统技术栈Servlet:JavaWeb基础,处
- 强大的销售团队背后 竟然是大数据分析的身影
蓝儿唯美
数据分析
Mark Roberge是HubSpot的首席财务官,在招聘销售职位时使用了大量数据分析。但是科技并没有挤走直觉。
大家都知道数理学家实际上已经渗透到了各行各业。这些热衷数据的人们通过处理数据理解商业流程的各个方面,以重组弱点,增强优势。
Mark Roberge是美国HubSpot公司的首席财务官,HubSpot公司在构架集客营销现象方面出过一份力——因此他也是一位数理学家。他使用数据分析
- Haproxy+Keepalived高可用双机单活
bylijinnan
负载均衡keepalivedhaproxy高可用
我们的应用MyApp不支持集群,但要求双机单活(两台机器:master和slave):
1.正常情况下,只有master启动MyApp并提供服务
2.当master发生故障时,slave自动启动本机的MyApp,同时虚拟IP漂移至slave,保持对外提供服务的IP和端口不变
F5据说也能满足上面的需求,但F5的通常用法都是双机双活,单活的话还没研究过
服务器资源
10.7
- eclipse编辑器中文乱码问题解决
0624chenhong
eclipse乱码
使用Eclipse编辑文件经常出现中文乱码或者文件中有中文不能保存的问题,Eclipse提供了灵活的设置文件编码格式的选项,我们可以通过设置编码 格式解决乱码问题。在Eclipse可以从几个层面设置编码格式:Workspace、Project、Content Type、File
本文以Eclipse 3.3(英文)为例加以说明:
1. 设置Workspace的编码格式:
Windows-&g
- 基础篇--resources资源
不懂事的小屁孩
android
最近一直在做java开发,偶尔敲点android代码,突然发现有些基础给忘记了,今天用半天时间温顾一下resources的资源。
String.xml 字符串资源 涉及国际化问题
http://www.2cto.com/kf/201302/190394.html
string-array
- 接上篇补上window平台自动上传证书文件的批处理问卷
酷的飞上天空
window
@echo off
: host=服务器证书域名或ip,需要和部署时服务器的域名或ip一致 ou=公司名称, o=公司名称
set host=localhost
set ou=localhost
set o=localhost
set password=123456
set validity=3650
set salias=s
- 企业物联网大潮涌动:如何做好准备?
蓝儿唯美
企业
物联网的可能性也许是无限的。要找出架构师可以做好准备的领域然后利用日益连接的世界。
尽管物联网(IoT)还很新,企业架构师现在也应该为一个连接更加紧密的未来做好计划,而不是跟上闸门被打开后的集成挑战。“问题不在于物联网正在进入哪些领域,而是哪些地方物联网没有在企业推进,” Gartner研究总监Mike Walker说。
Gartner预测到2020年物联网设备安装量将达260亿,这些设备在全
- spring学习——数据库(mybatis持久化框架配置)
a-john
mybatis
Spring提供了一组数据访问框架,集成了多种数据访问技术。无论是JDBC,iBATIS(mybatis)还是Hibernate,Spring都能够帮助消除持久化代码中单调枯燥的数据访问逻辑。可以依赖Spring来处理底层的数据访问。
mybatis是一种Spring持久化框架,要使用mybatis,就要做好相应的配置:
1,配置数据源。有很多数据源可以选择,如:DBCP,JDBC,aliba
- Java静态代理、动态代理实例
aijuans
Java静态代理
采用Java代理模式,代理类通过调用委托类对象的方法,来提供特定的服务。委托类需要实现一个业务接口,代理类返回委托类的实例接口对象。
按照代理类的创建时期,可以分为:静态代理和动态代理。
所谓静态代理: 指程序员创建好代理类,编译时直接生成代理类的字节码文件。
所谓动态代理: 在程序运行时,通过反射机制动态生成代理类。
一、静态代理类实例:
1、Serivce.ja
- Struts1与Struts2的12点区别
asia007
Struts1与Struts2
1) 在Action实现类方面的对比:Struts 1要求Action类继承一个抽象基类;Struts 1的一个具体问题是使用抽象类编程而不是接口。Struts 2 Action类可以实现一个Action接口,也可以实现其他接口,使可选和定制的服务成为可能。Struts 2提供一个ActionSupport基类去实现常用的接口。即使Action接口不是必须实现的,只有一个包含execute方法的P
- 初学者要多看看帮助文档 不要用js来写Jquery的代码
百合不是茶
jqueryjs
解析json数据的时候需要将解析的数据写到文本框中, 出现了用js来写Jquery代码的问题;
1, JQuery的赋值 有问题
代码如下: data.username 表示的是: 网易
$("#use
- 经理怎么和员工搞好关系和信任
bijian1013
团队项目管理管理
产品经理应该有坚实的专业基础,这里的基础包括产品方向和产品策略的把握,包括设计,也包括对技术的理解和见识,对运营和市场的敏感,以及良好的沟通和协作能力。换言之,既然是产品经理,整个产品的方方面面都应该能摸得出门道。这也不懂那也不懂,如何让人信服?如何让自己懂?就是不断学习,不仅仅从书本中,更从平时和各种角色的沟通
- 如何为rich:tree不同类型节点设置右键菜单
sunjing
contextMenutreeRichfaces
组合使用target和targetSelector就可以啦,如下: <rich:tree id="ruleTree" value="#{treeAction.ruleTree}" var="node" nodeType="#{node.type}"
selectionChangeListener=&qu
- 【Redis二】Redis2.8.17搭建主从复制环境
bit1129
redis
开始使用Redis2.8.17
Redis第一篇在Redis2.4.5上搭建主从复制环境,对它的主从复制的工作机制,真正的惊呆了。不知道Redis2.8.17的主从复制机制是怎样的,Redis到了2.4.5这个版本,主从复制还做成那样,Impossible is nothing! 本篇把主从复制环境再搭一遍看看效果,这次在Unbuntu上用官方支持的版本。 Ubuntu上安装Red
- JSONObject转换JSON--将Date转换为指定格式
白糖_
JSONObject
项目中,经常会用JSONObject插件将JavaBean或List<JavaBean>转换为JSON格式的字符串,而JavaBean的属性有时候会有java.util.Date这个类型的时间对象,这时JSONObject默认会将Date属性转换成这样的格式:
{"nanos":0,"time":-27076233600000,
- JavaScript语言精粹读书笔记
braveCS
JavaScript
【经典用法】:
//①定义新方法
Function .prototype.method=function(name, func){
this.prototype[name]=func;
return this;
}
//②给Object增加一个create方法,这个方法创建一个使用原对
- 编程之美-找符合条件的整数 用字符串来表示大整数避免溢出
bylijinnan
编程之美
import java.util.LinkedList;
public class FindInteger {
/**
* 编程之美 找符合条件的整数 用字符串来表示大整数避免溢出
* 题目:任意给定一个正整数N,求一个最小的正整数M(M>1),使得N*M的十进制表示形式里只含有1和0
*
* 假设当前正在搜索由0,1组成的K位十进制数
- 读书笔记
chengxuyuancsdn
读书笔记
1、Struts访问资源
2、把静态参数传递给一个动作
3、<result>type属性
4、s:iterator、s:if c:forEach
5、StringBuilder和StringBuffer
6、spring配置拦截器
1、访问资源
(1)通过ServletActionContext对象和实现ServletContextAware,ServletReque
- [通讯与电力]光网城市建设的一些问题
comsci
问题
信号防护的问题,前面已经说过了,这里要说光网交换机与市电保障的关系
我们过去用的ADSL线路,因为是电话线,在小区和街道电力中断的情况下,只要在家里用笔记本电脑+蓄电池,连接ADSL,同样可以上网........
- oracle 空间RESUMABLE
daizj
oracle空间不足RESUMABLE错误挂起
空间RESUMABLE操作 转
Oracle从9i开始引入这个功能,当出现空间不足等相关的错误时,Oracle可以不是马上返回错误信息,并回滚当前的操作,而是将操作挂起,直到挂起时间超过RESUMABLE TIMEOUT,或者空间不足的错误被解决。
这一篇简单介绍空间RESUMABLE的例子。
第一次碰到这个特性是在一次安装9i数据库的过程中,在利用D
- 重构第一次写的线程池
dieslrae
线程池 python
最近没有什么学习欲望,修改之前的线程池的计划一直搁置,这几天比较闲,还是做了一次重构,由之前的2个类拆分为现在的4个类.
1、首先是工作线程类:TaskThread,此类为一个工作线程,用于完成一个工作任务,提供等待(wait),继续(proceed),绑定任务(bindTask)等方法
#!/usr/bin/env python
# -*- coding:utf8 -*-
- C语言学习六指针
dcj3sjt126com
c
初识指针,简单示例程序:
/*
指针就是地址,地址就是指针
地址就是内存单元的编号
指针变量是存放地址的变量
指针和指针变量是两个不同的概念
但是要注意: 通常我们叙述时会把指针变量简称为指针,实际它们含义并不一样
*/
# include <stdio.h>
int main(void)
{
int * p; // p是变量的名字, int *
- yii2 beforeSave afterSave beforeDelete
dcj3sjt126com
delete
public function afterSave($insert, $changedAttributes)
{
parent::afterSave($insert, $changedAttributes);
if($insert) {
//这里是新增数据
} else {
//这里是更新数据
}
}
- timertask
shuizhaosi888
timertask
java.util.Timer timer = new java.util.Timer(true);
// true 说明这个timer以daemon方式运行(优先级低,
// 程序结束timer也自动结束),注意,javax.swing
// 包中也有一个Timer类,如果import中用到swing包,
// 要注意名字的冲突。
TimerTask task = new
- Spring Security(13)——session管理
234390216
sessionSpring Security攻击保护超时
session管理
目录
1.1 检测session超时
1.2 concurrency-control
1.3 session 固定攻击保护
- 公司项目NODEJS实践0.3[ mongo / session ...]
逐行分析JS源代码
mongodbsessionnodejs
http://www.upopen.cn
一、前言
书接上回,我们搭建了WEB服务端路由、模板等功能,完成了register 通过ajax与后端的通信,今天主要完成数据与mongodb的存取,实现注册 / 登录 /
- pojo.vo.po.domain区别
LiaoJuncai
javaVOPOJOjavabeandomain
POJO = "Plain Old Java Object",是MartinFowler等发明的一个术语,用来表示普通的Java对象,不是JavaBean, EntityBean 或者 SessionBean。POJO不但当任何特殊的角色,也不实现任何特殊的Java框架的接口如,EJB, JDBC等等。
即POJO是一个简单的普通的Java对象,它包含业务逻辑
- Windows Error Code
OhMyCC
windows
0 操作成功完成.
1 功能错误.
2 系统找不到指定的文件.
3 系统找不到指定的路径.
4 系统无法打开文件.
5 拒绝访问.
6 句柄无效.
7 存储控制块被损坏.
8 存储空间不足, 无法处理此命令.
9 存储控制块地址无效.
10 环境错误.
11 试图加载格式错误的程序.
12 访问码无效.
13 数据无效.
14 存储器不足, 无法完成此操作.
15 系
- 在storm集群环境下发布Topology
roadrunners
集群stormtopologyspoutbolt
storm的topology设计和开发就略过了。本章主要来说说如何在storm的集群环境中,通过storm的管理命令来发布和管理集群中的topology。
1、打包
打包插件是使用maven提供的maven-shade-plugin,详细见maven-shade-plugin。
<plugin>
<groupId>org.apache.maven.
- 为什么不允许代码里出现“魔数”
tomcat_oracle
java
在一个新项目中,我最先做的事情之一,就是建立使用诸如Checkstyle和Findbugs之类工具的准则。目的是制定一些代码规范,以及避免通过静态代码分析就能够检测到的bug。 迟早会有人给出案例说这样太离谱了。其中的一个案例是Checkstyle的魔数检查。它会对任何没有定义常量就使用的数字字面量给出警告,除了-1、0、1和2。 很多开发者在这个检查方面都有问题,这可以从结果
- zoj 3511 Cake Robbery(线段树)
阿尔萨斯
线段树
题目链接:zoj 3511 Cake Robbery
题目大意:就是有一个N边形的蛋糕,切M刀,从中挑选一块边数最多的,保证没有两条边重叠。
解题思路:有多少个顶点即为有多少条边,所以直接按照切刀切掉点的个数排序,然后用线段树维护剩下的还有哪些点。
#include <cstdio>
#include <cstring>
#include <vector&