Linux的I2C总线的原理和结构详解
Linux的I2C总线的原理和结构讲解
我前面基本已经吃透了Platform总线,关于Platform总线的原理和结构,详情见下面三篇博文:
https://blog.csdn.net/wenhao_ir/article/details/145023181
https://blog.csdn.net/wenhao_ir/article/details/145018442
https://blog.csdn.net/wenhao_ir/article/details/145030037
在Platform总线中,三个重点是匹配规则(总线的match函数)、platform_device结构体、platform_driver结构体。关于 Platform总线不错的视频总结回顾讲解,请百度网盘搜索“1-3_03_SPI总线设备驱动”,然后从头开始看。
在Linux的I2C总线中,其实重点也是类似的三点,即I2C的match机制、i2c_client结构体、i2c_driver结构体,与Platform总线不同的是,在Platform总线中,总线是一个虚拟的总线概念,而在Linux的I2C总线结构中,总线是实实在在的,I2C本来就是一个物理总线嘛,它上面可以外挂很多I2C设备。我们可以利用Linux的I2C总线为这些外挂的I2C设备也提供上相应的驱动,这样上层应用就可以不用再去像博文 https://blog.csdn.net/wenhao_ir/article/details/146361457 中那样,还需要在用户空间去操作I2C控制器去直接操作硬件,而是直接用相应的驱动程序就可以调用相应的I2C设备了。
Linux的I2C总线的结构原理图如下:
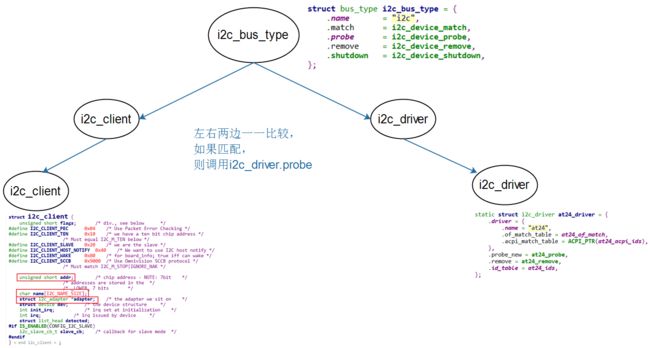
关于Linux的I2C总线的结构原理的详细介绍,请百度网盘搜索“1-8_4-8_I2C系统驱动程序模型”,然后从05分45秒开始看。这里就不再赘述了,因为只要吃透了Platform总线,那么理解Linux的I2C总线是很简单的。
i2c_driver的Demo实现(仅框架)
i2c_driver的Demo实现源码
#include i2c_driver的Demo实现源码分析
因为前面基本已经吃透了Platform总线,所以看这段源码是非常轻松的,不过为了将来能快速回顾,还是用chatgpt生成分析吧。
这段代码是一个 Linux I2C 设备驱动的简单示例,它实现了一个 I2C 驱动框架,并注册到了 I2C 总线。下面是对该驱动的详细分析:
代码结构分析
该驱动实现了以下主要功能:
-
匹配设备:
- 使用
of_device_id结构体支持设备树匹配。 - 使用
i2c_device_id结构体支持传统的 I2C 设备 ID 匹配。
- 使用
-
驱动核心函数:
probe_new(即probe)函数:当匹配到 I2C 设备时调用,用于设备初始化。remove函数:当设备被移除时调用,用于释放资源。
-
驱动注册:
i2c_add_driver()注册驱动。i2c_del_driver()注销驱动。
详细分析
1. 设备树匹配表
static const struct of_device_id of_match_ids_example[] = {
    { .compatible = "com_name,chip_name" },
    { /* END OF LIST */ }
};
- 这个表用于设备树匹配,当
compatible属性匹配时,设备就会与该驱动匹配。 "com_name,chip_name"是设备树中的compatible属性,格式一般为"厂商名,芯片名"。
2. 设备 ID 匹配表
static const struct i2c_device_id example_ids[] = {
    { "chip_name", 0 },
    { /* END OF LIST */ }
};
- 用于不依赖设备树的传统 I2C 设备匹配机制。
example_ids(即i2c_device_id结构体数组)用于匹配i2c_client结构体中的name字段。i2c_client结构体的定义在include/linux/i2c.h中,关键部分如下:
其中,struct i2c_client { char name[I2C_NAME_SIZE]; // 设备名称 const struct i2c_device_id *id; struct device dev; ... };name是 I2C 设备的名称,用于驱动匹配。"chip_name"与i2c_client结构体中的name字段相同,即可匹配成功。
3. probe 函数
static int i2c_driver_example_probe(struct i2c_client *client)
{
    return 0;
}
probe在设备匹配成功后被调用,一般在这里进行硬件初始化,比如:- 读取 I2C 设备寄存器
- 申请资源(GPIO、中断等)
- 注册设备节点(
devm_*API)
- 这里返回
0,意味着它什么也没做,仅仅是个框架。
4. remove 函数
static int i2c_driver_example_remove(struct i2c_client *client)
{
    return 0;
}
- 当驱动被卸载或者设备被移除时,
remove被调用,用于释放probe里申请的资源。 - 这里同样没有实际操作,通常需要:
- 释放申请的资源(GPIO、中断等)
- 注销子设备或文件系统接口
5. I2C 驱动结构体
static struct i2c_driver i2c_example_driver = {
    .driver = {
        .name = "example",
        .of_match_table = of_match_ids_example,
    },
    .probe_new = i2c_driver_example_probe,
    .remove = i2c_driver_example_remove,
    .id_table = example_ids,
};
driver.name:用于 sysfs 和日志中标识该驱动,这个名字也可用来用i2c_client进行匹配。of_match_table:绑定设备树匹配表。probe_new:新的probeAPI,建议使用probe_new而不是probe。remove:移除设备时调用。id_table:传统 I2C 设备 ID 匹配表。
6. 驱动初始化和注销
static int __init i2c_driver_example_init(void)
{
    return i2c_add_driver(&i2c_example_driver);
}

static void __exit i2c_driver_example_exit(void)
{
    i2c_del_driver(&i2c_example_driver);
}
i2c_add_driver():将驱动注册到 I2C 子系统。i2c_del_driver():从 I2C 子系统移除驱动。
7. 模块声明
module_init(i2c_driver_example_init);
module_exit(i2c_driver_example_exit);

MODULE_AUTHOR("suwenhao");
MODULE_LICENSE("GPL");
module_init()和module_exit()设定了驱动的加载和卸载函数。MODULE_LICENSE("GPL")指明许可证,防止内核报taint(污染)警告。
问:i2c_driver中并没有指定是哪条I2C总线,那么它怎么知道操作哪条I2C总线?
答案很简单,因为在i2c_client中会含有I2C设备挂接于哪条I2C总线的信息啦。你往这篇博文后面看i2c_client的实现就知道了。
i2c_client的实现
i2c_client的实现有三种方式,分别为直接使用echo命令创建、利用代码实现、利用设备树生成,详情见 https://blog.csdn.net/wenhao_ir/article/details/146417363 【搜索“i2c_client的实现和生成”】