【模型部署】使用onnxruntime部署yolo11n,提供fastapi接口
文章目录
-
- 背景
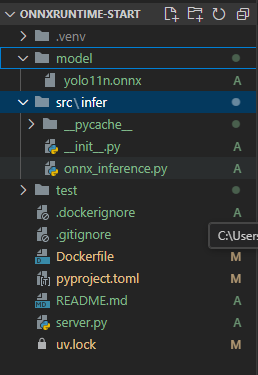
- 目录结构
-
- server.py
- onnx_inference.py
- Dockerfile文件编写
- docker镜像构建
- 运行并测试
背景
triton太臃肿,所以选择onnxruntime进行yolo模型部署,fastapi提供http接口调用。
目录结构
server.py
from fastapi import FastAPI, UploadFile, File, HTTPException
from fastapi.middleware.cors import CORSMiddleware
from PIL import Image
import io,os
from typing import List, Dict, Union
from pydantic import BaseModel
from src.infer.onnx_inference import YOLOv8ONNXInference

class DetectionResult(BaseModel):
    box: List[int]
    score: float
    class_id: int
    class_name: str

class APIResponse(BaseModel):
    code: int
    data: Union[List[DetectionResult], None] = None
    message: Union[str, None] = None

app = FastAPI(title="YOLOv8 Object Detection API")

# 允许跨域请求(根据需求配置)
app.add_middleware(
    CORSMiddleware,
    allow_origins=["*"],
    allow_methods=["*"],
    allow_headers=["*"],
)

# 在启动时加载模型
yolo_detector = YOLOv8ONNXInference(
        model_path=os.path.join("model", "yolo11n.onnx"),
        conf_thresh=0.25,
        iou_thresh=0.45
    )

# 执行预测
@app.post("/detect",
         response_model=APIResponse,
         summary="物体检测接口",
         description="上传图片进行YOLOv8物体检测")
async def detect_objects(
    file: UploadFile = File(..., description="需要检测的图片文件")
):
    # 验证文件类型
    if not file.content_type.startswith("image/"):
        return {"code": 500, "message": "仅支持图片文件上传"}

    try:
        # 读取图片内容
        contents = await file.read()
        image = Image.open(io.BytesIO(contents)).convert("RGB")

        # 执行预测
        results = yolo_detector.predict(image)
        return {"code": 200, "data": results}

    except Exception as e:
        return {"code": 500, "message": f"处理失败: {str(e)}"}

if __name__ == "__main__":
    import uvicorn
    uvicorn.run(app, host="0.0.0.0", port=8000)
onnx_inference.py
from PIL import Image,  ImageDraw, ImageFont
import numpy as np
import onnxruntime
import os

class YOLOv8ONNXInference:
    def __init__(self, model_path, target_size=640, conf_thresh=0.5, iou_thresh=0.5):
        self.target_size = target_size
        self.conf_thresh = conf_thresh
        self.iou_thresh = iou_thresh

        # 初始化 ONNX Runtime
        self.session = onnxruntime.InferenceSession(model_path,
                                                   providers=['CPUExecutionProvider'])
        self.input_name = self.session.get_inputs()[0].name
        self.output_names = [output.name for output in self.session.get_outputs()]

        # 获取类别标签(示例使用 COCO 80 类)
        self.class_names = [
            'person', 'bicycle', 'car', 'motorcycle', 'airplane', 'bus', 'train', 'truck', 'boat',
                                'traffic light', 'fire hydrant', 'stop sign', 'parking meter', 'bench', 'bird', 'cat',
                                'dog', 'horse', 'sheep', 'cow', 'elephant', 'bear', 'zebra', 'giraffe', 'backpack',
                                'umbrella', 'handbag', 'tie', 'suitcase', 'frisbee', 'skis', 'snowboard', 'sports ball',
                                'kite', 'baseball bat', 'baseball glove', 'skateboard', 'surfboard', 'tennis racket',
                                'bottle', 'wine glass', 'cup', 'fork', 'knife', 'spoon', 'bowl', 'banana', 'apple',
                                'sandwich', 'orange', 'broccoli', 'carrot', 'hot dog', 'pizza', 'donut', 'cake', 'chair',
                                'couch', 'potted plant', 'bed', 'dining table', 'toilet', 'tv', 'laptop', 'mouse', 'remote',
                                'keyboard', 'cell phone', 'microwave', 'oven', 'toaster', 'sink', 'refrigerator', 'book',
            'clock', 'vase', 'scissors', 'teddy bear', 'hair drier', 'toothbrush'
        ]  # 替换为实际类别列表

    def preprocess(self, img):
        """ 使用 PIL 实现预处理,返回归一化后的张量 """
        orig_w, orig_h = img.size  # 原始尺寸
        scale = min(self.target_size / orig_h, self.target_size / orig_w)
        new_w, new_h = int(orig_w * scale), int(orig_h * scale)

        # 缩放并转换为数组
        resized = img.resize((new_w, new_h), Image.BILINEAR)
        resized_arr = np.array(resized)  # (H, W, 3)

        # 计算填充
        dw = self.target_size - new_w
        dh = self.target_size - new_h
        top, bottom = dh // 2, dh - (dh // 2)
        left, right = dw // 2, dw - (dw // 2)

        # 创建填充画布
        padded = np.full((self.target_size, self.target_size, 3), 114, dtype=np.uint8)
        padded[top:top+new_h, left:left+new_w] = resized_arr

        # 转换为模型输入格式
        input_tensor = padded.astype(np.float32) / 255.0
        input_tensor = input_tensor.transpose(2, 0, 1)[np.newaxis, ...]  # (1,3,640,640)

        # 保存预处理参数用于后处理
        self.meta = {
            'original_shape': (orig_h, orig_w),
            'resized_shape': (new_h, new_w),
            'pad_params': (top, bottom, left, right)
        }

        return input_tensor

    def postprocess(self, outputs):
        """
        解析模型输出:
        YOLOv8 输出格式: (1, 84, 8400)
        - 前 4 维:cx, cy, w, h(相对于输入尺寸 640x640)
        - 第5维开始:80 类置信度
        """
        # 转置为 (8400, 84)
        predictions = outputs[0].squeeze().T

        # 过滤低置信度检测
        scores = np.max(predictions[:, 4:], axis=1)
        mask = scores > self.conf_thresh
        predictions = predictions[mask]
        scores = scores[mask]

        if predictions.shape[0] == 0:
            return []

        # 获取类别 ID
        class_ids = np.argmax(predictions[:, 4:], axis=1)

        # 转换框格式:cxcywh → xyxy(输入尺寸坐标系)
        boxes = predictions[:, :4]
        boxes[:, 0] -= boxes[:, 2] / 2  # x1 = cx - w/2
        boxes[:, 1] -= boxes[:, 3] / 2  # y1 = cy - h/2
        boxes[:, 2] = boxes[:, 0] + boxes[:, 2]  # x2 = x1 + w
        boxes[:, 3] = boxes[:, 1] + boxes[:, 3]  # y2 = y1 + h

        # 执行 NMS
        keep = self.nms(boxes, scores)
        boxes = boxes[keep]
        scores = scores[keep]
        class_ids = class_ids[keep]

        # 转换到原始图像坐标系
        boxes = self.transform_boxes(boxes)

        return [{
            'box': box.tolist(),  # 将 NumPy 数组转换为 Python 列表
            'score': float(score),  # 将 NumPy float 转换为 Python float
            'class_id': int(class_id),  # 将 NumPy int 转换为 Python int
            'class_name': self.class_names[class_id]
        } for box, score, class_id in zip(boxes, scores, class_ids)]

    def nms(self, boxes, scores):
        """ 非极大值抑制 """
        x1 = boxes[:, 0]
        y1 = boxes[:, 1]
        x2 = boxes[:, 2]
        y2 = boxes[:, 3]

        areas = (x2 - x1) * (y2 - y1)
        order = scores.argsort()[::-1]

        keep = []
        while order.size > 0:
            i = order[0]
            keep.append(i)

            # 计算交集的坐标
            xx1 = np.maximum(x1[i], x1[order[1:]])
            yy1 = np.maximum(y1[i], y1[order[1:]])
            xx2 = np.minimum(x2[i], x2[order[1:]])
            yy2 = np.minimum(y2[i], y2[order[1:]])

            # 计算交集面积
            w = np.maximum(0.0, xx2 - xx1)
            h = np.maximum(0.0, yy2 - yy1)
            intersection = w * h

            # 计算 IoU
            iou = intersection / (areas[i] + areas[order[1:]] - intersection)

            # 保留 IoU 低于阈值的框
            inds = np.where(iou <= self.iou_thresh)[0]
            order = order[inds + 1]

        return keep

    def transform_boxes(self, boxes):
        """
        将检测框从 640x640 坐标系转换到原始图像坐标系
        需要处理缩放和填充的逆操作
        """
        top, bottom, left, right = self.meta['pad_params']
        new_h, new_w = self.meta['resized_shape']
        orig_h, orig_w = self.meta['original_shape']

        # 去除填充区域
        boxes[:, 0] -= left   # x1
        boxes[:, 1] -= top    # y1
        boxes[:, 2] -= left   # x2
        boxes[:, 3] -= top    # y2

        # 限制在有效区域
        boxes[:, 0] = np.clip(boxes[:, 0], 0, new_w)
        boxes[:, 1] = np.clip(boxes[:, 1], 0, new_h)
        boxes[:, 2] = np.clip(boxes[:, 2], 0, new_w)
        boxes[:, 3] = np.clip(boxes[:, 3], 0, new_h)

        # 计算缩放比例
        scale = min(self.target_size / orig_h, self.target_size / orig_w)

        # 缩放回原始尺寸
        boxes /= scale

        # 限制在原始图像范围内
        boxes[:, 0] = np.clip(boxes[:, 0], 0, orig_w)
        boxes[:, 1] = np.clip(boxes[:, 1], 0, orig_h)
        boxes[:, 2] = np.clip(boxes[:, 2], 0, orig_w)
        boxes[:, 3] = np.clip(boxes[:, 3], 0, orig_h)

        return boxes.astype(int)

    def draw_results(self, img: Image, results, output_path=os.path.join("test", "result.jpg")):
        """绘制检测结果并保存为图片"""
        # 创建绘图对象
        draw = ImageDraw.Draw(img)

        # 为每个检测结果绘制边界框和标签
        for det in results:
            box = det['box']
            score = det['score']
            class_name = det['class_name']

            # 确保box是四个坐标值
            x1, y1, x2, y2 = box

            # 绘制边界框
            draw.rectangle([(x1, y1), (x2, y2)], outline='red', width=2)

            # 准备标签文本
            label = f"{class_name} {score:.2f}"

            # 绘制标签背景
            text_bbox = draw.textbbox((x1, y1), label)
            draw.rectangle(text_bbox, fill='red')

            # 绘制标签文本
            draw.text((x1, y1), label, fill='white')

        # 保存结果图片
        img.save(output_path)
        print(f"结果已保存到: {output_path}")

    def predict(self, img: Image):
        # 预处理
        input_tensor = self.preprocess(img)

        # 推理
        outputs = self.session.run(self.output_names, {self.input_name: input_tensor})

        # 后处理
        results = self.postprocess(outputs)

        # 绘制并保存结果
        # self.draw_results(img, results)
        return results

# 使用示例 ----------------------------------------------------
if __name__ == "__main__":
    # 初始化检测器(替换为实际类别)
    detector = YOLOv8ONNXInference(
        model_path=os.path.join("model", "yolo11n.onnx"),
        conf_thresh=0.25,
        iou_thresh=0.45
    )

    # 执行预测
    img = Image.open(os.path.join("test", "test.jpg")).convert('RGB')
    results = detector.predict(img)

    # 打印结果
    for det in results:
        print(f"Class: {det['class_name']}, Score: {det['score']:.2f}, Box: {det['box']}")
Dockerfile文件编写
# 使用 Python 3.13 作为基础镜像
FROM python:3.13-slim

# 设置工作目录
WORKDIR /app

# 设置环境变量
ENV PYTHONPATH=/app
ENV PYTHONUNBUFFERED=1
ENV PYTHONDONTWRITEBYTECODE=1

# 复制项目文件
COPY . /app/

# 安装 Python 依赖
RUN pip install --no-cache-dir -e . -i https://pypi.tuna.tsinghua.edu.cn/simple
RUN pip install --no-cache-dir gunicorn -i https://pypi.tuna.tsinghua.edu.cn/simple

# 暴露端口
EXPOSE 8000

# 使用 gunicorn 运行应用
CMD ["gunicorn", "server:app", \
     "--workers", "4", \
     "--worker-class", "uvicorn.workers.UvicornWorker", \
     "--bind", "0.0.0.0:8000", \
     "--timeout", "120"]
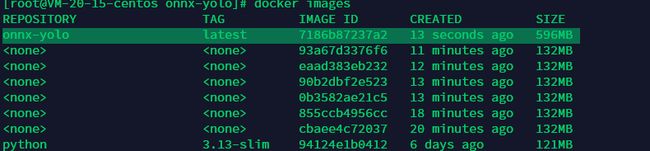
docker镜像构建
执行docker build --no-cache -t onnx-yolo.
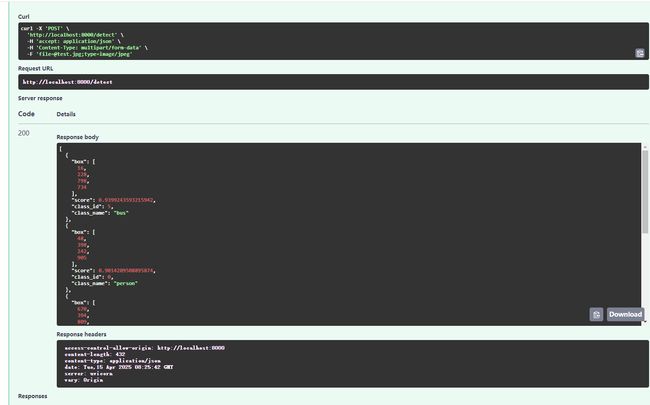
运行并测试
可以看到,返回的data中包含识别bbox检测框,置信度以及类别id