freeMarker入门示例
1.创建Web项目freeMarkerDemo。
2.添加jar包---freemarker-2.3.9.jar。
3.在WebContent目录下新建templates文件夹,用于放置模板文件ftl。
4.在templates目录下新建hello.ftl。
<html>

<head>

    <title>Hello!</title>

</head>

<body>

	<h1>hello ${user}!</h1>

</body>

</html>
5.在src目录下创建Hello.java文件。
package example;


import freemarker.template.Configuration;

import freemarker.template.Template;

import freemarker.template.TemplateException;


import javax.servlet.ServletException;

import javax.servlet.http.HttpServlet;

import javax.servlet.http.HttpServletRequest;

import javax.servlet.http.HttpServletResponse;


import java.io.IOException;

import java.io.PrintWriter;

import java.util.HashMap;

import java.util.Map;


public class Hello extends HttpServlet {

    private Configuration cfg;


    public void init(){

        cfg = new Configuration();


        //设置FreeMarker的模版文件位置---此处的templates就是上面建的那个文件夹

        cfg.setServletContextForTemplateLoading(getServletContext(),"templates");

    }


    public void doGet(HttpServletRequest request,HttpServletResponse response) throws ServletException,IOException{

    	//数据模型

    	Map root = new HashMap();

    	root.put("user", "xin");


        //模版文件

        Template temp =cfg.getTemplate("hello.ftl");


        response.setContentType("text/html; charset=" + temp.getEncoding());


        PrintWriter out = response.getWriter();


        //模版+数据模型=输出

        try{

        	temp.process(root,out);

        }catch(TemplateException e){

        	e.printStackTrace();

        }

    }


    public void doPost(HttpServletRequest request, HttpServletResponse response) throws ServletException, IOException {

		doGet(request,response);

	}

}
6.配置web.xml文件。
<?xml version="1.0" encoding="UTF-8"?>

<web-app xmlns:xsi="http://www.w3.org/2001/XMLSchema-instance" xmlns="http://java.sun.com/xml/ns/javaee" xsi:schemaLocation="http://java.sun.com/xml/ns/javaee http://java.sun.com/xml/ns/javaee/web-app_3_0.xsd" id="WebApp_ID" version="3.0">

  <display-name>freeMarkerDemo</display-name>

  <welcome-file-list>

    <welcome-file>index.html</welcome-file>

  </welcome-file-list>

  <servlet>

    <servlet-name>Hello</servlet-name>

    <servlet-class>example.Hello</servlet-class>

  </servlet>

  <servlet-mapping>

    <servlet-name>Hello</servlet-name>

    <url-pattern>/hello.do</url-pattern>

  </servlet-mapping>

</web-app>
7.新建引导页面index.html。
<!DOCTYPE html>

<html>

<head>

    <meta charset="UTF-8">

</head>


<body>

	点击下面链接看看效果:

    <hr>

    <a href="hello.do">调用Hello模板</a>

</body>

</html>
8.把项目部署到tomcate服务器,即可运行。
项目工作流程:首先看到index页面,发现程序跳转到hello.do;然后通过web.xml找到执行主体example.Hello,即Hello.java;执行该程序将数据user输出到模板文件hello.ftl中。
作为入门,我们来快速了解三个最为常见的指令---if,list,include
1.if指令
使用if指令可以有条件地跳过模板的一部分。
用法:<#if condition>…</#if>
使用<#else>标签可以指定当条件为假时程序执行的内容。
用法:<#if condition>…<#else>…</#if>
例子,修改hello.ftl
<html>

<head>

    <title>Hello!</title>

</head>

<body>

    <h1>

        hello ${user}!

        <#if user=="xin">

            ,my best friend!!!

        <#else>

            ,happy new year!!!

        </#if>

    </h1>

</body>

</html>
2.list指令
当需要用列表来遍历集合的内容时,list指令是非常好用的。
list指令的一般格式为:
<#list sequence as loopVariable>repeatThis</#list>
repeatThis部分将会在给定的sequence遍历时在每项中重复,从第一项开始,一个接着一个。在所有的重复中,loopVariable将持有当前项的值。这个循环变量仅在于<#list …>和</#list>标签之间。
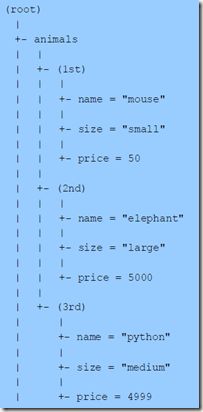
例子,假设有一组animals数据,如下:
java语句为:
List<Animal> animals = new ArrayList<Animal>();


Animal mouse = new Animal("mouse","small",50);

Animal elephant = new Animal("elephant","large",5000);

Animal python = new Animal("python","medium",4999);


animals.add(mouse);

animals.add(elephant);

animals.add(python);


Map<String, List<Animal>> root = new HashMap<String, List<Animal>>();

root.put("animals", animals);
其中Animal是自定义的一个实体类。
修改hello.ftl,以list的方式遍历animals列出所有的animal
<#list animals as being>

	<h1>${being.name}---${being.size}---${being.price}</h1>

</#list>
3.include指令
使用include指令,可以在当前的模板中插入其他文件的内容。
用法:<#include “/a.html”>
在templates目录下新建文件a.html,内容为:
<hr>

<h3>Hello World~~~</h3>
当需要用到这个文件时,可以使用include指令来实现插入。
修改hello.ftl
<html>

<head>

    <title>Hello!</title>

</head>

<body>

    <h1>hello ${user}!</h1>

    <#include "/a.html">

</body>

</html>
运行后将会在页面中显示出a.html中的内容。
上面的图显示的是一组以sequence序列存储的数据。
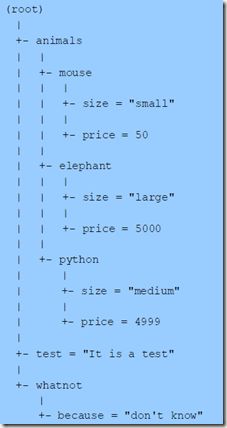
下面给出一组以hash表的形式存储的数据:
java语句为:
Map mouse = new HashMap();

mouse.put("size", "small");

mouse.put("price", 50);


Animal elephant = new Animal("large",5000);

Animal python = new Animal("medium",4999);


Map animals = new HashMap();

animals.put("mouse", mouse);

animals.put("elephant", elephant);

animals.put("python", python);


Map<String, Object> root = new HashMap<String, Object>();

root.put("animals", animals);

root.put("test", "It is a test");


Map whatnot = new HashMap();

whatnot.put("because", "don't know");

root.put("whatnot", whatnot);

