Android学习笔记(十二)
Fragment是一种可以嵌入在活动当中的UI片段,它能让程序更加合理和充分地利用大屏幕的空间。
碎片的简单用法:
新建一个FragmentTest项目,然后新建一个左侧碎片布局left_fragment.xml,代码如下所示:
<LinearLayout xmlns:android="http://schemas.android.com/apk/res/android"
    android:layout_width="match_parent"
    android:layout_height="match_parent"
    android:orientation="vertical" >

    <Button
        android:id="@+id/button"
        android:layout_width="wrap_content"
        android:layout_height="wrap_content"
        android:layout_gravity="center_horizontal"
        android:text="@string/button" />

</LinearLayout>
上面的代码功能是新建一个布局,只放置一个按钮,并让它水平居中显示。
然后新建一个右侧布局right_fragment.xml文件,代码如下:
<LinearLayout xmlns:android="http://schemas.android.com/apk/res/android"
    android:layout_width="match_parent"
    android:layout_height="match_parent"
    android:background="#00ff00"
    android:orientation="vertical" >

    <TextView
        android:id="@+id/text_view"
        android:layout_width="wrap_content"
        android:layout_height="wrap_content"
        android:layout_gravity="center_horizontal"
        android:textSize="20sp"
        android:text="@string/text_view" />

</LinearLayout>
上面的代码的功能是新建一个布局文件,背景为绿色,并放置了一个TextView用于显示一段文本。
接着新建一个LeftFragment类,继承自Fragment。LeftFragment类的代码如下所示:
package com.mfeng.fragmenttest;

import android.app.Fragment;
import android.os.Bundle;
import android.view.LayoutInflater;
import android.view.View;
import android.view.ViewGroup;

public class LeftFragment extends Fragment {
    @Override
    /**
     * 重写Fragment的onCreateView()方法,然后在这个方法中通过LayoutInflater的
     * inflate()方法将定义好的left_fragment布局动态加载进来。
     */
    public View onCreateView(LayoutInflater inflater, ViewGroup container,
            Bundle savedInstanceState) {
        View view = inflater.inflate(R.layout.left_fragment, container, false);
        return view;
    }

}
上述的代码
重写Fragment的onCreateView()方法,然后在这个方法中通过LayoutInflater的
inflate()方法将定义好的left_fragment布局动态加载进来。
在新建一个RightFragment类,代码如下所示:
package com.mfeng.fragmenttest;

import android.app.Fragment;
import android.os.Bundle;
import android.view.LayoutInflater;
import android.view.View;
import android.view.ViewGroup;

public class RightFragment extends Fragment {


    @Override
    /**
     * 重写Fragment的onCreateView()方法,然后在这个方法中通过LayoutInflater的
     * inflate()方法将定义好的right_fragment布局动态加载进来。
     */
    public View onCreateView(LayoutInflater inflater, ViewGroup container,
            Bundle savedInstanceState) {
        View view = inflater.inflate(R.layout.right_fragment, container, false);

        return view;
    }

}
重写Fragment的onCreateView()方法,然后在这个方法中通过LayoutInflater的
inflate()方法将定义好的right_fragment布局动态加载进来。
修改activity_main.xml中的代码,如下所示:
<LinearLayout xmlns:android="http://schemas.android.com/apk/res/android"
    android:layout_width="match_parent"
    android:layout_height="match_parent"
    android:baselineAligned="false" >

    <fragment
        android:id="@+id/left_fragment"
        android:name="com.mfeng.fragmenttest.LeftFragment"
        android:layout_width="0dp"
        android:layout_height="match_parent"
        android:layout_weight="1" />


        <fragment
        android:id="@+id/right_fragment"
        android:name="com.mfeng.fragmenttest.RightFragment"
        android:layout_width="0dp"
        android:layout_height="match_parent"
        android:layout_weight="1"  />


</LinearLayout>
上述的代码中,使用<fragment>标签在布局中添加碎片,其中通过android:name属性来显式指明要添加的碎片类名。
注意:也要将类的包名加上。
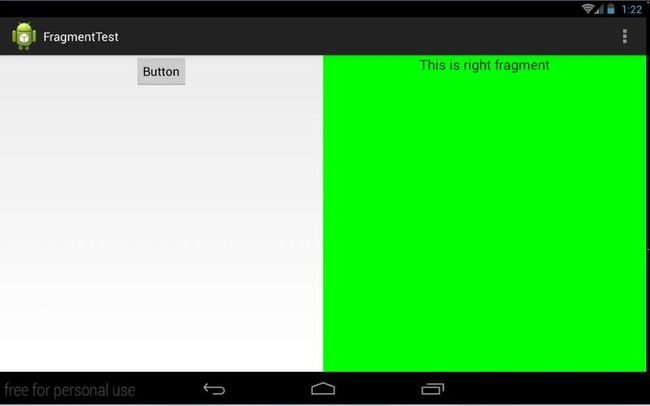
运行程序,可以得到下面的图片:
动态的添加碎片
碎片的强大之处在于,它可以在程序运行时动态地添加到活动当中。
新建一个another_right_fragment.xml文件,代码如下:
<LinearLayout xmlns:android="http://schemas.android.com/apk/res/android"
    android:layout_width="match_parent"
    android:layout_height="match_parent"
    android:background="#ffff00"
    android:orientation="vertical" >

    <TextView
        android:id="@+id/another_text_view"
        android:layout_width="wrap_content"
        android:layout_height="wrap_content"
        android:layout_gravity="center_horizontal"
        android:text="@string/another_text_view" />


</LinearLayout>
上述的代码中新建一个背景为黄色的布局,设置一个文本框来显示文字。然后新建一个AnotherRightFragment类,代码如下:
package com.mfeng.fragmenttest;

import android.app.Fragment;
import android.os.Bundle;
import android.view.LayoutInflater;
import android.view.View;
import android.view.ViewGroup;

public class AnotherRightFragment extends Fragment {

    /**
     * /**
     * 重写Fragment的onCreateView()方法,然后在这个方法中通过LayoutInflater的
     * inflate()方法将定义好的another_right_fragment布局动态加载进来。
     */
    @Override
    public View onCreateView(LayoutInflater inflater, ViewGroup container,
            Bundle savedInstanceState) {
        View view = inflater.inflate(R.layout.another_right_fragment, container, false);

        return view;
    }

}
上述的代码
重写Fragment的onCreateView()方法,然后在这个方法中通过LayoutInflater的
inflate()方法将定义好的another_right_fragment布局动态加载进来。
修改activity_main.xml文件,代码如下所示:
<LinearLayout xmlns:android="http://schemas.android.com/apk/res/android"
    android:layout_width="match_parent"
    android:layout_height="match_parent"
    android:baselineAligned="false" >

    <fragment
        android:id="@+id/left_fragment"
        android:name="com.mfeng.fragmenttest.LeftFragment"
        android:layout_width="0dp"
        android:layout_height="match_parent"
        android:layout_weight="1" />

    <FrameLayout
        android:id="@+id/right_layout"
        android:layout_width="0dp"
        android:layout_height="match_parent"
        android:layout_weight="1" >


        <fragment
        android:id="@+id/right_fragment"
        android:name="com.mfeng.fragmenttest.RightFragment"
        android:layout_width="match_parent"
        android:layout_height="match_parent" />

    </FrameLayout>


</LinearLayout>
上述的代码中,将右侧布局放入FrameLayout中。
修改MainActivity中的代码,如下所示:
package com.mfeng.fragmenttest;

import android.app.Activity;
import android.app.FragmentManager;
import android.app.FragmentTransaction;
import android.os.Bundle;
import android.view.Menu;
import android.view.MenuItem;
import android.view.View;
import android.view.View.OnClickListener;
import android.widget.Button;


public class MainActivity extends Activity {


    private Button button;

    @Override
    protected void onCreate(Bundle savedInstanceState) {
        super.onCreate(savedInstanceState);
        setContentView(R.layout.activity_main);
        button = (Button) findViewById(R.id.button);
        //为Button按钮设置监听器
        button.setOnClickListener(new OnClickListener() {

            @Override
            public void onClick(View v) {//创建待添加的碎片实例
                    AnotherRightFragment fragment = new AnotherRightFragment();
                    //获取到FragmentManager,在活动中可以直接调用getFragmentManager()方法得到
                    FragmentManager fragmentManager = getFragmentManager();
                    //开启一个事务,通过调用beginTransaction()方法开启
                    FragmentTransaction transaction = fragmentManager.beginTransaction();
                    //向容器内加入碎片,一般使用replace()方法实现,需要传入容器的id和待添加的碎片实例
                    transaction.replace(R.id.right_layout, fragment);
                    //提交事务,调用commit()方法来完成
                    transaction.commit();

            }
        });
    }


    @Override
    public boolean onCreateOptionsMenu(Menu menu) {
        // Inflate the menu; this adds items to the action bar if it is present.
        getMenuInflater().inflate(R.menu.main, menu);
        return true;
    }

    @Override
    public boolean onOptionsItemSelected(MenuItem item) {
        // Handle action bar item clicks here. The action bar will
        // automatically handle clicks on the Home/Up button, so long
        // as you specify a parent activity in AndroidManifest.xml.
        int id = item.getItemId();
        if (id == R.id.action_settings) {
            return true;
        }
        return super.onOptionsItemSelected(item);
    }
}
通过上面的代码,可以看出动态添加碎片主要分为5步:
1.创建待添加的碎片实例
AnotherRightFragment fragment = new AnotherRightFragment();
2.获取到FragmentManager,在活动中可以直接调用getFragmentManager()方法得到
FragmentManager fragmentManager = getFragmentManager();
3.开启一个事务,通过调用beginTransaction()方法开启
FragmentTransaction transaction = fragmentManager.beginTransaction();
4.向容器内加入碎片,一般使用replace()方法实现,需要传入容器的id和待添加的碎片实例
transaction.replace(R.id.right_layout, fragment);
5.提交事务,调用commit()方法来完成
transaction.commit();
