Android应用开发中如何进行单元测试
-
Menifest.xml中加入:
<application>中加入:
<uses-library android:name="android.test.runner" />
<application>外面加入:
<uses-permission android:name="android.permission.RUN_INSTRUMENTATION" />
<instrumentation android:name="android.test.InstrumentationTestRunner" android:targetPackage="name.feisky.android.test"
android:label="Test for my app"/>
-
编写单元测试代码:必须继承自AndroidTestCase类
package name.feisky.android.test;
import android.test.AndroidTestCase;
import junit.framework.Assert;
public class MyTest extends AndroidTestCase {
private static final String Tag="MyTest";
public void testSave() throws Throwable
{
int i=4+8;
Assert.assertEquals(5,i);
}
public void testSomethingElse() throws Throwable {
Assert.assertTrue(1 + 1 == 12);
}
}
-
执行测试
IntelliJ中:
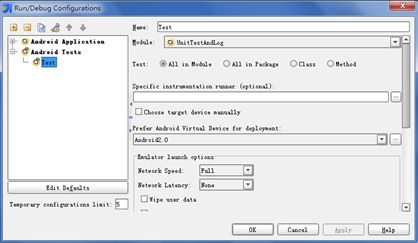

eclipse中:右键 run as Android JUnit Test
命令行工具:
adb shell am instrument -w name.feisky.android.test/android.test.InstrumentationTestRunner
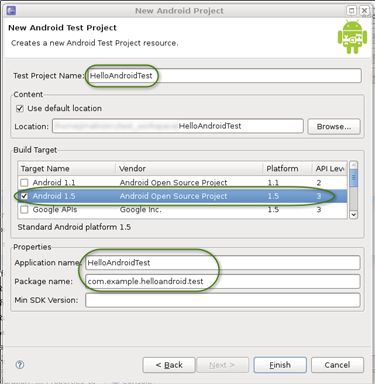
也可以新建一个测试项目进行测试
- New > Project > Android > Android Test Project.
-
添加测试用例类
添加新类,基类设置为android.test.ActivityInstrumentationTestCase2<HelloAndroid>
-
添加构造函数
添加setUp()方法,这个方法在所有的测试之前进行变量和测试环境的初始化。
@Override
protected void setUp() throws Exception {
super.setUp();
mActivity = this.getActivity();
mView = (TextView) mActivity.findViewById(com.example.helloandroid.R.id.textview);
resourceString = mActivity.getString(com.example.helloandroid.R.string.hello);
}
-
添加testPreconditions()方法,检查初始化环境,只执行一次
public void testPreconditions() {
assertNotNull(mView);
}
-
添加单元测试
public void testText() {
assertEquals(resourceString,(String)mView.getText());
}
- 测试 Run As... > Android JUnit Test
(二. 对整个App或某个Activity等进行测试)
本文相关的代码下载链接: http://download.csdn.net/detail/stevenhu_223/4895796
本文是在上一篇文章《java单元测试》的基础上继续讲解android的单元测试,android源码中引入了java单元测试的框架(android源码目录:libcore\junit\src\main\java\junit\framework中可见),然后在java单元测试框架的基础上扩展属于android自己的测试框架。android具体框架类的关系图如下:
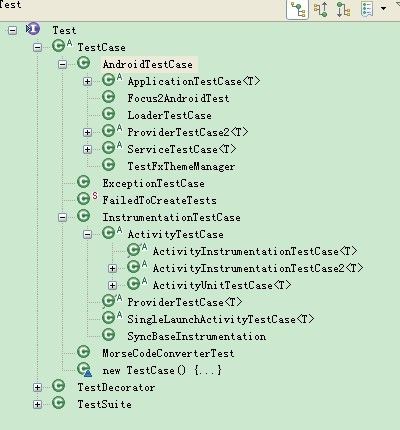
从上图的类关系图中可以知道,通过android测试类可以实现对android中相关重要的组件进行测试(如Activity,Service,ContentProvider,甚至是application)。
其实在android源码中,基本上每个系统应用都自带一个测试工程,如下图的源码中settings(设置)模块:
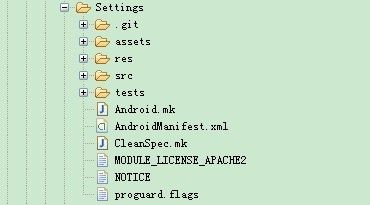
上图的tests文件夹中就是settings模块自带的单元测试工程,有兴趣的读者可自行去研读一下源代码。
eclipse下(当然,前提是要保证eclipse中相关的android环境已经搭建好)进行android单元测试:
1.Application的测试:
新建一个android项目,在该android项目添加一个继承Application的类,代码如下:
- package com.phicomm.hu;
- import android.app.Application;
- public class FxAndroidApplication extends Application
- {
- @Override
- public void onCreate()
- {
- // TODO Auto-generated method stub
- super.onCreate();
- }
- @Override
- public void onTerminate()
- {
- // TODO Auto-generated method stub
- super.onTerminate();
- }
- public String getFavourite()
- {
- return "I Love Java";
- }
- }
Appication类创建好后,接着创建对应的测试工程:选中其所在的android工程---->鼠标右键----->new---->Android Test Project----->输入测试工程名--->next----->选择被测试的目标android工程(此处为FxAndroidApplication所在的android工程)。这样,一个测试工程就创建完成了。
通过eclipse创建自动生成的测试工程项目和android工程项目结构上没什么大的区别,主要是在AndroidManifest.xml中有变化,如下:
- <?xml version="1.0" encoding="utf-8"?>
- <manifest xmlns:android="http://schemas.android.com/apk/res/android"
- package="com.phicomm.hu.test"
- android:versionCode="1"
- android:versionName="1.0" >
- <uses-sdk android:minSdkVersion="10" />
- <instrumentation
- android:name="android.test.InstrumentationTestRunner"
- android:targetPackage="com.phicomm.hu" />
- <application
- android:icon="@drawable/ic_launcher"
- android:label="@string/app_name" >
- <uses-library android:name="android.test.runner" />
- </application>
- </manifest>
在AndroidManifest.xml注册了相关的测试环境(这些是android独有的):<uses-library android:name="android.test.runner" />实现使用相关的运行测试类库,<instrumentation />中的targetPackage为被测试类所在的包。
接下来在测试工程中创建FxAndroidApplicationd的测试类,代码如下:
- package com.phicomm.hu.test;
- import com.phicomm.hu.FxAndroidApplication;
- import android.app.Application;
- import android.test.ApplicationTestCase;
- public class FxApplicationTest extends ApplicationTestCase<FxAndroidApplication>
- {
- private FxAndroidApplication AppTest;
- public FxApplicationTest()
- {
- //调用父类构造函数,且构造函中传递的参数为被测试的类
- super(FxAndroidApplication.class);
- }
- @Override
- protected void setUp() throws Exception
- {
- // TODO Auto-generated method stub
- super.setUp();
- //获取application之前必须调用的方法
- createApplication();
- //获取待测试的FxAndroidApplication
- AppTest = getApplication();
- }
- //测试FxAndroidApplication的getFavourite方法
- public void testGetFavourite()
- {
- /*验证预测值"I Love C++"是否等于实际值,
- 由于实际值为"I love Java",所以此处测试结果为Failure*/
- assertEquals("I Love C++", AppTest.getFavourite());
- }
- }
测试类创建好后,就可以实现对FxAndroidApplicationd进行测试了。
测试方法:
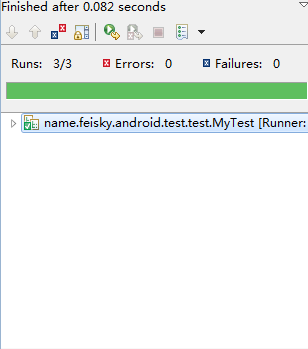
启动android模拟器(也可以通过android手机)----->运行android工程----->在测试工程中选中测试类FxApplicationTest---->鼠标右键--->Run As---->Android Junit Test。这样,测试结果就可以在eclipse的Junit视图上显示了,如下图:
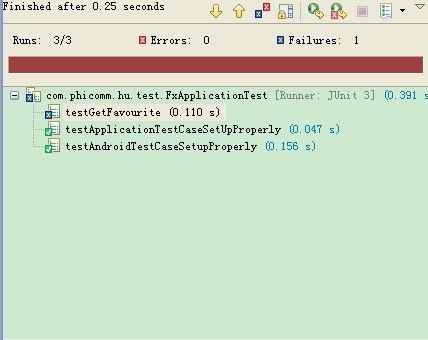
通过上图的测试结果可知,ApplicationTestCase测试类中有两个测试方法是默认进行测试的(testGetFavourite才是我们要测试的方法)。
当然,还可以通过adb进行测试:连接android手机------>打开电脑命令窗口(开始-->运行--->输入cmd)---->在命令窗口输入adb shell---->am instrument -w com.phicomm.hu.test(测试用例所在的包名)/android.test.InstrumentationTestRunner。
2.Activity的测试:
和上面application一样,先创建一个android工程,该工程中创建了两个activity,一个activity实现输入用户信息的登录界面,另一个acticity显示输入的用户信息。
效果图如下:
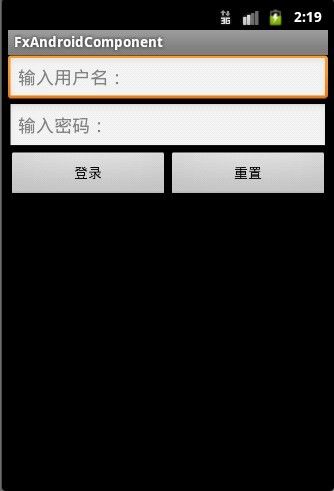
登录界面FxLoginActivity的代码如下:
- package com.phicomm.hu;
- import android.app.Activity;
- import android.content.Intent;
- import android.os.Bundle;
- import android.view.View;
- import android.view.View.OnClickListener;
- import android.widget.Button;
- import android.widget.EditText;
- public class FxLoginActivity extends Activity
- {
- private EditText userName;
- private EditText passWord;
- /** Called when the activity is first created. */
- @Override
- public void onCreate(Bundle savedInstanceState)
- {
- super.onCreate(savedInstanceState);
- setContentView(R.layout.main);
- userName = (EditText)findViewById(R.id.name);
- passWord = (EditText)findViewById(R.id.psd);
- Button login = (Button)findViewById(R.id.login);
- Button reset = (Button)findViewById(R.id.reset);
- //监听登录按钮
- login.setOnClickListener(new OnClickListener() {
- @Override
- public void onClick(View v)
- {
- // TODO Auto-generated method stub
- Intent intent = new Intent(FxLoginActivity.this, FxResultActivity.class);
- //通过intent传递登录信息到ResultActivity的界面中显示
- intent.putExtra("userName", userName.getText().toString());
- intent.putExtra("passWord", passWord.getText().toString());
- //启动ResultActivity显示登录界面信息
- startActivity(intent);
- }
- });
- //监听重置按钮
- reset.setOnClickListener(new OnClickListener()
- {
- @Override
- public void onClick(View v)
- {
- // TODO Auto-generated method stub
- resetInput();
- }
- });
- }
- public void resetInput()
- {
- userName.setText("");
- passWord.setText("");
- }
- }
main.xml布局文件的代码如下:
- <?xml version="1.0" encoding="utf-8"?>
- <LinearLayout xmlns:android="http://schemas.android.com/apk/res/android"
- android:layout_width="fill_parent"
- android:layout_height="fill_parent"
- android:orientation="vertical" >
- <EditText
- android:id="@+id/name"
- android:layout_width="fill_parent"
- android:layout_height="wrap_content"
- android:hint="@string/name"/>
- <EditText
- android:id="@+id/psd"
- android:layout_width="fill_parent"
- android:layout_height="wrap_content"
- android:hint="@string/psd"/>
- <LinearLayout
- android:orientation="horizontal"
- android:layout_width="match_parent"
- android:layout_height="wrap_content"
- >
- <Button
- android:id="@+id/login"
- android:layout_width="fill_parent"
- android:layout_height="wrap_content"
- android:layout_weight="1"
- android:text="@string/login"/>
- <Button
- android:id="@+id/reset"
- android:layout_width="fill_parent"
- android:layout_height="wrap_content"
- android:layout_weight="1"
- android:text="@string/reset"/>
- </LinearLayout>
- </LinearLayout>
显示用户信息界面的FxResultActivity代码如下:
- package com.phicomm.hu;
- import android.app.Activity;
- import android.content.Intent;
- import android.os.Bundle;
- import android.util.Log;
- import android.widget.EditText;
- import android.widget.TextView;
- public class FxResultActivity extends Activity
- {
- private static final String TAG = "ResultActivity";
- @Override
- protected void onCreate(Bundle savedInstanceState)
- {
- // TODO Auto-generated method stub
- super.onCreate(savedInstanceState);
- setContentView(R.layout.result);
- TextView result = (TextView)findViewById(R.id.result);
- //通过得到intent获取登录界面传来的信息
- Intent intent = getIntent();
- String userName = intent.getStringExtra("userName");
- String passWord = intent.getStringExtra("passWord");
- //将登录信息在页面中显示
- result.setText("用户名:" + userName + "\n" + "密码:" + passWord);
- }
- }
以上的android工程创建好后,创建一个对应的测试工程:
测试工程中对应的FxLoginActivity类的测试代码如下(详细的代码讲解见代码中的相关注释,这里不在累赘):
- package com.phicomm.hu.test;
- import android.app.Instrumentation;
- import android.test.ActivityInstrumentationTestCase2;
- import android.view.KeyEvent;
- import android.widget.Button;
- import android.widget.EditText;
- import com.phicomm.hu.FxLoginActivity;
- public class FxLoginActivityTest extends ActivityInstrumentationTestCase2<FxLoginActivity>
- {
- private Instrumentation mInstrumentation;
- private FxLoginActivity mLoginTest;
- private EditText userName;
- private EditText passWord;
- private Button login;
- private Button reset;
- public FxLoginActivityTest()
- {
- super(FxLoginActivity.class);
- }
- //重写setUp方法,在该方法中进行相关的初始化操作
- @Override
- protected void setUp() throws Exception
- {
- // TODO Auto-generated method stub
- super.setUp();
- /**这个程序中需要输入用户信息和密码,也就是说需要发送key事件,
- * 所以,必须在调用getActivity之前,调用下面的方法来关闭
- * touch模式,否则key事件会被忽略
- */
- //关闭touch模式
- setActivityInitialTouchMode(false);
- mInstrumentation = getInstrumentation();
- //获取被测试的FxLoginActivity
- mLoginTest = getActivity();
- //获取FxLoginActivity相关的UI组件
- userName = (EditText)mLoginTest.findViewById(com.phicomm.hu.R.id.name);
- passWord = (EditText)mLoginTest.findViewById(com.phicomm.hu.R.id.psd);
- login = (Button)mLoginTest.findViewById(com.phicomm.hu.R.id.login);
- reset = (Button)mLoginTest.findViewById(com.phicomm.hu.R.id.reset);
- }
- //该测试用例实现在测试其他用例之前,测试确保获取的组件不为空
- public void testPreConditions()
- {
- assertNotNull(mLoginTest);
- assertNotNull(userName);
- assertNotNull(passWord);
- assertNotNull(login);
- assertNotNull(reset);
- }
- /**该方法实现在登录界面上输入相关的登录信息。由于UI组件的
- * 相关处理(如此处的请求聚焦)需要在UI线程上实现,
- * 所以需调用Activity的runOnUiThread方法实现。
- */
- public void input()
- {
- mLoginTest.runOnUiThread(new Runnable()
- {
- @Override
- public void run()
- {
- // TODO Auto-generated method stub
- userName.requestFocus();
- userName.performClick();
- }
- });
- /*由于测试用例在单独的线程上执行,所以此处需要同步application,
- * 调用waitForIdleSync等待测试线程和UI线程同步,才能进行输入操作。
- * waitForIdleSync和sendKeys不允许在UI线程里运行
- */
- mInstrumentation.waitForIdleSync();
- //调用sendKeys方法,输入用户名
- sendKeys(KeyEvent.KEYCODE_P, KeyEvent.KEYCODE_H,
- KeyEvent.KEYCODE_I, KeyEvent.KEYCODE_C,
- KeyEvent.KEYCODE_O, KeyEvent.KEYCODE_M,
- KeyEvent.KEYCODE_M);
- mLoginTest.runOnUiThread(new Runnable()
- {
- @Override
- public void run()
- {
- // TODO Auto-generated method stub
- passWord.requestFocus();
- passWord.performClick();
- }
- });
- //调用sendKeys方法,输入密码
- sendKeys(KeyEvent.KEYCODE_1, KeyEvent.KEYCODE_2,
- KeyEvent.KEYCODE_3, KeyEvent.KEYCODE_4);
- }
- //测试输入的用户信息
- public void testInput()
- {
- //调用测试类的input方法,实现输入用户信息(sendKeys实现输入)
- input();
- //测试验证用户信息的预期值是否等于实际值
- assertEquals("phicomm", userName.getText().toString());
- //密码的预期值123与实际值1234不符,Failure;
- assertEquals("123", passWord.getText().toString());
- }
- //测试登录按钮
- public void testLogin()
- {
- input();
- //开新线程,并通过该线程在实现在UI线程上执行操作
- mInstrumentation.runOnMainSync(new Runnable()
- {
- @Override
- public void run()
- {
- // TODO Auto-generated method stub
- login.requestFocus();
- login.performClick();
- }
- });
- }
- //测试重置按钮
- public void testReset()
- {
- input();
- mInstrumentation.runOnMainSync(new Runnable()
- {
- @Override
- public void run()
- {
- // TODO Auto-generated method stub
- reset.requestFocus();
- //点击按钮
- reset.performClick();
- }
- });
- //验证重置按钮的实现功能,是否点击后内容为空
- assertEquals("", userName.getText().toString());
- assertEquals("", passWord.getText().toString());
- }
- }
运行该测试类进行测试(选中---->Run As--->Android Junit Test),然后会自动启动模拟器进行相关的输入点击测试。注:测试时可以发现,程序在测试到testLogin()方法登录到另一个界面时,测试就停止了,也就是说testReset()没测试到。所以,需要测试testReset()时可以先把testLogin()注释掉,不然程序会测试到testLogin()后就不在对testReset()进行测试。
FxResultActivity的测试类代码如下:
- package com.phicomm.hu.test;
- import android.content.Intent;
- import android.test.ActivityInstrumentationTestCase2;
- import android.widget.TextView;
- import com.phicomm.hu.FxResultActivity;
- public class FxResultActivityTest extends ActivityInstrumentationTestCase2<FxResultActivity>
- {
- private static final String LOGIN_INFO = "用户名:feixun\n密码:123";
- private FxResultActivity mResultActivity;
- private TextView result;
- public FxResultActivityTest()
- {
- super(FxResultActivity.class);
- }
- @Override
- protected void setUp() throws Exception
- {
- // TODO Auto-generated method stub
- super.setUp();
- //创建Intent,通过Intent传递用户的登录信息
- Intent intent = new Intent();
- intent.putExtra("userName", "feixun");
- intent.putExtra("passWord", "123");
- //通过携带用户登录信息的intent启动FxResultActivity
- mResultActivity = launchActivityWithIntent("com.phicomm.hu",
- FxResultActivity.class, intent);
- //获取UI组件
- result = (TextView)mResultActivity.findViewById(com.phicomm.hu.R.id.result);
- }
- //测试验证用户的登录信息
- public void testLoginInfo()
- {
- //验证预期值是否等于实际值
- assertEquals(LOGIN_INFO, result.getText().toString());
- }
- }
运行上面的测试类,结果正确。