使用Varnish代替Squid做网站缓存加速器的详细解决方案
Varnish是一款高性能的开源HTTP加速器,挪威最大的在线报纸 Verdens Gang (vg.no) 使用3台Varnish代替了原来的12台squid,性能比以前更好。
Varnish的作者Poul-Henning Kamp是FreeBSD的内核开发者之一,他认为现在的计算机比起1975年已经复杂许多。在1975年时,储存媒介只有两种:内存与硬盘。但现在计算 机系统的内存除了主存外,还包括了cpu内的L1、L2,甚至有L3快取。硬盘上也有自己的快取装置,因此squid cache自行处理物件替换的架构不可能得知这些情况而做到最佳化,但操作系统可以得知这些情况,所以这部份的工作应该交给操作系统处理,这就是 Varnish cache设计架构。
Varnish可以在FreeBSD 6.0和Linux 2.6内核上运行。
1、编译安装varnish HTTP加速器:
tar zxvf varnish-1.1.1.tar.gz
cd varnish-1.1.1
./configure --prefix=/usr/local/varnish
make && make install
2、简单启动varnish守护进程,用本机80端口去反向代理加速127.0.0.1:81上的Apache服务器:
Varnish官方网站:http://www.varnish-cache.org/
另有一份PDF文档,说明Varnish原理的:http://ishare.iask.sina.com.cn/cgi-bin/fileid.cgi?fileid=2163384
我测试了一下,在同等配置环境下,Varnish的性能确实要超过Squid,稳定性也不错,值得继续去深入研究。
今天写的这篇关于Varnish的文章,已经是一篇可以完全替代Squid做网站缓存加速器的详细解决方案了。网上关于Varnish的资料很少,中文资料更是微乎其微,希望本文能够吸引更多的人研究、使用Varnish。
在我看来,使用Varnish代替Squid的理由有三点:
1、Varnish采用了“Visual Page Cache”技术,在内存的利用上,Varnish比Squid具有优势,它避免了Squid频繁在内存、磁盘中交换文件,性能要比Squid高。
2、Varnish的稳定性还不错,我管理的一台图片服务器运行Varnish已经有一个月,没有发生过故障,而进行相同工作的Squid服务器就倒过几次。
3、通过Varnish管理端口,可以使用正则表达式快速、批量地清除部分缓存,这一点是Squid不能具备的。

下面来安装Varnish网站缓存加速器(Linux系统):
1、创建www用户和组,以及Varnish缓存文件存放目录(/var/vcache):
/usr/sbin/useradd -u 48 -g www www
mkdir -p /var/vcache
chmod +w /var/vcache
chown -R www:www /var/vcache
2、创建Varnish日志目录(/var/logs/):
chmod +w /var/logs
chown -R www:www /var/logs
3、编译安装varnish:
tar zxvf varnish-1.1.2.tar.gz
cd varnish-1.1.2
./configure --prefix=/usr/local/varnish
make && make install
4、创建Varnish配置文件:
输入以下内容:
set backend.host = "192.168.0.5";
set backend.port = "80";
}
acl purge {
"localhost";
"127.0.0.1";
"192.168.1.0"/24;
}
sub vcl_recv {
if (req.request == "PURGE") {
if (!client.ip ~ purge) {
error 405 "Not allowed.";
}
lookup;
}
if (req.http.host ~ "^blog.s135.com") {
set req.backend = myblogserver;
if (req.request != "GET" && req.request != "HEAD") {
pipe;
}
else {
lookup;
}
}
else {
error 404 "Zhang Yan Cache Server";
lookup;
}
}
sub vcl_hit {
if (req.request == "PURGE") {
set obj.ttl = 0s;
error 200 "Purged.";
}
}
sub vcl_miss {
if (req.request == "PURGE") {
error 404 "Not in cache.";
}
}
sub vcl_fetch {
if (req.request == "GET" && req.url ~ "\.(txt|js)$") {
set obj.ttl = 3600s;
}
else {
set obj.ttl = 30d;
}
}
这里,我对这段配置文件解释一下:
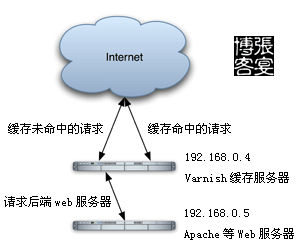
(1)、Varnish通过反向代理请求后端IP为192.168.0.5,端口为80的web服务器;
(2)、Varnish允许localhost、127.0.0.1、192.168.0.***三个来源IP通过PURGE方法清除缓存;
(3)、Varnish对域名为blog.s135.com的请求进行处理,非blog.s135.com域名的请求则返回“Zhang Yan Cache Server”;
(4)、Varnish对HTTP协议中的GET、HEAD请求进行缓存,对POST请求透过,让其直接访问后端Web服务器。之所以这样配置,是因为POST请求一般是发送数据给服务器的,需要服务器接收、处理,所以不缓存;
(5)、Varnish对以.txt和.js结尾的URL缓存时间设置1小时,对其他的URL缓存时间设置为30天。
5、启动Varnish
/usr/local/varnish/sbin/varnishd -n /var/vcache -f /usr/local/varnish/vcl.conf -a 0.0.0.0:80 -s file,/var/vcache/varnish_cache.data,1G -g www -u www -w 30000,51200,10 -T 127.0.0.1:3500 -p client_http11=on
6、启动varnishncsa用来将Varnish访问日志写入日志文件:
7、配置开机自动启动Varnish
在末尾增加以下内容:
/usr/local/varnish/sbin/varnishd -n /var/vcache -f /usr/local/varnish/vcl.conf -a 0.0.0.0:80 -s file,/var/vcache/varnish_cache.data,1G -g www -u www -w 30000,51200,10 -T 127.0.0.1:3500 -p client_http11=on
/usr/local/varnish/bin/varnishncsa -n /var/vcache -w /var/logs/youvideo.log &
8、优化Linux内核参数
在末尾增加以下内容:
net.ipv4.tcp_keepalive_time = 300
net.ipv4.tcp_syncookies = 1
net.ipv4.tcp_tw_reuse = 1
net.ipv4.tcp_tw_recycle = 1
net.ipv4.ip_local_port_range = 5000 65000
再看看如何管理Varnish:
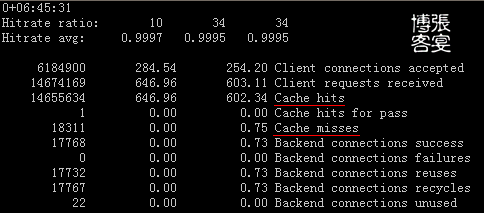
1、查看Varnish服务器连接数与命中率:

2、通过Varnish管理端口进行管理:
用help看看可以使用哪些Varnish命令:
ping [timestamp]
status
start
stop
stats
vcl.load
vcl.inline
vcl.use
vcl.discard
vcl.list
vcl.show
param.show [-l] []
param.set
help [command]
url.purge
dump.pool
3、通过Varnish管理端口,使用正则表达式批量清除缓存:
(1)、例:清除类似http://blog.s135.com/a/zhangyan.html的URL地址):
(2)、例:清除类似http://blog.s135.com/tech的URL地址:
(3)、例:清除所有缓存:
4、一个清除Squid缓存的PHP函数(清除Varnish缓存同样可以使用该函数,无需作任何修改,十分方便):
- <?php
- function purge($ip, $url)
- {
- $errstr = '';
- $errno = '';
- $fp = fsockopen ($ip, 80, $errno, $errstr, 2);
- if (!$fp)
- {
- return false;
- }
- else
- {
- $out = "PURGE $url HTTP/1.1\r\n";
- $out .= "Host:blog.s135.com\r\n";
- $out .= "Connection: close\r\n\r\n";
- fputs ($fp, $out);
- $out = fgets($fp , 4096);
- fclose ($fp);
- return true;
- }
- }
- purge("192.168.0.4", "/index.php");
- ?>
附1:Varnish官方网站:http://www.varnish-cache.org/
附2:2007年12月10日,我写了一个每天0点运行,按天切割Varnish日志,生成一个压缩文件,同时删除上个月旧日志的脚本(/var/logs/cutlog.sh):
/var/logs/cutlog.sh文件内容如下:
# This file run at 00:00
date=$(date -d "yesterday" +"%Y-%m-%d")
pkill -9 varnishncsa
mv /var/logs/youvideo.log /var/logs/${date}.log
/usr/local/varnish/bin/varnishncsa -n /var/vcache -w /var/logs/youvideo.log &
mkdir -p /var/logs/youvideo/
gzip -c /var/logs/${date}.log > /var/logs/youvideo/${date}.log.gz
rm -f /var/logs/${date}.log
rm -f /var/logs/youvideo/$(date -d "-1 month" +"%Y-%m*").log.gz
设置在每天00:00定时执行:
或者
输入以下内容: