EXT.NET复杂布局(四)——系统首页设计(下)
此篇为EXT.NET系列终结篇。希望此系列能够对大家有所帮助。
首页JS函数介绍
使然使用了Ext.NET,但是JavaScript的地位还是举足轻重的。
1.添加选项卡
1: var addTab = function (id, url, title) {
2: var tab = tplCenter.getComponent(id);
3: if (!tab) {
4: tab = tplCenter.add({
5: id: id,
6: title: title,
7: closable: true,
8: autoLoad: {
9: showMask: true,
10: url: url,
11: mode: "iframe",
12: maskMsg: "正在加载 " + title + " ..."
13: }
14: });
15: }
16: tplCenter.setActiveTab(tab);
17: }
注意maskMsg,它有以下效果:
2.显示消息
1: function showMsg(title, content) {
2: Ext.net.Notification.show({
3: hideFx: {
4: fxName: 'switchOff',
5: args: [{}]
6: },
7: showFx: {
8: args: [
9: 'C3DAF9',
10: 1,
11: {
12: duration: 2.0
13: }
14: ],
15: fxName: 'frame'
16: },
17: closeVisible: true,
18: html: content,
19: title: title + ' ' + new Date().format('g:i:s A')
20: });
21: }
3.弹出窗口
1: function showMyWindow(url, id, title, isMaximized) {
2: url += ((url.indexOf('?') == -1 ? ("?rand=") : ("&rand=")) + Math.round(Math.random() * 10000));
3: var myWin = new Ext.Window({
4: id: id,
5: title: title,
6: width: 572,
7: height: 290,
8: iconCls: "addicon",
9: resizable: false,
10: draggable: true,
11: defaultType: "textfield",
12: labelWidth: 100,
13: collapsible: false,
14: closeAction: 'close',
15: closable: true,
16: maximizable: true,
17: maximized: arguments.length == 4 ? isMaximized : false,
18: modal: true,
19: buttonAlign: "center",
20: bodyStyle: "padding:0 0 0 0",
21: listeners: { "beforedestroy": function (obj) {
22: var tabs = top.tabs;
23: if (typeof tabs != undefined && tabs != null) {
24: if (top.tabs.items.getCount() > 1) {
25: var currentTab = tabs.getActiveTab();
26: tabs.remove(currentTab);
27: }
28: }
29: top.showMsg('温馨提示', '我已经关闭啦!');
30: }
31: },
32: html: '<iframe style="margin-left:0px;margin-top:0px;border:0;' +
33: 'border-style:solid;border-color:red;" width="100%" height="100%" ' +
34: ' id="frmWin' + id + '" src="' + url + '" name="' + id + '" />'
35: });
36: myWin.show();
37: }
注意beforedestroy事件,这个事件可以在窗口关闭后通知你,有了这个通知事件,想干啥都方便了。在示例中,本人是显示消息。
页面布局
从图中可以看出分为上、中、左、右四块,前面介绍过了,就不细说了。
之所以使用Viewport,主要是为了自适应浏览器。值得注意的是,将一个页面分割几块,通常使用BorderLayout,其下有North、West、Center、East、South五个元素,其Collapsible属性指示是否隐藏面板,比如本示例的East面板。West这里放置左侧菜单,支持无限子集。为了有折叠面板的效果,需要设置Layout="AccordionLayout"。然后在后台动态添加TreePanel。
值得注意的是Center面板:
                <Center MarginsSummary="5 5 5 0">

                    <ext:TabPanel runat="server" ID="tplCenter" IDMode="Static" ResizeTabs="true" Border="true"

                        MinTabWidth="75" TabWidth="135" EnableTabScroll="true">

                        <Plugins>

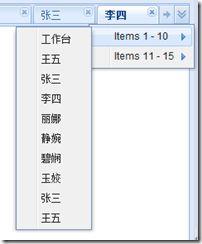
                            <ext:TabScrollerMenu ID="TabScrollerMenu1" runat="server" />

                        </Plugins>

                        <Items>

                            <ext:Panel ID="Panel1" runat="server" TabMenuHidden="true" Title="工作台" TabTip="工作台"

                                Closable="false">

                                <AutoLoad Url="/WorkbenchMain.aspx" Mode="IFrame" TriggerEvent="show" ShowMask="true" />

                            </ext:Panel>

                        </Items>

                    </ext:TabPanel>

                </Center>
可以看出Center面板中放置了选项卡面板(TabPanel),主要到Plugins元素中的TabScrollerMenu控件,作用如图:
至于Panel,能让其自动加载框架页。TriggerEvent="show" 表示显示的时候加载。
可以看出,工作台那块都在Url="/WorkbenchMain.aspx" 设置。注意/表示网站根目录,只有发布到IIS或者Web应用程序有效。
工作台
工作台是非常重要的一块。
有时候为了显示重要信息,可能需要以不同颜色显示,那么注意下面的JS:
var template = '<b style="color:{1};">{0}</b>';

var setTitle = function (value, metadata, record, rowIndex, colIndex, store) {

    return String.format(template, value, 'green');

};
在上面的代码中,你可以根据值来判断显示什么样的HTML,这里是粗体加绿。
自适应区域:
function autoSizeArea() {

            var vHeight = Viewport1.getHeight();

            pnlView.setHeight(vHeight);

            vHeight = vHeight - 150;

            GridPanel1.setHeight(vHeight);

            GridPanel3.setHeight(vHeight);

            GridPanel2.setHeight(vHeight);

            GridPanel6.setHeight(vHeight);

            GridPanel5.setHeight(vHeight);

        }
弹出窗体:
function showTestPage() {

            top.showMyWindow('/Test.aspx', 'frmStatesRequestList', '测a试?页3', true);

        }
这里显示的是我的测试页,你可以在这里显示自定义页面,并且可以传递工作台中面板中的Json数据。
在这里,我在工作台也添加了一个弹出窗口的JS函数,这么做的原因是,从这里打开窗口处理完事项,我可以刷新工作台的数据,甚至是指定的面板的数据,也就是在beforedestroy事件中,reload相应的store。
在工作台,本人写了一些处理的JS,大家可以根据自己需要更改,并且剪切到独立的JS文件中去。
比如这个函数:
1: function showInput(animEl, recodes, TypeID, iconCs, msg, progressText, taskIDName, ObjectIdName, DriverIdName, TaskTitelName) {
2: Ext.MessageBox.show({
3: title: '批注',
4: msg: '请输入批注:',
5: width: 300,
6: buttons: Ext.MessageBox.OKCANCEL,
7: multiline: true,
8: fn: function (btn, text) {
9: var remark = text.replace(/(^\s*)|(\s*$)/g, '');
10: if (TypeID == 'Reject' || TypeID == 'Repeal') {
11: var tip = '';
12: if (TypeID == 'Reject')
13: tip = '【退回】';
14: if (TypeID == 'Repeal')
15: tip = '【撤销】';
16: if (remark == '' && btn == 'ok') {
17: showInput(animEl, recodes, TypeID, iconCs, msg, progressText, taskIDName, ObjectIdName, DriverIdName, TaskTitelName);
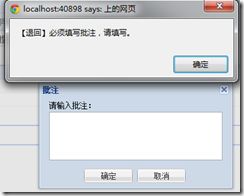
18: alert(tip + '必须填写批注,请填写。');
19: }
20: else if (btn == 'cancel')
21: Ext.MessageBox.alert('温馨提示', '操作已取消(' + tip + '必须填写批注)。');
22: else if (remark != '' && btn == 'ok')
23: Operations(animEl, recodes, TypeID, iconCs, msg, progressText, taskIDName, ObjectIdName, DriverIdName, TaskTitelName, remark);
24: }
25: else {
26: if (btn == 'ok')
27: Operations(animEl, recodes, TypeID, iconCs, msg, progressText, taskIDName, ObjectIdName, DriverIdName, TaskTitelName, remark);
28: else
29: Ext.MessageBox.alert('温馨提示', '操作已取消。');
30: }
31: },
32: animEl: animEl
33: });
34: }
用来判断相应的操作类型,假如是退回或者撤销,则必须填写批注。如:
至于其他的代码,我就不多介绍了,篇幅有限,精力有限。
工作台的代码,其他篇幅有部分介绍,可以参考EXT.NET复杂布局(一)——工作台。
处理面板顶部工具栏有不少按钮,如何动态添加这些按钮(可以根据用户权限和事项判断),代码如下:
1: /// <summary>
2: /// 向工具条添加按钮
3: /// </summary>
4: /// <param name="icon">图标</param>
5: /// <param name="text">文本</param>
6: /// <param name="facode">操作Code</param>
7: /// <param name="toolbar">工具条</param>
8: /// <param name="_panelName">容器ID</param>
9: private static void SetButton(Icon icon, string text, FACodeEnum facode, Toolbar toolbar, string _panelName)
10: {
11: if (toolbar == null) throw new ArgumentNullException("toolbar");
12: var _btn = new Ext.Net.Button
13: {
14: Icon = icon,
15: Text = text,
16: Listeners =
17: {
18: Click =
19: {
20: Handler =
21: string.Format("toExcuteOperations(#{{{0}}}.getSelectionModel().getSelections(),'{1}');", _panelName, facode.ToString())
22: }
23: }
24: };
25: //设置Click事件的Handler,用于操作所选项。操作参数(所选记录集、操作Code)
26: if (toolbar.Items.Count > 0)
27: toolbar.Items.Add(new ToolbarSeparator());
28: toolbar.Items.Add(_btn);
29: }
ToolbarSeparator表示分割线,比如:
在String.Format中,两个大括号代表一个大括号哦。
表单
还记得那个测试页么,在工作台弹出窗口后,窗口加载的是框架页,那么在这个框架页中,我们如何关闭这个窗口呢?比如提交数据完毕的时候。其实只需要输出这段脚本即可:
top.Ext.getCmp('frmStatesRequestList').destroy();
在这个框架页中,我们也可以调用首页消息函数,比如:
top.showMsg('温馨提示', '欢迎进入该页面!');
关于表单的一些介绍,请看EXT.NET复杂布局(三)——复杂表单布局。
尾声
从使用EXT.NET到现在,也差不多一年了,真正使用的时间也只有几个月而已。现在回想起来,还是感慨良多。
回想当初上手的时候,不仅ext不熟悉,而且对EXT.NET也一无所知,中间碰到过许多问题,但是挺过来了,而且还留下了自己的足迹。希望我的帖子能够帮助各位更快的掌握EXT以及EXT.NET,也希望能为EXT.NET的资料库添加块砖片瓦。
最后,附上源码。


