SWT 和 JFace,第 4 部分: 简介
ToolBar、SashForm 以及其他控件和对话框
“SWT 和 JFace” 系列的第 4 部分对于前几部分中使用 Java™ 技术、Eclipse 以及 SWT 和 JFace 库创建应用程序的知识进行扩展。这篇文章介绍了 ToolBar、CoolBar、Tray、 SashForm、Link 和其他控件以及其他几种对话框的使用方法。另请参阅本系列前几篇文章。
 内容
内容
在本系列的前三篇文章中,我介绍了用与构建 Eclipse 和独立、功能丰富的 GUI 的 Eclipse、Eclipse Standard Widget Toolkit (SWT) 和 JFace GUI 工具包。另外还介绍了许多基本 GUI 控件、容器类型和布局管理器。随后展示了如何把这些控件组合到一个简单的工作应用程序中。还详细说明了如何为这些应用程序提供一个菜单系统。最后演示了如何按照最佳实践创建方法和类的库,从而简化 GUI 开发。
关于本系列
本系列 “SWT 和 JFace” 包含一些描述使用 Standard Widget Toolkit (SWT) 和 JFace 库开发应用程序的基础文章,这些库是与基本的 Eclipse 软件开发工具包一起提供的。这一系列集中描述了如何使用 SWT 和 JFace 开发独立的应用程序。不过,您所学到的大部分知识同样适用于在 Eclipse 工作台上使用 SWT 的情况。
本系列从功能有限的一些简单 GUI 开始,然后朝着有用的应用程序逐步推进。我们将介绍大多数标准的、定制的 SWT 小部件和许多 JFace 特性。讨论中至少包含一个使用该技术的示例。
本系列假定您熟悉 Java 编程语言和基于 Java 技术的开发,并且对 Java AWT 或 Swing GUI 工具包有一定了解。
在这里,我们将完成对 org.eclipse.swt.widgets 和 org.eclipse.swt.custom 包中的各种小部件的详细观察(除非特别说明,否则这里讨论的控件都在 widgets 包中)。关于背景知识,本文假设您至少阅读过这个系列的 第 1 部分。
简介
在后面几节中,我将讨论几个 GUI 控件。这些控件通过一个叫作 BarApp 的应用程序进行演示。正如前几部分所述,BarApp 是 BasicApplication 类(内含控件生成方法)的扩展。还使用了这个应用程序的几幅屏幕快照来展示不同控件的特性。
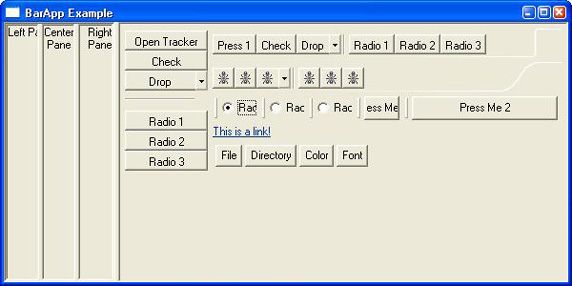
图 1 显示了我们讨论的所有控件,包括几个 ToolBar 和一个 CoolBar。最左边是三个有边框的 Composite(包含一个 Label),每个 Composite 都位于一个 SashForm 面板内。而 SashForm 本身又处在一个更大的 SashForm 中有边框的 Composite 内。靠近左侧中间是一个垂直的 ToolBar,它的顶部有一个 Open Tracker 按钮。在右上方是四个水平的 ToolBar(在两个 CBanner 中)—— 但只能看到两个;前两个使用了文本标签,后两个使用图片(同一张图片)。这几个 ToolBar 和 CBanner 全都在外围 SashForm 中的一个 Composite 中。从清单 1 的控件层次结构中可以清楚地看出这个结构。
图 1. BarApp 示例
清单 1. BarApp 应用程序的控件层次结构
0: BarApp {}
    1: SashForm {}
        2: Composite {}
            3: SashForm {}
                4: Composite {}
                    5: Label {Left Pane}
                4: Composite {}
                    5: Label {Center Pane}
                4: Composite {}
                    5: Label {Right Pane}
        2: Composite {}
            3: ToolBar {}
                4: ToolItem {Open Tracker}
                4: ToolItem {Check}
                4: ToolItem {Drop}
                4: ToolItem {}
                4: ToolItem {Radio 1}
                4: ToolItem {Radio 2}
                4: ToolItem {Radio 3}
                4: Label {}
            3: CBanner {}
                4: ToolBar {}
                    5: ToolItem {Press 1}
                    5: ToolItem {Check}
                    5: ToolItem {Drop}
                    5: ToolItem {}
                    5: ToolItem {Radio 1}
                    5: ToolItem {Radio 2}
                    5: ToolItem {Radio 3}
                    5: Label {}
                4: ToolBar {}
                    5: ToolItem {Push 2}
                    5: ToolItem {Check}
                    5: ToolItem {Drop}
                    5: ToolItem {}
                    5: ToolItem {Radio 1}
                    5: ToolItem {Radio 2}
                    5: ToolItem {Radio 3}
                    5: Label {}
            3: CBanner {}
                4: ToolBar {}
                    5: ToolItem {}
                    5: ToolItem {}
                    5: ToolItem {}
                    5: ToolItem {}
                    5: ToolItem {}
                    5: ToolItem {}
                    5: ToolItem {}
                    5: Label {}
                4: ToolBar {}
                    5: ToolItem {}
                    5: ToolItem {}
                    5: ToolItem {}
                    5: ToolItem {}
                    5: ToolItem {}
                    5: ToolItem {}
                    5: ToolItem {}
                    5: Label {}
            3: CoolBar {}
                4: CoolItem {Drop}
                4: CoolItem {Drop}
                4: CoolItem {Drop}
                4: CoolItem {Drop}
                4: CoolItem {Drop}
                4: Button {Press Me 1}
                4: Button {Press Me 2}
                4: Button {Radio 1}
                4: Button {Radio 2}
                4: Button {Radio 3}
            3: Link {<a href="http://www.somecorp.com">This is a link!</a>}
            3: Composite {}
                4: Button {File}
                4: Button {Directory}
                4: Button {Color}
                4: Button {Font}
回页首
ToolBar、CoolBar 和 Tray
ToolBar 与本系列 第 2 部分 中所描述的 Menu 控件类似。ToolBar 包含 ToolItem, ToolItem 可以有文本或图片作为按钮。一般来说,要么使用图片(AKA 图标)、要么使用文本,不能同时使用。如果仅使用图片,那么 ToolItem 需要有一个 ToolTip (帮助提供信息的短语或句子),这样当鼠标停留在 ToolItem 上时,会显示 ToolTip,解释图片的功能。
ToolBar 必须定义成以下两种完全互异的样式之一:
HORIZONTAL—— 水平方向的VERTICAL—— 垂直方向的
ToolBar 支持以下样式:
FLAT—— 以平面样式显示项目WRAP—— 项目换行RIGHT—— 项目右对齐(及左对齐)SHADOW_OUT—— 显示阴影
ToolItem 必须定义成以下 5 种完全互异的样式之一:
CHECK—— 可连续选择项目(复选)。DROP_DOWN—— 项目(通常)显示下拉菜单。PUSH—— 项目作为按钮,可直接引发动作(最常见的形式)。RADIO—— 此类项目只能选择一个。SEPARATOR—— 在项目组之间充当分隔符(通常是一个条),这个项目没有功能。
以下两个清单分别显示了创建 ToolBar 和 ToolItem 的代码。
清单 2. 创建 ToolBar 的方法
protected ToolBar createVToolBar(Composite parent, int style) {
    return new ToolBar(parent, style | SWT.VERTICAL);
}

protected ToolBar createHToolBar(Composite parent, int style) {
    return new ToolBar(parent, style | SWT.HORIZONTAL);
}
清单 3. 创建 ToolItem 的方法
protected ToolItem createToolItem(ToolBar bar, int style, String text,
                                  Image image, String tooltip,
                                  SelectionListener listener) {
    if (image != null && (text == null && tooltip == null)) {
        throw new IllegalArgumentException("image only items require a tool tip");
    }
    ToolItem ti = new ToolItem(bar, style);
    if (image != null) {
        ti.setImage(image);
    }
    else {
        if (text != null) {
            ti.setText(text);
        }
    }
    if (tooltip != null) {
        ti.setToolTipText(tooltip);
    }
    if (listener != null) {
        ti.addSelectionListener(listener);
    }
    return ti;
}
多数操作系统都提供了与系统状态关联的特殊形式的工具栏,称为 托盘 (Tray)。不能构造 Tray;必须使用 Display.getSystemTray() 访问 Tray。与 ToolBar 相似,托盘中包含 TrayItem。TrayItem 没有样式选项,通常以 PUSH ToolItem 的形式工作。
CoolBar 类似 ToolBar,区别在于用户可以重新安排栏中的 CoolItem,可以在 CoolItem 之间拖曳分隔条。对于栏中的 CoolItem 如何换行以及栏中项目显示的顺序,CoolBar 还允许更多控制。CoolBar 只支持 FLAT (或 NONE)样式。CoolItem 只支持 DROP_DOWN 样式。与 ToolItem 不同,CoolItem 有相关的控件负责实际实现项目的 GUI。如果没有这个控件,CoolItem 就没有功能,通常也没有可视的实现。这个控件应当有一个 ToolTip。
下面两个清单分别显示了创建 CoolBar 和 CoolItem 的代码。请注意只能创建水平 CoolBar。
清单 4. 创建 CoolBar 的方法
protected CoolBar createCoolBar(Composite parent, int style) {
    return new CoolBar(parent, style);
}
清单 5. 创建 CoolItem 的方法
protected CoolItem createCoolItem(CoolBar bar, int style, String text,
                                  Image image, SelectionListener listener) {
    CoolItem ci = new CoolItem(bar, style);
    if (text != null) {
        ci.setText(text);
    }
    if (image != null) {
        ci.setImage(image);
    }
    return ci;
}
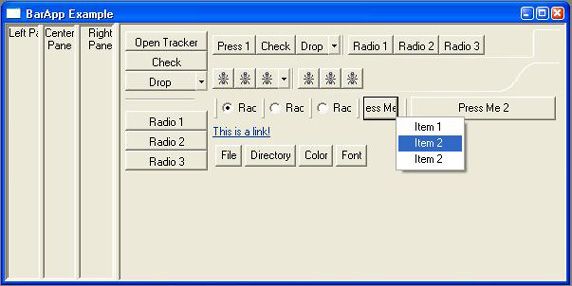
下面这个清单显示了如何用这个代码创建 CoolItem 和相关控件。在这个示例中,当选中 CoolItem 的控件时,会弹出一个菜单,如图 2 所示。请注意 CoolItem、按钮和菜单都用 CoolBar 作为双亲。还请注意 CoolItem 的文本没有显示,只显示了关联的控件。
清单 6. CoolItem 的创建示例
CoolBar cb = createCoolBar(..., SWT.FLAT);
  :  // other CoolItems
CoolItem ci = createCoolItem(cb, SWT.FLAT,  "Drop", null, null);
Button b = createButton(cb, SWT.PUSH, "Press Me 1", null, new SelectionAdapter() {
    public void widgetSelected(SelectionEvent se) {
        menu.setVisible(true);
    }
});
ci.setControl(b);     // associate Button with CoolItem
Menu m = new Menu(cb);
createMenuItem(m, SWT.PUSH, "Item 1", null, '1', true, null);
createMenuItem(m, SWT.PUSH, "Item 2", null, '2', true, null);
createMenuItem(m, SWT.PUSH, "Item 2", null, '3', true, null);
  :  // other CoolItems
图 2. CoolItem 示例
回页首
SashForm
通常需要给应用程序 GUI 的某些部分分配可变的屏幕空间。第 3 部分 介绍了如何用 TabFolder 实现此目标。而本文将介绍使用 SashForm 的替代方法。
SashForm 显示多个(通常是两个)控件时,在控件间可以有分隔 Sash(框格)。可移动此框格,在控件间分隔屏幕空间。请注意在多数情况下,SashFrom 中的控件是 Composite。要获得最佳使用性,Composite 应当有边框,以便让 Sash 看起来更清楚。SashForm 可以嵌套在其他 SashForm 中(看起来工作得很好),从而形成相当复杂的分隔空间的方法。SashForm 在 custom 包中。
SashForm 必须定义成以下两种互斥的样式之一:
HORIZONTAL—— 水平方向排列元素VERTICAL—— 垂直方向排列元素
它们还支持 SMOOTH 样式,在使用此样式时,框格的移动更流畅。
以下清单显示了创建 SashForm 的方法。
清单 7. 创建 SashForm 的方法
protected SashForm createSashForm(Composite parent, int style) {
    SashForm sf = new SashForm(parent, style);
    return sf;
}
protected SashForm createVSashForm(Composite parent) {
    return createSashForm(parent, SWT.VERTICAL);
}
protected SashForm createHSashForm(Composite parent) {
    return createSashForm(parent, SWT.HORIZONTAL);
}
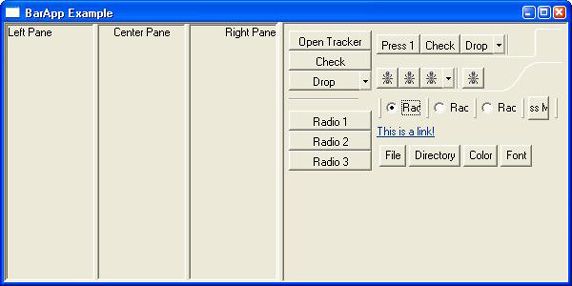
图 3 和图 4 显示了 SashForm 的实际效果。图 3 展示的是外部的 SashForm 移动到右侧。图 4 则展示调整内部 SashForm 以使中央 Composite 变得更大。把这两个图与 图 1 对比,可以看出 Sash 预先配置的位置是,外部 Sash 20%,内部 Sash 33%。
图 3. SashForm 示例 1
图 4. SashForm 示例 2
回页首
CBanner
CBanner 是带有定制、预定义布局的特殊 Composite。它支持三个控件:Left、Right 和 Bottom,这三个控件都是可选的;通常使用的是 Left 和 Right。一般来说这些控件是 ToolBar。CBanner 在 Eclipse 中被用来使主工具区恰好位于主菜单下。CBanner 在 custom 包中。
像 SashForm 一样,CBanner 提供了分隔器,可以容易地移动,从而分隔 Left 和 Right 控件之间分隔空间。CBanner 有一个setSimple(boolean) 方法,控制分隔器的形式。如果为 false,分隔器就采用粗曲线形式。
以下清单显示了创建 CBanner 的代码。
protected CBanner createCBanner(Composite parent) {
    return new CBanner(parent, SWT.NONE);
}
图 5 显示了一个简单的 CBanner 和一个复杂的 CBanner。
图 5. CBanner 示例
回页首
Link
Link 与 PUSH 按钮类似,但是看起来更像 Web 浏览器中的文本链接。Link 只支持文本内容。Link 可以使用普通文本或 HTML A 标记作为内容(通常采用 <a href="某个 url">某些文本消息</a> 的形式)。如果使用 A 标记的语法,那么 Link 看起来就像 Web 链接;否则,看起来就像 Label。请注意在 Eclipse V3.1 中才可以使用 Link。
以下清单显示了创建 Link 的代码。
清单 8. 创建 Link 的方法
protected Link createLink(Composite parent, String text,
                          SelectionListener listener) {
    Link l = new Link(parent, SWT.NONE);
    if (text != null) {
        l.setText(text);
    }
    if (listener != null) {
        l.addSelectionListener(listener);
    }
    return l;
}
图 6 显示了一个用红色强调的 Link。
图 6. Link 示例
回页首
Tracker
有些时候,您可能希望在修改控件大小或移动控件的同时给用户提供反馈。Tracker 可实现此目的。它创建一个临时的轮廓(实际是 GUI 上的透明窗口的边框),可以通过键盘或鼠标移动它或修改大小。在关闭 Tracker 时,应用程序通常就把相关控件移动或修改尺寸到与 Tracker 匹配的位置和尺寸。应用程序也可以跟着 Tracker 持续地移动控件或修改控件大小。
以下清单显示了创建 Tracker 的代码。
清单 9. 创建 Tracker 的方法
protected Tracker createTracker(Composite parent, int style) {
	return createTracker(parent, style, null, null);
}
protected Tracker createTracker(Composite parent, int style,
                                ControlListener cl, KeyListener kl) {
    Tracker t = new Tracker(parent, style);
    if (cl != null) {
        t.addControlListener(cl);
    }
    if (kl != null) {
        t.addKeyListener(kl);
    }
    return t;
}
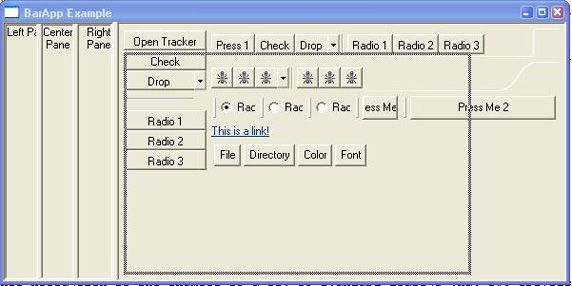
图 7 显示了 Check 按钮的 Tracker,扩展到了 GUI 的右侧。
图 7. Tracker 示例
回页首
Dialog
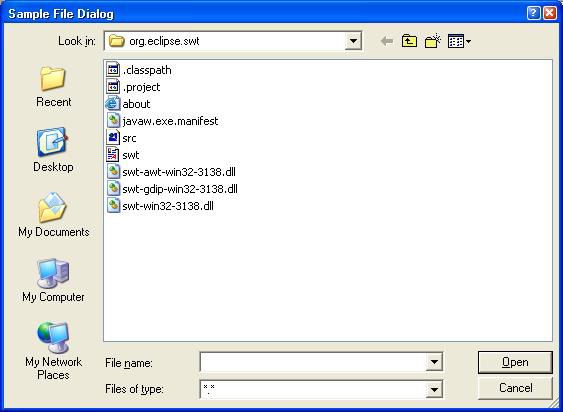
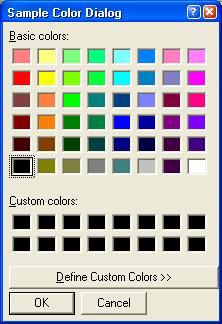
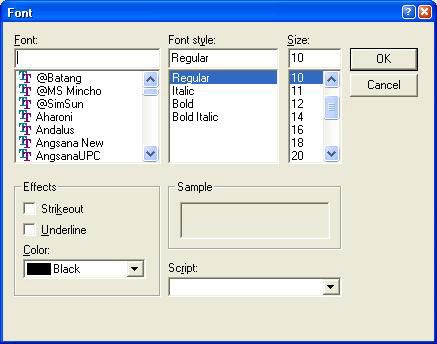
BasicApplication 类显示了确定退出的 MessageBox。这个 MessageBox 就是 SWT 提供的一组标准对话框的一个示例。其他一些有用的对话框是:
FileDialog —— 允许用户选择文件
DirectoryDialog —— 允许用户选择目录
FontDialog —— 允许用户选择字体
ColorDialog —— 允许用户选择选择颜色值
请注意 Dialog 可能不允许您对其标题文本进行设置。
下面的清单显示了创建全部 4 种 Dialog 的代码。
清单 10. 创建多种 Dialog 的方法
FileDialog fd = new FileDialog(getShell(), SWT.OPEN);
fd.setText("Sample File Dialog");
String path = fd.open();

DirectoryDialog dd = new DirectoryDialog(getShell(), SWT.NONE);
dd.setText("Sample Directory Dialog");
String path = dd.open();

ColorDialog cd = new ColorDialog(getShell(), SWT.NONE);
cd.setText("Sample Color Dialog");
RGB rgb = cd.open();

FontDialog fd = new FontDialog(getShell(), SWT.NONE);
fd.setText("Sample Font Dialog");
FontData d = fd.open();
图 8 至图 11 显示了不同 Dialog 的实际效果。
图 8. 文件对话框示例
图 9. 目录对话框示例
图 10. 颜色选择示例
图 11. 字体选择示例
回页首
结束语
本系列的第 4 部分介绍了 SWT 的控件 ToolBar、CoolBar、Tray、Link、SashForm、CBanner、Tracker 和不同的 Dialog。我们现在完成了对 SWT GUI 控件的游历。本系列的下一篇文章将进入 JFace 的领域,介绍如何使用 JFace ContentProvider 和 LabelProvider 构建表格和树的模型。
