var table = new Titanium.UI.createTableView({ /* properties */ });Titanium UI之TableViews组件
TableViews
内容
Ti里面创建一个TableView,如下:
这是其包含的属性:
-
height and width
-
top and left
-
backgroundColor and backgroundImage
-
rowHeight / minRowHeight / maxRowHeight – 控制行的尺寸
-
headerTitle / headerView
-
footerTitle / footerView
-
scrollable (boolean) –控制tableView的滚动,纵向滚动条
为TableView添加数据
TableView的一行是一个Ti.UI.TableViewRow对象,当然,你可以通过此对象来控制该行。
Ti.UI.createTableViewRow(),此方法用来创建一个TableViewRow对象。
你可以通过javascript来循环的创建此对象。
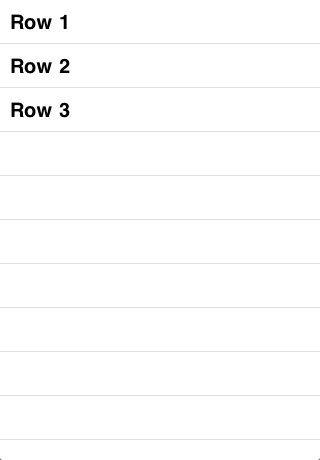
Object literals as rows
// 通过json来做为数据
var tbl_data = [
	{title:'Row 1'},
	{title:'Row 2'},
	{title:'Row 3'}
];
// 装载数据(第一种方法)
var table = Titanium.UI.createTableView({
	data:tbl_data
});
// 第二种方法
table.setData(tbl_data);
当然,你也可以创建TableViewRow对象来填充数据,这样做有个好处是:你对Row的可控性提高了,可以方便的使用其方法。
如:add(),fireEven()等
Explicit TableViewRow objects
var row = Titanium.UI.createTableViewRow({
    title: 'Row 1'
    /* other properties */
});
table.appendRow(row);
// 有了这个对象,你可以使用其方法。
关于一个空的TableView
你可以创建一个空的tableView(没有数据);
但是不要设置tableView的data属性为一个null或者一个underfined,这样将会抛出异常!
table.setData([]); // or table.data = [];呵呵,当然,如果你们的APP真有要插入1000行数数据的需要,你可能要重新考虑UI布局了,上面只是setData和data属性与appendRow()的比较,插入1000行,本身setData和data属性也很慢。
TableViewRow的属性
-
className –设置此属性,可以使操作系统重用Row。
-
leftImage
-
rightImage
-
backgroundImage
-
backgroundColor
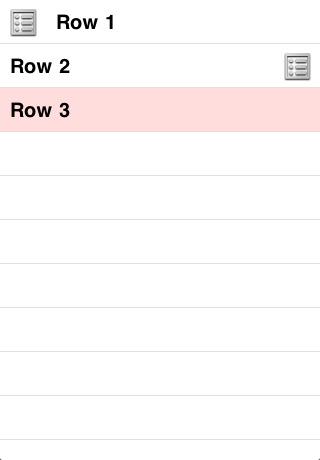
这是上面显示的示例代码:
var tbl_data = [
    {title:'Row 1', leftImage: 'KS_nav_ui.png'},
    {title:'Row 2', rightImage: 'KS_nav_ui.png'},
    {title:'Row 3', backgroundColor: '#fdd'}
];
// now assign that array to the table's data property to add those objects as rows
var table = Titanium.UI.createTableView({
    data:tbl_data
});
// alternatively, you could do
table.setData(tbl_data);
行标
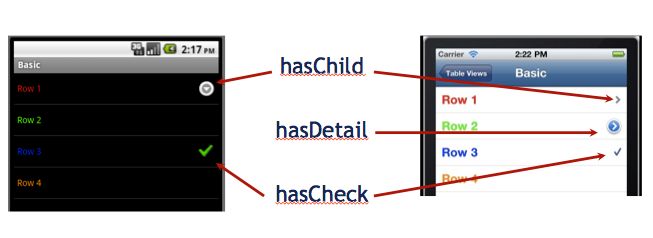
如图:Android 的行标和IOS的不同:android有两,IOS有三
-
hasChild – 表示其含有子Table或者行;
-
hasDetail –表示有详细信息,android不支持;
-
hasCheck – 是否选中
自定义行
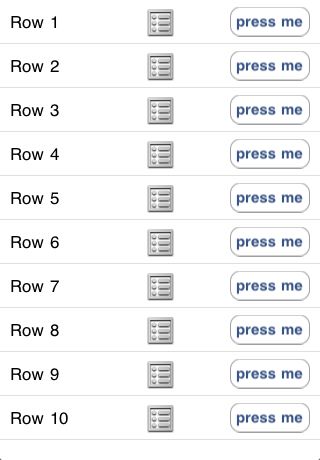
下面是个例子:
// Create an array of explicitly defined custom TableViewRows
var tbl_data = [];
for (var i = 0; i < 10; i++) {
	var row = Ti.UI.createTableViewRow();
	var label = Ti.UI.createLabel({
		left: 10,
		text: 'Row ' + (i+1)
	});
	var image = Ti.UI.createImageView({
		url: 'KS_nav_ui.png'
	});
	var button = Ti.UI.createButton({
		right: 10,
		height: 30,
		width: 80,
		title: 'press me'
	});
	row.add(label);
	row.add(image);
	row.add(button);
	tbl_data.push(row);
}

// now assign that array to the table's data property to add those objects as rows
var table = Titanium.UI.createTableView({
    data:tbl_data
});
Groupe rows
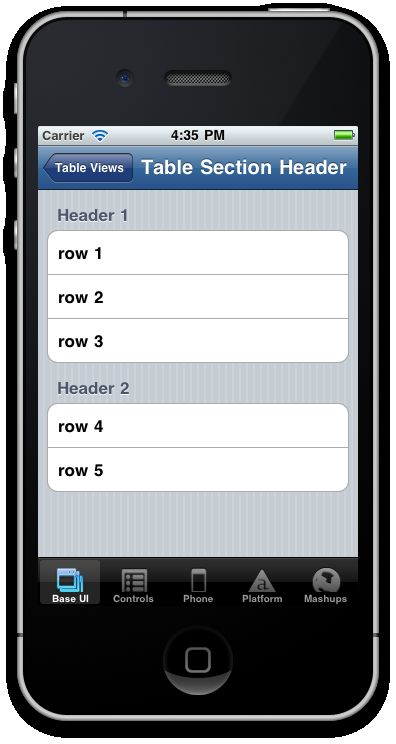
在IOS中,你可以设置style属性,让row分开显示(以组的方式显示):
var inputData = [
	{title:'row 1', header:'Header 1'},
	{title:'row 2'},
	{title:'row 3'},
	{title:'row 4', header:'Header 2'},
	{title:'row 5'}
];
var tableView = Titanium.UI.createTableView({
	data:inputData,
	style:Titanium.UI.iPhone.TableViewStyle.GROUPED
});
Headers and footers
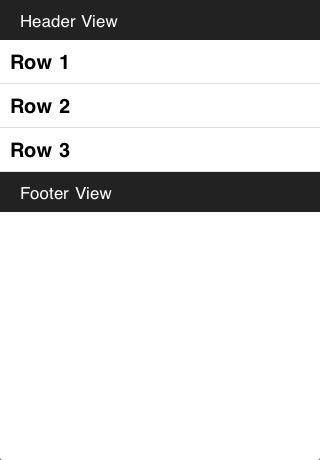
这是利用headerTitle和footerTitle属性来设置TableView的两标题
var data = [
	{ title: 'Row 1' },
	{ title: 'Row 2' },
	{ title: 'Row 3' }
];
var tableview = Titanium.UI.createTableView ({
    data:data,
    headerTitle:'TableView examples and test cases',
    footerTitle:"Wow. That was cool!",
});
还有一个更灵活的方法,你可以使用Views来丰富你的heads 和 footers;需要使用 TableView的headerView和footerView属性。
var tbl_data = [
	{ title: 'Row 1' },
	{ title: 'Row 2' },
	{ title: 'Row 3' }
];

var createCustomView = function(title) {
	var view = Ti.UI.createView({
		backgroundColor: '#222',
		height: 40
	});
	var text = Ti.UI.createLabel({
		text: title,
		left: 20,
		color: '#fff'
	});
	view.add(text);
	return view;
};

// now assign that array to the table's data property to add those objects as rows
var table = Titanium.UI.createTableView({
    data:tbl_data,
    headerView: createCustomView('Header View'),
    footerView: createCustomView('Footer View')
});
// alternatively, you could do
table.setData(tbl_data);
Table sections
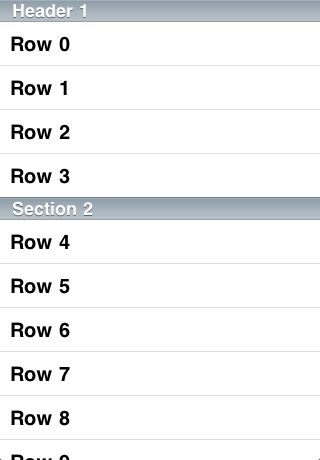
TableSections 可以使你把TableView一部分行,放在一个组,Table Sections 是包含headers和footers的。 使用Ti.UI.createTableViewSection() 来创建TableViewSection对象;
// Create the first TableViewSection
var section1 = Ti.UI.createTableViewSection({
	headerTitle:'Header 1'
});
// use a loop to add some rows
for (var i=0; i < 4; i++) {
	section1.add(Ti.UI.createTableViewRow({
		title:'Row '+i
	}));
}
// do it all again...
var section2 = Ti.UI.createTableViewSection({
	headerTitle: 'Section 2'
});
for (var i=4; i < 10; i++) {
	section2.add(Ti.UI.createTableViewRow({
		title:'Row '+i
	}));
}
// Now, here's our table, and we're setting the data to hold the sections
var tv = Ti.UI.createTableView({
	data:[section1,section2]
});
利用TableSection来遍历行row
在TI中,即使你不显示的创建TableViewSection,Ti会自动创建一个默认的。这是因为TableView没有arows属性,而sections有此属性,这样一来,就可以循环遍历row了;
var table = Ti.UI.createTableView({});
// we'll add rows, but not sections
table.data = resultsOfSomeDatabaseOperation();
// when the table is clicked, loop through the rows
table.addEventListener('click', function(e){
	var sections = table.data; // grab the array of sections
	var section = sections[0]; // use just the first section
	for(var x=0,y=section.rowCount;x < y;x++) {
		var theRow = section.rows[x];
		// do something with theRow
	}
});
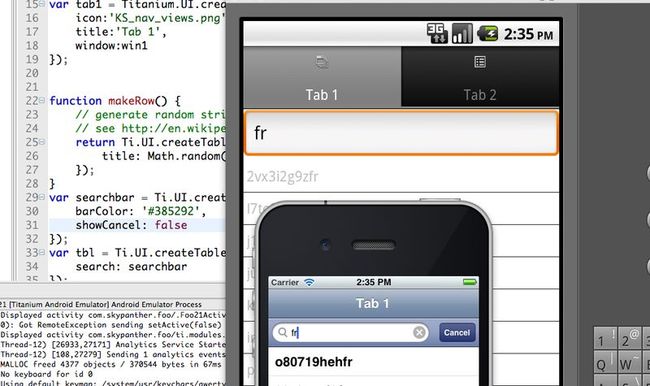
在TableView中搜索
例如,当用户输入一个“B”,tableView可以显示包含B的title的row;
function makeRow() {
	// generate random string of digits and capital English letters
	// see http://en.wikipedia.org/wiki/Base_36
	return Ti.UI.createTableViewRow({
		title: Math.random().toString(36).substring(7)
	});
}
//创建一个搜索栏
var searchbar = Ti.UI.createSearchBar({
	barColor: '#385292',
	showCancel: false
});
var tbl = Ti.UI.createTableView({
	search: searchbar,
	hideSearchOnSelection: true
});
var data = [];
for(var i=0; i<100; i++) {
	data.push(makeRow());
}
tbl.data = data;
win.add(tbl);
如下图所示,在IOS中和android中,搜索Bar是有所区别的:
-
showCancel boolean 值,如果为true始终显示cancel按钮;如果为false,在IOS中,不会显示cancel直到有用户输入,而android中,始终不会显示按钮;
-
hideSearchOnSelection 该属性只对IOS系统有效,设置为True,当用户点击searchBar 时会自动清空text的内容,然后隐藏cancel按钮;设置false则相反,会一直显示;
可以为sections,rows和其子节点绑定事件。我们不推荐直接给Rows绑定事件,这样做会增加不必要的内存和cpu开销;
table.addEventListener('click', function(e){
	alert('You clicked row '+e.index);
});
上面代码中有个重要的对象,E 事件对象,其有些重要的属性:
-
index – 触发事件时的行下标
-
row –row对象
-
rowData – the properties of the row that received the event//触发事件时的行对象的数据集
-
source – the object that received the original event//事件源
-
section – the table section that received the event//触发时的section
延伸阅读:
-
完整代码: http://assets.appcelerator.com.s3.amazonaws.com/app_u/code/345-finished.zip
-
TableView API docs: http://developer.appcelerator.com/apidoc/mobile/latest/Titanium.UI.TableView-object
-
TableViewRow API docs: http://developer.appcelerator.com/apidoc/mobile/latest/Titanium.UI.TableViewRow-object
-
Kitchen Sink code: https://github.com/appcelerator/KitchenSink
