JRebel安装和使用
安装JRebel
1. IntelljJ EDEA 14
1). Installation(安装)
Installing the JRebel plugin
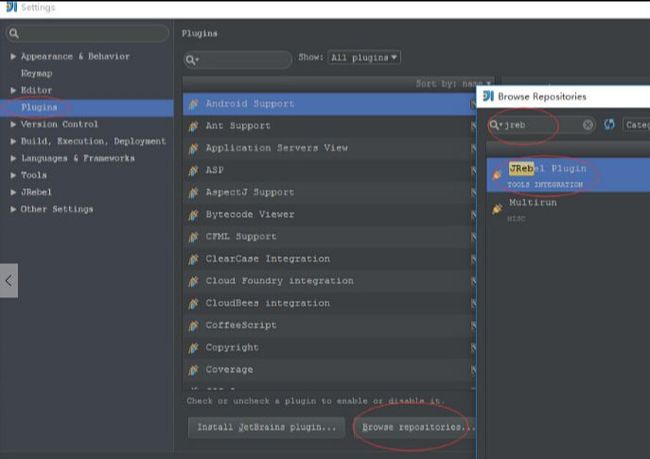
Open File > Settings. Select Plugins.
Press Browse Repositories.
Find JRebel. Press Install plugin.
Next → Activation
如果不工作:
The plugin can also be downloaded as a ZIP archive from http://plugins.jetbrains.com/plugin/?id=4441. Once downloaded, open Plugins and press Install plugin from disk. Browse to the downloaded file and follow the prompts.
如果安装OK:
If the installation was a success, your IDE will restart. After the restart, JRebel will alert you via a notification.
如图:
2). Activation(激活)
Getting a license
Open Help > JRebel Activation.
Fill out the form.
Press Activate JRebel.
Next → Server configuration
获取license
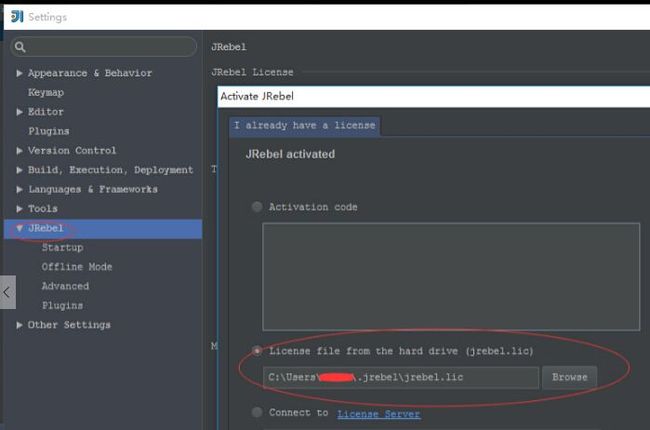
Press I already have a license in the activation window.
Activation code. Paste your activation code if you have one already.
License file from the hard drive. Point to your jrebel.lic file. You get this file via email when you purchase JRebel.
Connect to License Server. Enter your Group URL and email. You get the Group URL from your network administrator.
破解:
下载破解版本,http://pan.baidu.com/s/1mgKjrr6
替换安装的:C:\Users\用户\.IntelliJIdea12\config\plugins\jr-ide-idea\lib\jrebel\jrebel.jar
配置:jrebel config指定jrebel.lic
重启后查看显示已激活
如图激活后:
license:
3). Server configuration(服务配置)
Enabling JRebel agent for your server
Press the Run with JRebel button on the toolbar to run your application with JRebel enabled.
Next → Project configuration
安装成功后菜单多了两个图标:
4). Project configuration(项目配置)
Mapping your workspace to the deployed application
Open View > Tool Windows > JRebel panel. The JRebel Modules window opens.
Select the projects or modules you wish to enable JRebel for.
Next, right-click your project node and select JRebel > rebel.xml. The rebel.xml file is generated for your project.
Redeploy your application!
Next → Completion
如图右击项目菜单最下面如下:
启动项目:
To debug your application with JRebel, press the Debug with JRebel button instead.
How to start JRebel from a command line.
Configuring a remote server to work with JRebel.
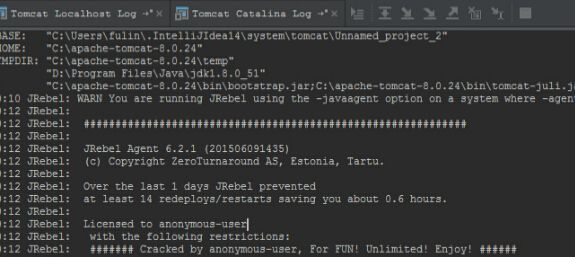
运行成功时提示:
When successful, you will see the JRebel banner in the console right at server startup. This is what the JRebel banner should look like:
2015-07-30 11:23:20 JRebel: #######################################################
2015-07-30 11:23:20 JRebel:
2015-07-30 11:23:20 JRebel: JRebel Legacy Agent 6.2.2 (201507291221)
2015-07-30 11:23:20 JRebel: (c) Copyright ZeroTurnaround AS, Estonia, Tartu.
2015-07-30 11:23:20 JRebel:
2015-07-30 11:23:20 JRebel: Over the last 1 days JRebel prevented
2015-07-30 11:23:20 JRebel: at least 0 redeploys/restarts saving you about 0 hours.
2015-07-30 11:23:20 JRebel:
2015-07-30 11:23:20 JRebel: Licensed to ZeroTurnaround.
2015-07-30 11:23:20 JRebel:
2015-07-30 11:23:20 JRebel: #######################################################
如图:
5). Completion(完成)
Building your project
IntelliJ IDEA does not compile classes by default. Use Build > Make Project command to compile classes and update your application.
And you’re done!
注意:
IntelliJ IDEA does not compile classes on save by default. Press Ctrl+Shift+F9 to compile the current file, module or package (you can also find this command via Build > Make Project).
Once you have generated rebel.xml, you need to redeploy your application to the server for the configuration to take effect.
没改变一次如图:
2.Eclipse 4
1). Installation(安装)
Installing the JRebel plugin
Open Help > Eclipse Marketplace…
Search for JRebel. Found it? Press Install.
Next→ Activation
如果不工作:
Don’t worry, you can also install JRebel using:
Update site URL. Open Help > Install New Software and enter the URL for our update site: http://update.zeroturnaround.com/update-site. Follow the prompts to complete the installation.
Download ZIP. The Eclipse plugin update can also be downloaded as ZIP archive from http://update.zeroturnaround.com/update-site/update-site.zip. Once downloaded, open Help > Install New Software and press Add. Select Archive to point to the ZIP archive of the update site. Press OK to proceed.
安装成功:
If the installation was a success, your IDE will restart. After the restart, JRebel will alert you via a notification.
安装如图:
2). Activation(激活)
Getting a license
Open Help > JRebel Activation.
Fill out the form.
Press Activate JRebel.
Next → Server configuration
获取license:
Got a license?
Press I already have a license in the activation window.
Activation code. Paste your activation code if you have one already.
License file from the hard drive. Point to your jrebel.lic file. You get this file via email when you purchase JRebel.
Connect to License Server. Enter your Group URL and email. You get the Group URL from your network administrator.
破解:
下载破解版本,http://pan.baidu.com/s/1mgKjrr6
替换安装的:D:\eclipse\plugins\org.zeroturnaround.eclipse.embedder_6.2.2.RELEASE-201507291337\jrebel\jrebel.jar
配置:jrebel config指定jrebel.lic
重启后查看显示已激活
如图:
3). Server configuration(服务配置)
Enabling JRebel agent for your server
Open Help > JRebel Configuration > Startup.
Select Run via IDE.
Select the check-box next to your server. Doing this will automatically run your server with the required JVM arguments.
Next → Project configuration
提示:
如果配置后IDE没成功运行选择Run using CLI 或者 Run on a remote server or VM 试试
运行成功提示:
When successful, you will see the JRebel banner in the console right at server startup. This is what the JRebel banner should look like:
2015-07-30 11:23:20 JRebel: #######################################################
2015-07-30 11:23:20 JRebel:
2015-07-30 11:23:20 JRebel: JRebel Legacy Agent 6.2.2 (201507291221)
2015-07-30 11:23:20 JRebel: (c) Copyright ZeroTurnaround AS, Estonia, Tartu.
2015-07-30 11:23:20 JRebel:
2015-07-30 11:23:20 JRebel: Over the last 1 days JRebel prevented
2015-07-30 11:23:20 JRebel: at least 0 redeploys/restarts saving you about 0 hours.
2015-07-30 11:23:20 JRebel:
2015-07-30 11:23:20 JRebel: Licensed to ZeroTurnaround.
2015-07-30 11:23:20 JRebel:
2015-07-30 11:23:20 JRebel: #######################################################
4). Project configuration(项目配置)
Mapping your workspace to the deployed application
Open Help > JRebel Configuration > Projects.
Select the check-box next to your project. Doing this will generate a rebel.xml file and keep it up to date.
Redeploy your application!
Next → Completion
Didn't work?
Using Maven to manage your projects? Use the JRebel Maven plugin to generate rebel.xml automatically. JRebel Maven instructions.
Running Gradle? Use the JRebel Gradle plugin to generate rebel.xml automatically. JRebel Gradle instructions.
Need to further tweak your rebel.xml? JRebel rebel.xml reference manual has the answers.
5). Completion(完成)
Enabling automatic build
Open Project > enable Build Automatically.
And you’re done!
Why do this?
JRebel relies upon your IDE to do the compiling. Enabling Build Automatically ensures that your .java files are compiled to .class files.
JRebel reloads your compiled .class files and not your .java files. When you change code, JRebel pushes the changed classes and resources to the server without redeploying.
参考官网:http://zeroturnaround.com/software/jrebel/quickstart/intellij/


