[ASP.NET MVC3.0]Contact Manager 之迭代开发 一
原文地址:http://www.asp.net/mvc/tutorials/iteration-1-create-the-application-cs
紫色永恒的翻译:http://www.cnblogs.com/024hi/archive/2009/03/19/ASP_NET_MVC_SAMPLE_CONTACT_MANAGER_1.html
系列将演示如何通过ASP.NET MVC framework结合单元测试、TDD、Ajax、软件设计原则及设计模式创建一个完整的Contact Manager应用。本系列共七个章节,也是七次迭代过程。我是在紫色永恒的博客看到文章后开始实践这个系列的。开发环境是ASP.NET MVC 3.0(Razor),Visual Studio 2010SP1,SQL2008。由于和上面两文里的环境不同,代码相对来说有部分变化,所以我也对照上两文记录一下我的实践过程。疏漏之处请拍砖~
迭代一 -- 创建应用程序
Iteration #1 -- Create the Application
在这个系列中,我们将从头至尾的创建一个Contact Management应用程序。我们可以通过它来管理联系信息,如名字、电话号码、电子邮件地址等等。
我们将通过迭代的方式开发这个应用,并在每次迭代的过程中逐渐的扩展和改善该应用程序。
本次迭代
在第一次迭代中,我们先建立最基本最简单的应用程序,然后在接下来的迭代中,逐渐改善程序的设计。
Contact Manager是一个基本的数据库驱动的应用程序。你可以使用它建立新的联系人,编辑已存在的联系人亦或者删除这些联系人。
本次迭代我们将完成如下步骤:
- ASP.NET MVC应用程序。
- 建立数据库来存储Contacts。
- 用Microsoft Entity Framework为数据库生成一个实体模型。
- 建立一个controller action以及一个view来列出数据库中的所有联系人。
- 建立controller action以及view向数据库添加新的联系人。
- 建立controller action以及view 实现修改数据库中现有的联系人记录。
- 建立controller action以及view实现对数据库中已存在的联系人的删除操作。
开发环境
开发环境是ASP.NET MVC 3.0(Razor),Visual Studio 2010SP1,SQL2008。
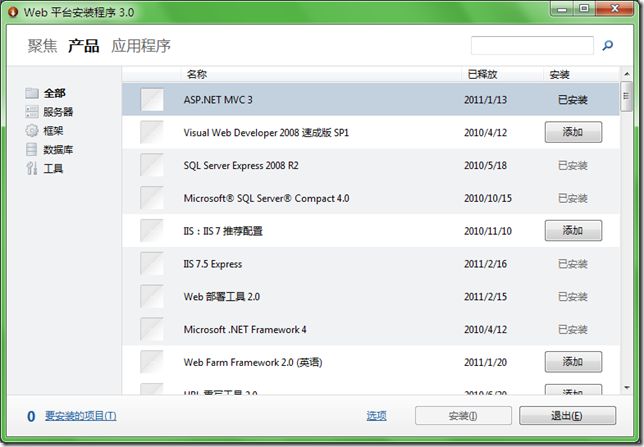
如果没有ASP.NET MVC 3.0请通过web平台安装程序安装:
建立ASP.NET MVC 项目
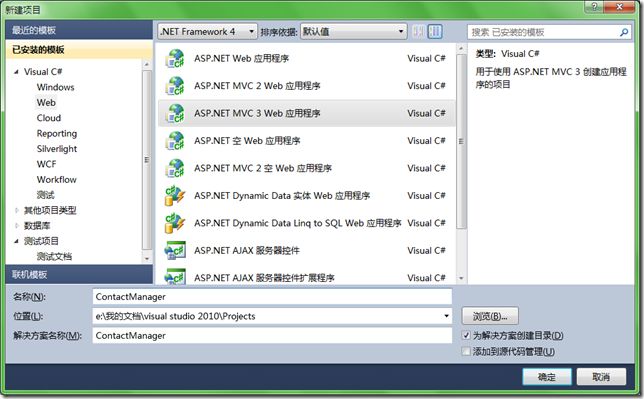
运行vs2010然后选择新建项目。在新建项目窗口选择c# web模板里的ASP.NET MVC 3 Web应用程序。项目名称输入ContactManager后按确定建立(如图1)。
图1.新建项目
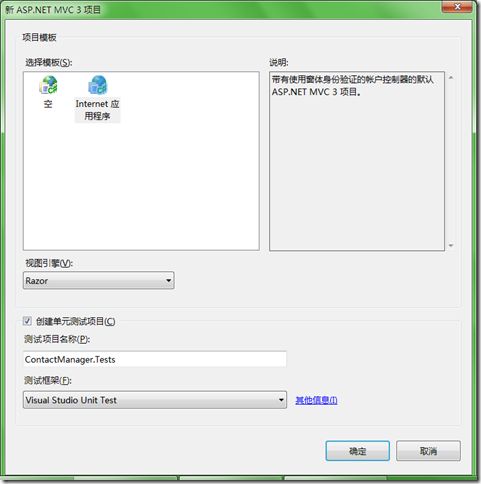
点击确定后,跳转到图2。在这个界面可以选择模板的具体类型是空模板还是示例应用程序,我们选Internet应用程序。接下来是视图引擎选择,传统的ASPX还是新发布的Razor,这里我们选择Razor引擎。这里我们还要创建单元测试项目ContactManager.Tests,因为在以后的迭代里我们计划加入单元测试。在创建mvc项目时添加测试项目要比完成时再添加要简单多了。
图2.创建单元测试及选择Razor引擎
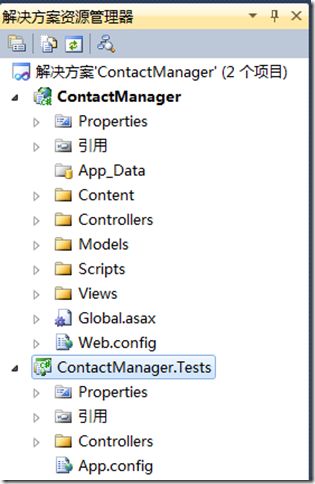
点击确定我们就创建了一个MVC3.0的应用程序。可以在解决方案资源管理器中看到图3。如果看不到解决方案资源管理器窗口请到视图里打开(或者按CTRL+W打开)。
注意:解决方案里包括了两个项目:ASP.NET MVC项目和测试项目。名字分别为ContactManager、ContactManager.
图3.解决方案资源管理器
删除项目里的sample文件
创建的实例项目里包含很多的controllers 和views的sample文件。在我们往下做之前先删除掉没用的文件。(实际项目里可以在创建的项目模板里图2选择空)在图3的窗口中点击右键并选择删除。删除的列表如下:
\Controllers\HomeController.cs
\Views\Home\About.cshtml
\Views\Home\Index.cshtml
同时测试项目里删除如下:
\Controllers\HomeControllerTest.cs
建立数据库
Contact Manager 是一个数据库驱动的web应用,所以我们建立一个数据库来存储contact信息。
本系列我们使用sql server2008。安装vs2010时候已经一起安装,如果你选择了的话:)
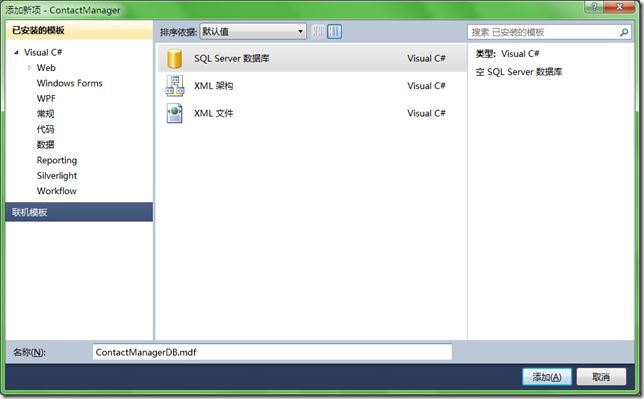
右击解决方案资源管理器中的App_Data文件夹选择 添加-》新建项,然后如图4,选择数据模板里的SQLServer数据库,名称填入ContactManagerDB.mdf 按添加。
图 04: 建立数据库
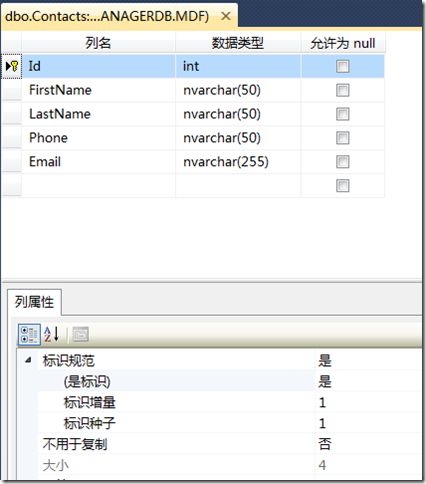
建立数据库完成后,App_Data文件夹里可以看到ContactManagerDB.mdf。双击ContactManagerDB.mdf打开服务器资源管理器连接数据库。在表上右击选择添加新表打开表设计器(图05).第一个字段Id右键设置成主键并且设置为增量种子,具体如图。完成后保存为表Contacts
图 05: 表设计器
在创建完表后右击表Contacts,选择显示表数据,然后添加几条数据来进行后面的测试。
建立数据实体模型
我们要为上面创建的Contacts创建一个实体模型。本系列我们使用Microsoft Entity Framework 来创建(简称EF)。当然也可以用其他的框架,例如NHibernate, LINQ to SQL, or ADO.NET。
通过以下几步来建立:
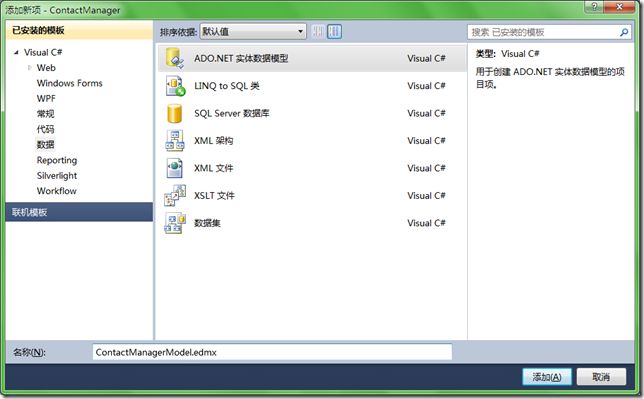
- 在右击Models文件夹(在解决方案资源管理器中,以下省略~这个搞成中文真囧~)选择添加-》新建项打开添加新项窗口(图06)。
- 模板目录选择数据,模板里选择ADO.NET实体数据模型,名称填写ContactManagerModel.edmx后点添加打开实体数据模型向导(图06).
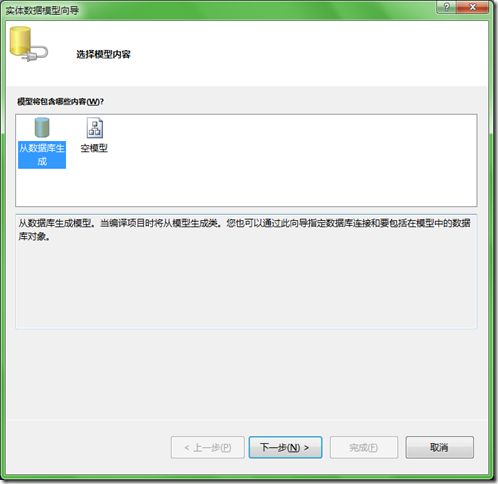
- 模型内容界面选择从数据库生产(图7).
- 数据连接选择步骤,选择ContactManagerDB.mdf 数据库,将Web.Config实体连接另存为ContactManagerDBEntities (图 8).
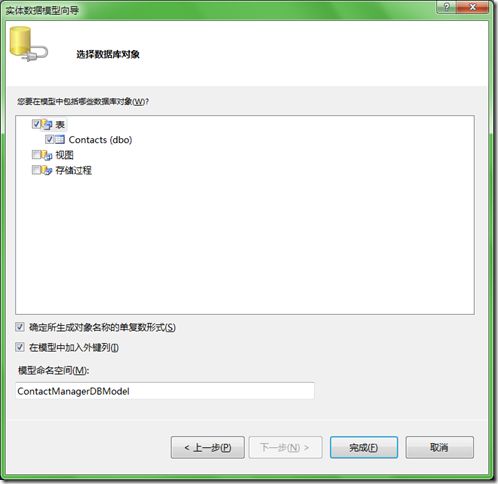
- 选择数据库对象,选中表前面的复选框。模型将包含所有数据库中的表(现在只有一个Contacts),模型命名空间输入ContactManagerDBModel,选中确定生成对象的单复数形式(图9)
图 06: 添加新项
图 07: 选择模型内容
图 08: 选择数据连接
图 09: 选择数据库对象
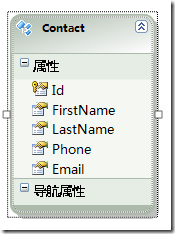
完成向导后会自动打开数据实体模型设计界面。可以看到一个类Contact(图10)
图10: 类Contact
这里我们已经创建了数据库模型,我们可以使用Contact 类代表数据库的contact 记录。
创建Home Controller
下面创建我们的Home controller。Home controller是mvc应用的默认入口。
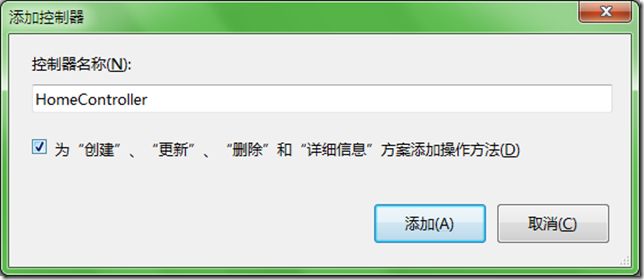
在Controllers 文件夹右击,选择添加-》控制器(图11)。.注意选上图中的复选框来自动生成创建、更新、删除等方法.
图 11: 添加Home Conntroller
创建完后得到如下代码的类
Listing 1 - Controllers\HomeController.cs
using System;
using System.Collections.Generic;
using System.Linq;
using System.Web;
using System.Web.Mvc;

namespace ContactManager.Controllers
{
    public class HomeController : Controller
    {
        //
        // GET: /Home/

        public ActionResult Index()
        {
            return View();
        }

        //
        // GET: /Home/Details/5

        public ActionResult Details(int id)
        {
            return View();
        }

        //
        // GET: /Home/Create

        public ActionResult Create()
        {
            return View();
        }

        //
        // POST: /Home/Create

        [HttpPost]
        public ActionResult Create(FormCollection collection)
        {
            try
            {
                // TODO: Add insert logic here

                return RedirectToAction("Index");
            }
            catch
            {
                return View();
            }
        }

        //
        // GET: /Home/Edit/5

        public ActionResult Edit(int id)
        {
            return View();
        }

        //
        // POST: /Home/Edit/5

        [HttpPost]
        public ActionResult Edit(int id, FormCollection collection)
        {
            try
            {
                // TODO: Add update logic here

                return RedirectToAction("Index");
            }
            catch
            {
                return View();
            }
        }

        //
        // GET: /Home/Delete/5

        public ActionResult Delete(int id)
        {
            return View();
        }

        //
        // POST: /Home/Delete/5

        [HttpPost]
        public ActionResult Delete(int id, FormCollection collection)
        {
            try
            {
                // TODO: Add delete logic here

                return RedirectToAction("Index");
            }
            catch
            {
                return View();
            }
        }
    }
}
Contacts列表
要列出Contacts 表的记录,我们需要创建Index的action和view。Home controller 已经生成了Index() action,修改如下:
Listing 2 - Controllers\HomeController.cs
...
using ContactManager.Models;

...
        private ContactManagerDBEntities _entities = new ContactManagerDBEntities();
        //
        // GET: /Home/

        public ActionResult Index()
        {
            return View(_entities.Contacts.ToList());
        }
...
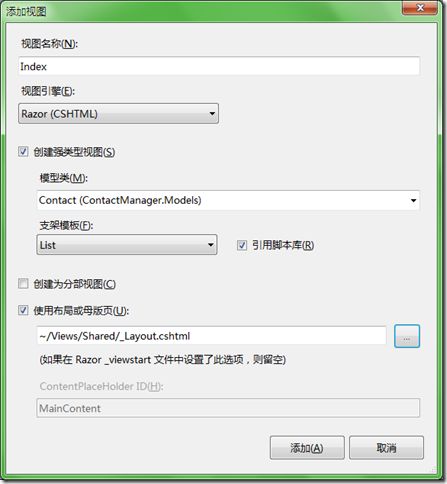
注意引用ContactManager.Models!这里编译一下整个解决方案,不然在action上右击添加视图会出问题。在index()上右击选添加视图打开添加视图窗口。
图12 添加视图
图13 添加视图
名称自动生成为Index,选择创建强类型视图模型类里选择Contact,支架模板里选择List,母版也选择/Views/Shared/_Layout.cshtml。可以看到index的view如下:
Listing 3 - Views\Home\Index.cshtml
@model IEnumerable<ContactManager.Models.Contact>

@{
    ViewBag.Title = "Index";
    Layout = "~/Views/Shared/_Layout.cshtml";
}

<h2>Index</h2>

<p>
    @Html.ActionLink("Create New", "Create")
</p>
<table>
    <tr>
        <th></th>
        <th>
            FirstName
        </th>
        <th>
            LastName
        </th>
        <th>
            Phone
        </th>
        <th>
            Email
        </th>
    </tr>

@foreach (var item in Model) {
    <tr>
        <td>
            @Html.ActionLink("Edit", "Edit", new { id=item.Id }) |
            @Html.ActionLink("Details", "Details", new { id=item.Id }) |
            @Html.ActionLink("Delete", "Delete", new { id=item.Id })
        </td>
        <td>
            @item.FirstName
        </td>
        <td>
            @item.LastName
        </td>
        <td>
            @item.Phone
        </td>
        <td>
            @item.Email
        </td>
    </tr>
}

</table>
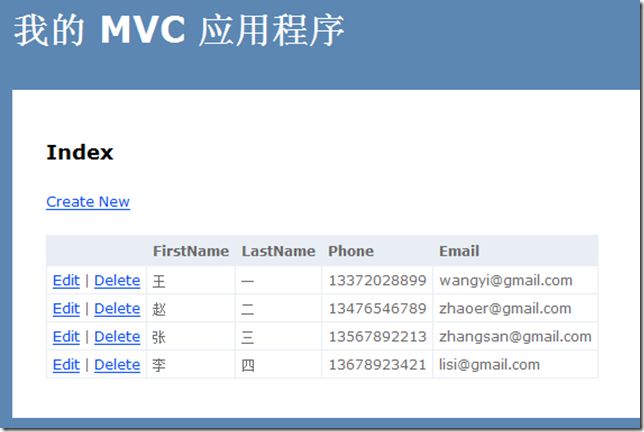
本系列我们不做联系人的详细界面,所以删除上面的@Html.ActionLink("Details", "Details", new { id=item.Id }) | ,这时可以按F5运行程序看看效果了(图14)。
创建新联系人 Creating New Contacts
要添加新联系人信息,我们要在Home controller里添加2个Create() actions,一个用来返回创建联系人的HTML表单,另外一个来执行实际的数据库插入操作。Create()方法代码如下:
Listing 4 - Controllers\HomeController.cs (with Create methods)
//
// GET: /Home/Create

public ActionResult Create()
{
    return View();
}

//
// POST: /Home/Create

[AcceptVerbs(HttpVerbs.Post)]
public ActionResult Create([Bind(Exclude = "Id")] Contact contactToCreate)
{
    if (!ModelState.IsValid)
        return View();

    try
    {
        _entities.AddToContactSet(contactToCreate);
        _entities.SaveChanges();
        return RedirectToAction("Index");
    }
    catch
    {
        return View();
    }
}
第一个Create()在HTTP GET时候被调用,它只是简单的返回一个用来添加联系人的表单,而第二个Create()只有在HTTP POST时候才会被调用,它往数据库里添加新联系人。
第二个Create()方法接收一个Contact的实例。表单值提交后被MVC框架自动的绑定到contact类,每一个表单域对应contact的一个属性。[Bind]属性绑定主键Id。和上面一样在create方法上右击选择添加视图(图16)。
图16
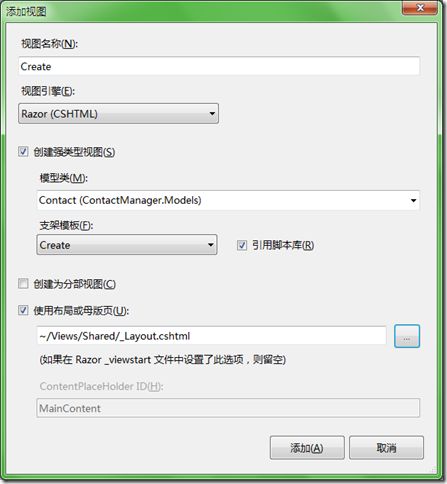
添加视图窗口里选择如下(图17):
图 17: 添加视图
添加后自动生成的Create的view如下.
Listing 5 - Views\Home\Create.cshtm
@model ContactManager.Models.Contact

@{
    ViewBag.Title = "Create";
    Layout = "~/Views/Shared/_Layout.cshtml";
}

<h2>Create</h2>

<script src="@Url.Content("~/Scripts/jquery.validate.min.js")" type="text/javascript"></script>
<script src="@Url.Content("~/Scripts/jquery.validate.unobtrusive.min.js")" type="text/javascript"></script>

@using (Html.BeginForm()) {
    @Html.ValidationSummary(true)
    <fieldset>
        <legend>Contact</legend>

        <div class="editor-label">
            @Html.LabelFor(model => model.FirstName)
        </div>
        <div class="editor-field">
            @Html.EditorFor(model => model.FirstName)
            @Html.ValidationMessageFor(model => model.FirstName)
        </div>

        <div class="editor-label">
            @Html.LabelFor(model => model.LastName)
        </div>
        <div class="editor-field">
            @Html.EditorFor(model => model.LastName)
            @Html.ValidationMessageFor(model => model.LastName)
        </div>

        <div class="editor-label">
            @Html.LabelFor(model => model.Phone)
        </div>
        <div class="editor-field">
            @Html.EditorFor(model => model.Phone)
            @Html.ValidationMessageFor(model => model.Phone)
        </div>

        <div class="editor-label">
            @Html.LabelFor(model => model.Email)
        </div>
        <div class="editor-field">
            @Html.EditorFor(model => model.Email)
            @Html.ValidationMessageFor(model => model.Email)
        </div>

        <p>
            <input type="submit" value="Create" />
        </p>
    </fieldset>
}

<div>
    @Html.ActionLink("Back to List", "Index")
</div>
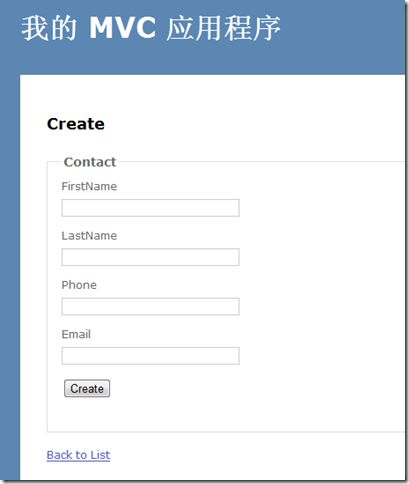
现在运行程序可以点击Create New菜单到创建页面(图18)
图 18: 创建页面
修改联系人 Editing Contacts
修改Conntroller里的Edit方法如下:
Listing 6 - Controllers\HomeController.cs (with Edit methods)
//
// GET: /Home/Edit/5

public ActionResult Edit(int id)
{
    var contactToEdit = (from c in _entities.Contacts
                         where c.Id == id
                         select c).FirstOrDefault();
    return View(contactToEdit);
}

//
// POST: /Home/Edit/5

[HttpPost]
public ActionResult Edit(Contact contactToEdit)
{
    if (!ModelState.IsValid)
        return View();
    try
    {
        var originalContact = (from c in _entities.Contacts
                               where c.Id == contactToEdit.Id
                               select c).FirstOrDefault();
        //_entities.ApplyPropertyChanges(originalContact.EntityKey.EntitySetName, contactToEdit);
        _entities.ApplyCurrentValues<Contact>(originalContact.EntityKey.EntitySetName, contactToEdit);
        _entities.SaveChanges();
        return RedirectToAction("Index");
    }
    catch
    {
        return View();
    }
}
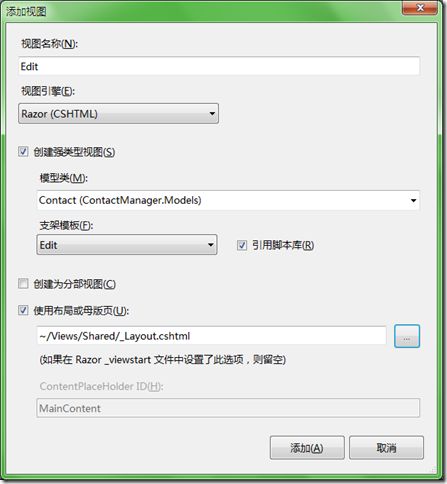
第一个Edit方法显示页面,第二个处理post的数据。在Edit方法上右击选择添加视图打开添加视图界面,选择如下(图19)
图 19: 添加eidt视图
添加完成生成如下代码:
Listing 7 - Views\Home\Edit.cshtml
@model ContactManager.Models.Contact

@{
    ViewBag.Title = "Edit";
    Layout = "~/Views/Shared/_Layout.cshtml";
}

<h2>Edit</h2>

<script src="@Url.Content("~/Scripts/jquery.validate.min.js")" type="text/javascript"></script>
<script src="@Url.Content("~/Scripts/jquery.validate.unobtrusive.min.js")" type="text/javascript"></script>

@using (Html.BeginForm()) {
    @Html.ValidationSummary(true)
    <fieldset>
        <legend>Contact</legend>

        @Html.HiddenFor(model => model.Id)

        <div class="editor-label">
            @Html.LabelFor(model => model.FirstName)
        </div>
        <div class="editor-field">
            @Html.EditorFor(model => model.FirstName)
            @Html.ValidationMessageFor(model => model.FirstName)
        </div>

        <div class="editor-label">
            @Html.LabelFor(model => model.LastName)
        </div>
        <div class="editor-field">
            @Html.EditorFor(model => model.LastName)
            @Html.ValidationMessageFor(model => model.LastName)
        </div>

        <div class="editor-label">
            @Html.LabelFor(model => model.Phone)
        </div>
        <div class="editor-field">
            @Html.EditorFor(model => model.Phone)
            @Html.ValidationMessageFor(model => model.Phone)
        </div>

        <div class="editor-label">
            @Html.LabelFor(model => model.Email)
        </div>
        <div class="editor-field">
            @Html.EditorFor(model => model.Email)
            @Html.ValidationMessageFor(model => model.Email)
        </div>

        <p>
            <input type="submit" value="Save" />
        </p>
    </fieldset>
}

<div>
    @Html.ActionLink("Back to List", "Index")
</div>
删除联系人 Deleting Contacts
修改Delete方法如下:
Listing 8 - Controllers\HomeController.cs (Delete methods)
// GET: /Home/Delete/5

public ActionResult Delete(int id)
{
    var contactToDelete = (from c in _entities.Contacts
                           where c.Id == id
                           select c).FirstOrDefault();

    return View(contactToDelete);
}

//
// POST: /Home/Delete/5

[HttpPost]
public ActionResult Delete(Contact contactToDelete)
{
    try
    {
        var originalContact = (from c in _entities.Contacts
                               where c.Id == contactToDelete.Id
                               select c).FirstOrDefault();

        _entities.DeleteObject(originalContact);
        _entities.SaveChanges();
        return RedirectToAction("Index");
    }
    catch
    {
        return View();
    }

}
同样为Dlete添加视图后运行。点击Delete到确认页面(图20):
图20: 删除确认页面
重命名默认的Controller
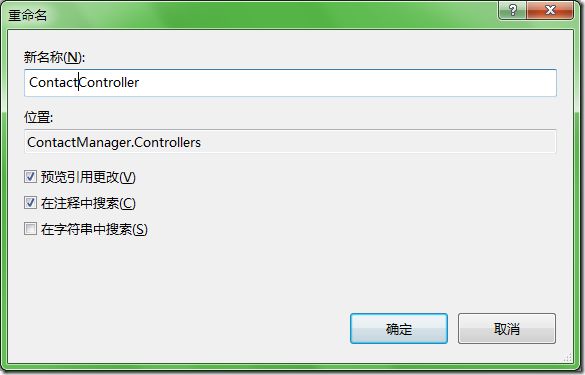
系统为我们默认生成的Controller有时候并不是我们需要的,在类名上右击选择重构-》重命名打开重命名界面(图21)
图21: 重命名controller
图22重命名界面
重命名之后Visual Studio 会自动去改动view文件夹里的相关东西。如\Views\Home 文件夹改为\Views\Contact文件夹。
这时候运行会出错,需要同步修改Global.asax 里的默认路由。
routes.MapRoute(
               "Default", // 路由名称
               "{controller}/{action}/{id}", // 带有参数的 URL
               new { controller = "Contact", action = "Index", id = UrlParameter.Optional } // 参数默认值
           );
摘要
在第一次迭代里,我们创建了Contact Manager 的各项基本功能(增删改查),充分利用了vs2010的自动生成Controller和view的强大,也体会到了ef框架带给我们的便利。
在下一次的迭代中,我们将修改母版页的css来提升应用体验。还有我们将为表单添加验证等……
