(译)如何使用cocos2d开发一个简单的iphone游戏:旋转炮塔。(第二部分)
免责申明(必读!):本博客提供的所有教程的翻译原稿均来自于互联网,仅供学习交流之用,切勿进行商业传播。同时,转载时不要移除本申明。如产生任何纠纷,均与本博客所有人、发表该翻译稿之人无任何关系。谢谢合作!
原文链接地址:http://www.raywenderlich.com/692/rotating-turrets
《怎样使用cocos2d来开发一个简单的iphone游戏》这个帖子太火了,你们当中的许多人都想要一些后续的教程!特别是,有些人问到我如何旋转炮塔来改变射击的方向。许多游戏都有这个功能,包括我最喜欢的一款游戏----塔防!
因此,在这个教程中,我将会详细地讲解如何实现这个功能,即如何把旋转炮塔的功能添加到一个游戏当中去。在这里,特别要感谢Jason和Robert,是他们建议我来写这篇教程。
准备工作
如果你看完并实践了上一个教程,你可以继续使用那个工程。如果没有的话,那么下载这个链接的代码吧。
接下来,下载新的 player sprite 和 projectile sprite图片,然后把它们加到工程里面,在这之前,先从工程里删除旧的Player.png和Projectile.png图片。然后,修改代码,把每个sprite添加进去。如下所示:
CCSprite * player = [CCSprite spriteWithFile: @" Player2.png " ];
// In the ccTouchesEnded method
CCSprite * projectile = [CCSprite spriteWithFile: @" Projectile2.png " ];
注意,这一次我们并没有指定精灵的宽度和高度,而是让cocos2d替我们来处理这些事情。
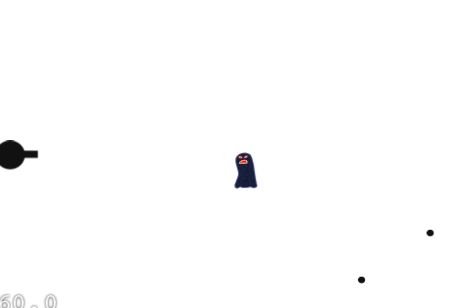
编译并运行你的工程,如果一切顺利的话,你将会看到一个炮塔正在发射子弹。然后,这并不是很好,因为炮塔在射击的时候并没有面朝那个方向。因此,接下来让我们来解决这个问题。
旋转并射击
在我们旋转炮塔之前,首先,我们需要保存Player精灵的引用,以便后面旋转它的时候使用。打开HelloWorldScene.h,然后修改类文件并包含以下成员变量:
然后修改init方法中的代码,把Player对象加入到层(layer)中。代码如下:
_player.position = ccp(_player.contentSize.width / 2 , winSize.height / 2 );
[self addChild:_player];
最后,我们在dealloc函数里面添加一些清除代码。(这是个好习惯,初使化后就做相应的清理操作,防止忘记。)
_player = nil;
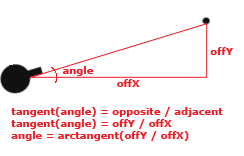
好了,现在让我们取出player对象的引用并且旋转它吧!为了旋转它,我们首先需要计算出旋转的角度。为了解决这个问题,想想我们在高中时候学过的三角代数吧。还记得sin cos tan吗?为了便于理解,下面使用一张图来解释一下:tan = 对面/邻边。
如上所示,我们想要旋转的角度是arctangent(angle),即对offY/offX求arctangent运算。
然而,这里还有两件事情,我们需要放在心上。首先,当我们计算actangent(offY/offX)的时候,这个结果是弧度,但是cocos2d使用的却是角度。还好,cocosd2d提供了一个非常方便的宏,可以使得角度和弧度之间方便转化。
第二点,我们假定上面的图中angle的偏转是正20度,但是,cocos2d里面顺时针方向为正(而不是上图所示的逆时针为正)。让我们看到下面这个图:
因此,为了得到正确的方向,我们把运算结果乘以一个-1就可以了。比如,如果我们把上面那幅图片里的角度乘以-1的话,我们就得够得到-20度,这个角度其实就是逆时针方向的20度。(感觉老外说话好啰嗦啊,聪明的读者恐怕早就明白了吧!:)
好了,讲得够多了!让我们来写一点代码吧。在ccTouchesEnded里面加入以下代码,添加位置在你的projectile runAction之前。
float angleRadians = atanf(( float )offRealY / ( float )offRealX);
float angleDegrees = CC_RADIANS_TO_DEGREES(angleRadians);
float cocosAngle = - 1 * angleDegrees;
_player.rotation = cocosAngle;
编译并运行工程,现在我们的炮塔在射击的时候可以改变方向了。
旋转之后再射击
目前来说还不错,但是有一点点怪。因为,这个炮塔好像突然一下跳到一个方向射击,有点不够流畅。我们可以解决这个问题,但是在这之前,我们需要重构一下代码。
首先,打开HelloWorldScene.h,然后在你的类里添加如下成员变量:
然后,修改你的ccTouchesEnded方法,并且添加一个新的方法,叫做finishShoot,如下所示:
if (_nextProjectile != nil) return ;
// Choose one of the touches to work with
UITouch * touch = [touches anyObject];
CGPoint location = [touch locationInView:[touch view]];
location = [[CCDirector sharedDirector] convertToGL:location];
// Set up initial location of projectile
CGSize winSize = [[CCDirector sharedDirector] winSize];
_nextProjectile = [[CCSprite spriteWithFile: @" Projectile2.png " ] retain];
_nextProjectile.position = ccp( 20 , winSize.height / 2 );
// Determine offset of location to projectile
int offX = location.x - _nextProjectile.position.x;
int offY = location.y - _nextProjectile.position.y;
// Bail out if we are shooting down or backwards
if (offX <= 0 ) return ;
// Play a sound!
[[SimpleAudioEngine sharedEngine] playEffect: @" pew-pew-lei.caf " ];
// Determine where we wish to shoot the projectile to
int realX = winSize.width + (_nextProjectile.contentSize.width / 2 );
float ratio = ( float ) offY / ( float ) offX;
int realY = (realX * ratio) + _nextProjectile.position.y;
CGPoint realDest = ccp(realX, realY);
// Determine the length of how far we're shooting
int offRealX = realX - _nextProjectile.position.x;
int offRealY = realY - _nextProjectile.position.y;
float length = sqrtf((offRealX * offRealX) + (offRealY * offRealY));
float velocity = 480 / 1 ; // 480pixels/1sec
float realMoveDuration = length / velocity;
// Determine angle to face
float angleRadians = atanf(( float )offRealY / ( float )offRealX);
float angleDegrees = CC_RADIANS_TO_DEGREES(angleRadians);
float cocosAngle = - 1 * angleDegrees;
float rotateSpeed = 0.5 / M_PI; // Would take 0.5 seconds to rotate 0.5 radians, or half a circle
float rotateDuration = fabs(angleRadians * rotateSpeed);
[_player runAction:[CCSequence actions:
[CCRotateTo actionWithDuration:rotateDuration angle:cocosAngle],
[CCCallFunc actionWithTarget:self selector:@selector(finishShoot)],
nil]];
// Move projectile to actual endpoint
[_nextProjectile runAction:[CCSequence actions:
[CCMoveTo actionWithDuration:realMoveDuration position:realDest],
[CCCallFuncN actionWithTarget:self selector:@selector(spriteMoveFinished:)],
nil]];
// Add to projectiles array
_nextProjectile.tag = 2 ;
}
- ( void )finishShoot {
// Ok to add now - we've finished rotation!
[self addChild:_nextProjectile];
[_projectiles addObject:_nextProjectile];
// Release
[_nextProjectile release];
_nextProjectile = nil;
}
这看上去好像有许多代码,但是,实际上我们改动的并不多--大部分只是做一些小小的重构。下面是我们所修改的内容的一个列表:
1.在函数开头检查nextProjectile的值是否为nil。这意味着我们当前的touch事件正发生在射击过程之中。也就是说,炮塔已经发射出一个子弹了。
2.之前,我们使用一个projectile的局部变量,并把它加入到了当前的场景中。在这个版本中,我们增加了一个nextProjectile的成员变量,但是并没有马上加到当前场景中。因为后要还要使用。
3.定义炮塔旋转的角度,半秒钟旋转半个圆。记住,一个圆有2 PI个弧度。
4.计算旋转特定的角度需要多长时间,这里是拿弧度乘以速度。
5.接下来,我们使用一个sequence action来旋转我们的炮塔。最后,调用一个函数,把projectile加入到当前场景当中去。
好,大功告成!编译并运行工程,现在炮塔可以旋转,并且很流畅地射击了!
接下来做什么?
首先,这里有《怎样使用cocos2d来开发简单的iphone游戏》目前为止的完整代码。
接下来,在这个系列的教程中,我们教大家如何添加更猛的怪物和更多的关卡!
或者期待我接下来翻译的cocos2d和box2d方面的教程吧!
著作权声明:本文由http://www.cnblogs.com/andyque翻译,欢迎转载分享。请尊重作者劳动,转载时保留该声明和作者博客链接,谢谢!


