【Cocos2d-x v3.2+Cocos Studio1.6】实现一个简单的uibutton点击功能
使用Cocos Studio能够非常方便地设计游戏的一些界面,并导入到Cocos2d-x中。本文讲解如何基于Cocos Stusio 1.6和Cocos2d-x v3.2来实现一个简单的uibutton点击功能。
首先我们打开Cocos Studio1.6,选择UIEditor,进去后我们发现有很多的示例,选中一个叫demologin的示例:
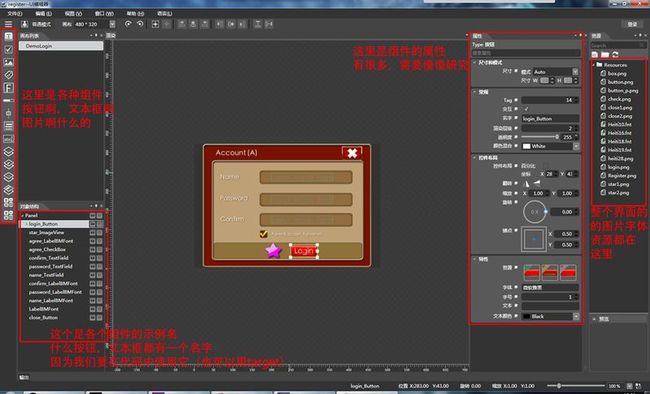
选择好后我们发现如下图,简单介绍了下功能:
这里我们选中那个login按钮,发现这个按钮的实例名叫login_Button,这个名字我们等会代码里要用,然后我们保存一下。
在保存路径下找到这个工程文件夹,打开
有这些文件,我们把Json和Resources文件夹下的资源复制到Cocos2d-x中的资源文件夹中。
这个json文件就是记录了这个widget的各种数据,Cocos2d-x会解析这些数据然后还原这个界面,感兴趣的可以打开研究下。
好了到了代码阶段,我就简单的创建了个helloworld,但是我们要把三个外部的工程库导入这个解决方案并引用 并在头文件中包含。
好了,下面就是代码了
|
1
2
3
4
5
6
7
8
9
10
11
12
13
14
15
16
17
18
19
20
21
22
23
24
25
26
27
28
|
//HelloWorldScene.h
#ifndef __HELLOWORLD_SCENE_H__
#define __HELLOWORLD_SCENE_H__
#include "cocos2d.h"
//导入这三个头文件
//注意在这个工程的属性->C\C++ ->常规->附加包含目录 中添加这三个文件的路径
#include "cocostudio/CocoStudio.h"
#include "extensions/cocos-ext.h"
#include "ui/CocosGUI.h"
class
HelloWorld :
public
cocos2d::Layer
{
public
:
// there's no 'id' in cpp, so we recommend returning the class instance pointer
static
cocos2d::Scene* createScene();
// Here's a difference. Method 'init' in cocos2d-x returns bool, instead of returning 'id' in cocos2d-iphone
virtual
bool
init();
// a selector callback
void
menuCloseCallback(cocos2d::Ref* pSender,cocos2d::ui::TouchEventType type);
// implement the "static create()" method manually
CREATE_FUNC(HelloWorld);
};
#endif // __HELLOWORLD_SCENE_H__
|
|
1
2
3
4
5
6
7
8
9
10
11
12
13
14
15
16
17
18
19
20
21
22
23
24
25
26
27
28
29
30
31
32
33
34
35
36
37
38
39
40
41
42
43
44
45
46
47
48
49
50
51
52
53
54
55
56
57
58
59
60
61
62
63
64
65
66
67
68
69
70
71
72
73
74
75
76
77
78
79
80
81
82
83
|
//HelloWorldScene.cpp
#include "HelloWorldScene.h"
USING_NS_CC;
//这个是命名空间
using
namespace
cocostudio;
using
namespace
ui;
Scene* HelloWorld::createScene()
{
// 'scene' is an autorelease object
auto scene = Scene::create();
// 'layer' is an autorelease object
auto layer = HelloWorld::create();
// add layer as a child to scene
scene->addChild(layer);
// return the scene
return
scene;
}
// on "init" you need to initialize your instance
bool
HelloWorld::init()
{
//////////////////////////////
// 1. super init first
if
( !Layer::init() )
{
return
false
;
}
Size visibleSize = Director::getInstance()->getVisibleSize();
Vec2 origin = Director::getInstance()->getVisibleOrigin();
//获取我们的Cocos Studio UIdemo
//这里我们创建了一个widget,这里说明下貌似cocostudio有自己的一套代码风格和api
//有些功能能和cocos2dx混合着用
//这里的widget有点类似一个layer,反正我是这样理解的
ui::Widget * pNode=cocostudio::GUIReader::getInstance()->widgetFromJsonFile(
"DemoLogin.json"
);
this
->addChild(pNode);
//我们从widget中找到那个button的名字然后实例出来(跟android有点像)
ui::Button * button=(ui::Button *)ui::Helper::seekWidgetByName(pNode,
"login_Button"
);
//给这个按钮增加一个touch的侦听(这边就和cocos2dx有不同了)
button->addTouchEventListener(
this
,toucheventselector(HelloWorld::menuCloseCallback));
return
true
;
}
//这里是侦听回调函数
void
HelloWorld::menuCloseCallback(cocos2d::Ref* pSender,ui::TouchEventType type)
{
//cocostudio的侦听,你可以根据type的类型来执行相应的代码
//这里用switch来判断,非常的简洁明了
switch
(type)
{
case
ui::TouchEventType::TOUCH_EVENT_BEGAN:
{
log
(
"touch began"
);
break
;
}
case
ui::TouchEventType::TOUCH_EVENT_MOVED:
{
log
(
"touch moved"
);
break
;
}
case
ui::TouchEventType::TOUCH_EVENT_ENDED:
{
log
(
"touch ended"
);
break
;
}
case
ui::TouchEventType::TOUCH_EVENT_CANCELED:
{
log
(
"touch canceled"
);
break
;
}
default
:
break
;
}
}
|
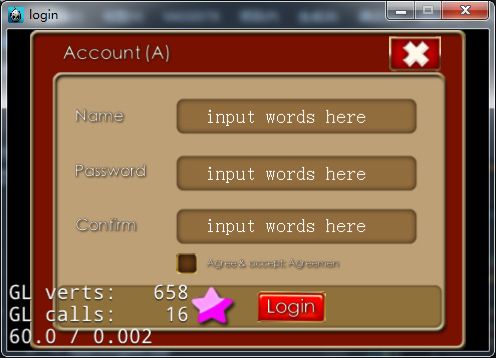
运行
点击按钮测试下
好的,完成。
来源网址:http://blog.csdn.net/u011373759/article/details/40074897


