Objective-C ,ios,iphone开发基础:使用第三方库FMDB连接sqlite3 数据库,实现简单的登录
Objective-C ,ios,iphone开发基础:使用第三方库FMDB连接sqlite3 数据库,实现简单的登录
第一步:下载第三方库,点击 连接 下载,
第二部:准备数据库:按照连接&中博客的步骤实现数据库,
数据库的设计大致如下表:
| id username password registertime realname groupid |
|
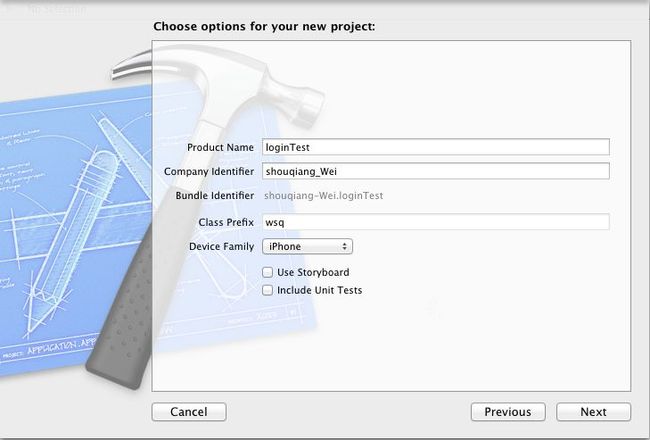
新建一个单视图工程,
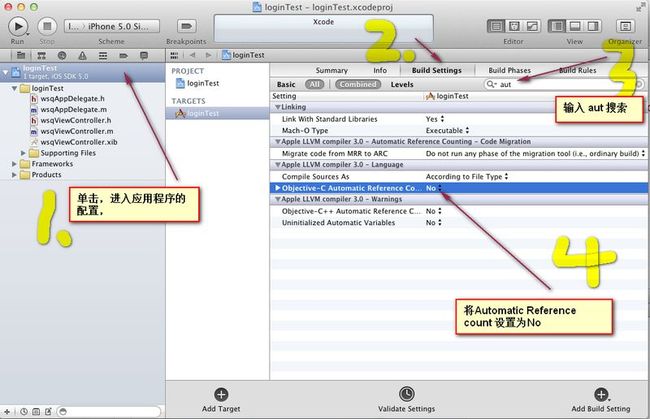
关闭arc (Automatic reference count)自动引用计数,
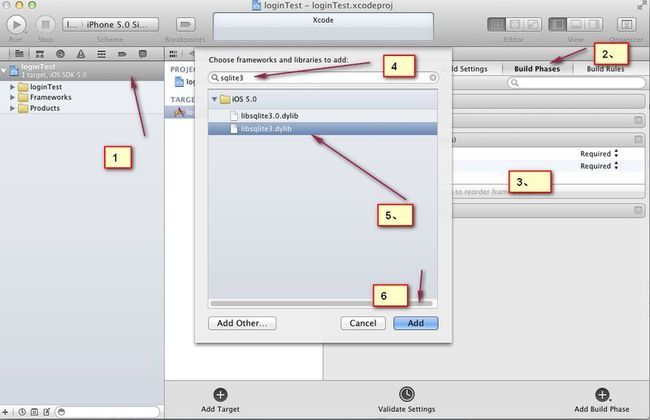
添加 sqlite3.dylib 类库的包含,
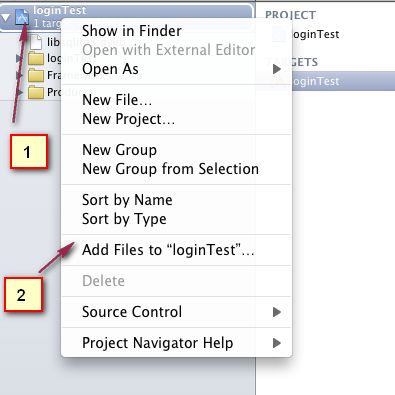
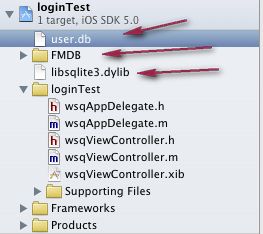
将准备好的第三方库FMDB 以及准备好的数据库包含在项目中,包含时要注意选中copy 选项,不然只是单纯的引用到项目中,
包含后项目结构如下,
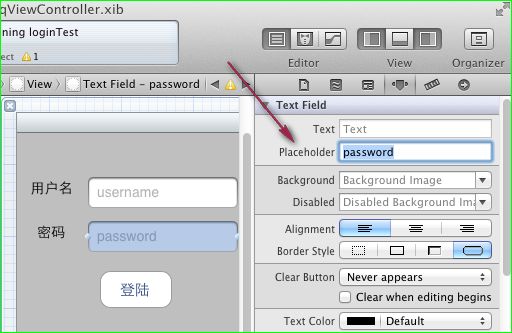
单击打开 wsqViewController.xib 拖放两个UILable ,并分别设置title属性为 "用户名" 和 " 密码" ,然后拖放两个Text Field ,再拖放一个UIButton title属性设置为登录,布局随意,
为两个TextField 设置Placeholder属性,这个就是水印属性,用来添加水印提示,当点击输入任何一个字符的时候就会消失。。
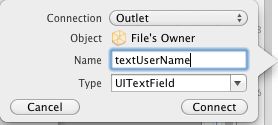
为控件连线,分别为两个TextField 连接连个插座变量 分别命名为textUserName 和 textPwd ,为UIButton 连接一个action 事件,命名为btnClick。(注意红色箭头标注的关键点)
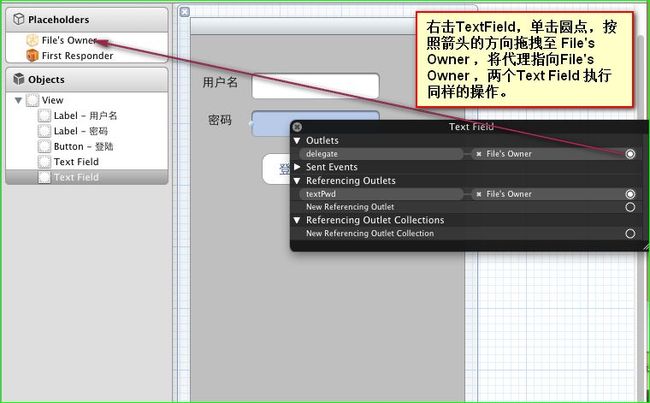
为连个TextField 添加键盘消失的方法,首先让 wsqViewController 遵循 UITextFieldDelegate 协议 ,
@interface wsqViewController : UIViewController<UITextFieldDelegate>
并且在 wsqViewController.m 中重写- (BOOL)textFieldShouldReturn:(UITextField *)textField;方法,
[textField resignFirstResponder];
return YES;
}
其实主要是让两个TextField 在结束的时候调用 resignFirstResponder 方法,通过将代理 delegate 指向File's Owner,在单击小键盘return 键和敲键盘回车键的时候让小键盘消失。
因为我们是在单击UIbutton的时候来判断是否登录成功,所以,所有的赋值和取值的操作都可以放在btnClick 事件里面来操作,
但是这样会在单击button的时候增加响应时间,所以我们把一些基本的操作还是放在- (void)viewDidLoad 里面,这里面主要就是
把数据库拷贝直应用程序的沙盒中,因为在mainBundle 目录下,所有系统的文件都是不可以通过程序来操作的,任何操作都会返回nil。
操作其他应用程序也不行,这样每一个应用程序都在自己的沙盒中运行,从而不会影响其他的应用程序。
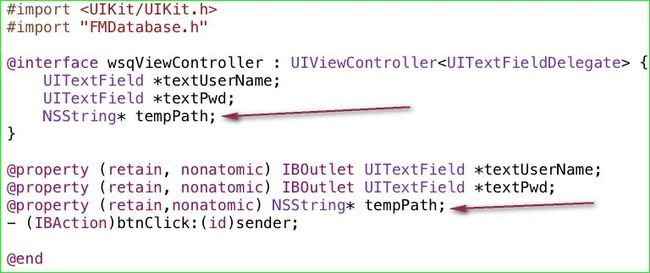
在 wsqViewController.h 添加一个实例变量,为NSString 类型,用来存放数据库在沙盒中的路径。不要忘记在 dealloc 中release,并且在.m文件中实现它:@synthesize tempPath;
在viewDidLoad 中添加代码:主要是获取user.db在目录中的路径然后通过 NSFileManager 类中的方法,将数据库拷贝至沙盒目录下。
- (void)viewDidLoad
{
    [super viewDidLoad];
    //获取 user.db在目录中的路径
    NSString* strBundlePath = [[NSBundle mainBundle] pathForResource:@"user.db" ofType:nil];
    //获取应用程序沙盒下所有文件夹 的路径
    NSArray* arrayDocunmentPath = NSSearchPathForDirectoriesInDomains(NSDocumentDirectory, NSUserDomainMask, YES);
    //获取应用程序沙盒下 doucumnet文件夹 的路径
    NSString* strDocunmentPath = [arrayDocunmentPath objectAtIndex:0];
    //为文件夹路径附加文件路径,
    NSString* destinationPath = [strDocunmentPath stringByAppendingString:@"user.db"];
    NSFileManager* fManager = [NSFileManager defaultManager];
    //实例化一个NSFileManager 将文件拷贝至沙盒目录下。
    if(![fManager fileExistsAtPath:destinationPath]){
        NSError* error= nil;
        [fManager copyItemAtPath:strBundlePath toPath:destinationPath error:&error];
        if(error){
            NSLog(@"%@",error);
        }
    }
  //retain 一次,不然会在出了括号之后就会释放,
 tempPath = [destinationPath retain];
}
在wsqViewController.h 文件中包含第三方库的头文件:
#import "FMDatabase.h"
在btnClick 方法中添加代码:
- (IBAction)btnClick:(id)sender {
    [textUserName resignFirstResponder];
    [textPwd resignFirstResponder];

    //创建一个第三方库的对象 ,用数据库路径来初始化,
    FMDatabase* fmDatebase = [[FMDatabase alloc] initWithPath:tempPath];
    //连接数据库,并做判断
    if(![fmDatebase open]){
        UIAlertView* alert = [[UIAlertView alloc] initWithTitle:@"数据库连接" message:@"连接失败" delegate:self cancelButtonTitle:@"cancel" otherButtonTitles:@"ok", nil];
        //显示消息框,
        [alert show];
        // alloc 出来的空间必须释放
        [alert release];
    }
    //sql语句
    NSString* executeStr = [NSString stringWithFormat:@"select * from \"member\" where username =\"%@\" and password = \"%@\"",textUserName.text,textPwd.text];
    //sql语句执行之后返回一个FMResultSet容器。
    FMResultSet * fmSet = [fmDatebase executeQuery:executeStr];
    //扑捉sql异常错误,
    if([fmDatebase hadError]){
        NSLog(@"%i ,%@",[fmDatebase lastErrorCode],[fmDatebase lastErrorMessage]);
        return ;
    }
   //循环容器
    while ([fmSet next]) {

        UIAlertView* alert = [[UIAlertView alloc] initWithTitle:@"Login" message:@"success" delegate:self cancelButtonTitle:@"cancel" otherButtonTitles:@"ok", nil];
        [alert show];
        [alert release];
    }
    if([fmDatebase hadError]){
        NSLog(@"%i ,%@",[fmDatebase lastErrorCode],[fmDatebase lastErrorMessage]);
        return ;
    }

    //关闭连接,以及容器
    [fmDatebase close];
    [fmSet close];
    //alloc 出来的空间必须释放。
    [fmDatebase release];

}
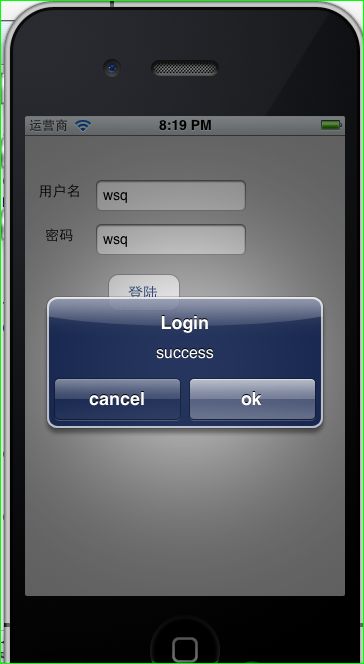
然后点击run 运行结果如下:
最后为应用程序添加事先准备的图标和应用程序启动动画:
lanch.jpg 和icon.jpg
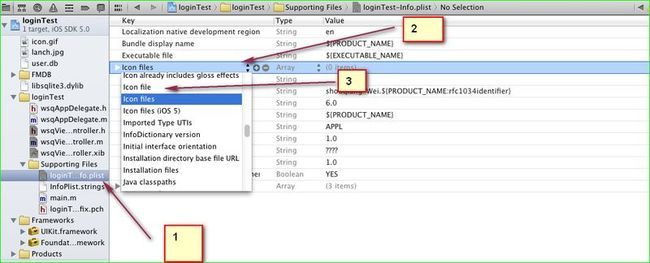
打开 .plist文件 ,修改icon 。并且添加 一项lanch
修改后结果如下图:
#import <UIKit/UIKit.h>
#import "FMDatabase.h"

@interface wsqViewController : UIViewController<UITextFieldDelegate> {
    UITextField *textUserName;
    UITextField *textPwd;
    NSString* tempPath;
}

@property (retain, nonatomic) IBOutlet UITextField *textUserName;
@property (retain, nonatomic) IBOutlet UITextField *textPwd;
@property (retain,nonatomic) NSString* tempPath;
- (IBAction)btnClick:(id)sender;

@end
//
//  wsqViewController.m
//  loginTest
//
//  Created by administrator on 13-9-4.
//  Copyright (c) 2013年 __MyCompanyName__. All rights reserved.
//

#import "wsqViewController.h"

@implementation wsqViewController
@synthesize textUserName;
@synthesize textPwd;
@synthesize tempPath;

- (void)didReceiveMemoryWarning
{
    [super didReceiveMemoryWarning];
    // Release any cached data, images, etc that aren't in use.
}

#pragma mark - View lifecycle

- (void)viewDidLoad
{
    [super viewDidLoad];
    //获取 user.db在目录中的路径
    NSString* strBundlePath = [[NSBundle mainBundle] pathForResource:@"user.db" ofType:nil];
    //获取应用程序沙盒下所有文件夹 的路径
    NSArray* arrayDocunmentPath = NSSearchPathForDirectoriesInDomains(NSDocumentDirectory, NSUserDomainMask, YES);
    //获取应用程序沙盒下 doucumnet文件夹 的路径
    NSString* strDocunmentPath = [arrayDocunmentPath objectAtIndex:0];
    //为文件夹路径附加文件路径,
    NSString* destinationPath = [strDocunmentPath stringByAppendingString:@"user.db"];
    NSFileManager* fManager = [NSFileManager defaultManager];
    //实例化一个NSFileManager 将文件拷贝至沙盒目录下。
    if(![fManager fileExistsAtPath:destinationPath]){
        NSError* error= nil;
        [fManager copyItemAtPath:strBundlePath toPath:destinationPath error:&error];
        if(error){
            NSLog(@"%@",error);
        }
    }

    tempPath = [destinationPath retain];


}

- (void)viewDidUnload
{
    [self setTextUserName:nil];
    [self setTextPwd:nil];
    [super viewDidUnload];

}

- (void)viewWillAppear:(BOOL)animated
{
    [super viewWillAppear:animated];
}

- (void)viewDidAppear:(BOOL)animated
{
    [super viewDidAppear:animated];
}

- (void)viewWillDisappear:(BOOL)animated
{
    [super viewWillDisappear:animated];
}

- (void)viewDidDisappear:(BOOL)animated
{
    [super viewDidDisappear:animated];
}

- (BOOL)shouldAutorotateToInterfaceOrientation:(UIInterfaceOrientation)interfaceOrientation
{
    // Return YES for supported orientations
    return (interfaceOrientation != UIInterfaceOrientationPortraitUpsideDown);
}

- (BOOL)textFieldShouldEndEditing:(UITextField *)textField{
    [textUserName resignFirstResponder];
    [textPwd resignFirstResponder];
    return YES;
}

- (BOOL)textFieldShouldReturn:(UITextField *)textField{
    [textField resignFirstResponder];
    return YES;
}

- (void)dealloc {
    [textUserName release];
    [textPwd release];
    [tempPath release];
    [super dealloc];
}
- (IBAction)btnClick:(id)sender {
    [textUserName resignFirstResponder];
    [textPwd resignFirstResponder];

    //创建一个第三方库的对象 ,用数据库路径来初始化,
    FMDatabase* fmDatebase = [[FMDatabase alloc] initWithPath:tempPath];
    //连接数据库,并做判断
    if(![fmDatebase open]){
        UIAlertView* alert = [[UIAlertView alloc] initWithTitle:@"数据库连接" message:@"连接失败" delegate:self cancelButtonTitle:@"cancel" otherButtonTitles:@"ok", nil];
        //显示消息框,
        [alert show];
        // alloc 出来的空间必须释放
        [alert release];
    }
    //sql语句
    NSString* executeStr = [NSString stringWithFormat:@"select * from \"member\" where username =\"%@\" and password = \"%@\"",textUserName.text,textPwd.text];
    //sql语句执行之后返回一个FMResultSet容器。
    FMResultSet * fmSet = [fmDatebase executeQuery:executeStr];
    //扑捉sql异常错误,
    if([fmDatebase hadError]){
        NSLog(@"%i ,%@",[fmDatebase lastErrorCode],[fmDatebase lastErrorMessage]);
        return ;
    }
   //循环容器
    while ([fmSet next]) {

        UIAlertView* alert = [[UIAlertView alloc] initWithTitle:@"Login" message:@"success" delegate:self cancelButtonTitle:@"cancel" otherButtonTitles:@"ok", nil];
        [alert show];
        [alert release];
    }
    if([fmDatebase hadError]){
        NSLog(@"%i ,%@",[fmDatebase lastErrorCode],[fmDatebase lastErrorMessage]);
        return ;
    }

    //关闭连接,以及容器
    [fmDatebase close];
    [fmSet close];
    //alloc 出来的空间必须释放。
    [fmDatebase release];

}
@end
