建议阅读知识:http://linux.vbird.org/linux_basic/0210filepermission.php 这是关于档案权限,用户,组等的问题。介绍的很有意思。
1. Install vsftp service
download from the official website and build it from source if necessary :)
on ubuntu you could use
2. vsftp settings
Purposes: 1). make severial folders for different users.
e.g. user_a is for /home/user_a , user_b is for /home/user_b
but user_a has more privileges than user_b. That means user_b can check out all folders of the system while user_b can't. user_b can only view his own root folder which I've set.
[1]. edit the /etc/vsftpd.conf
find lines which are initialized with chroot_

uncomment those lines
chroot_local_user=NO

chroot_list_enable=YES

chroot_list_file=/etc/vsftpd.chroot_list
第一行chroot_local_user=NO的意思是 下面这个chroot_list_file文件 表里的特定用户,是不能看到其主目录之外的东西的。只能看到主目录里面,或者内部的文件。
第二行,是chroot_list_enable=YES 是chroot_list_file的使能开关,用来解释chroot_list_file是否有用的。
第三行,是决定的chroot_list_file的位置。
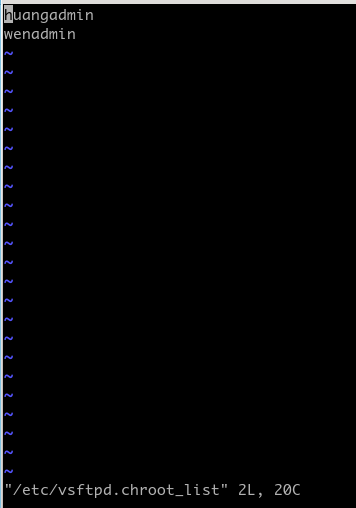
这里将/etc/vsftpd.chroot_list 示例列出来。
then create a file /etc/vsftpd.chroot_list which looks like this :

添加的两行分别是两个用户名。
这个需要在系统内用
mkdir -p /home/huangadmin #建立一个特定的文件夹,作为一个账户的名称
useradd -d /home/huangadmin huangadmin #创建特定的用户特定的文件夹
# usermod 这个命令是用来对账户进行控制的。可以操作用户组,权限,主目录等
##更多信息请查看 useradd 以及 usermod 的帮助
××××××××××××××
这里,如果将上面的vsftpd.conf 修改成这样的
chroot_local_user=YES

chroot_list_enable=YES

chroot_list_file=/etc/vsftpd.chroot_list
而vsftpd.chroot_list 我们不修改,
则意思是只有huangadmin 和 wenadmin 账户登录的时候才能在各种目录之间跳转选择,而别的用户比如说zhangadmin,就不能登录后跳转到别的目录下面,只能在/home/zhangadmin/ 看到自己的文档,往上一级目录都不行。
总结: 以上两种操作方式,都可以达到我们想要的功能,仅仅是在描述上不同,第一种是肯定所有,否定(chroot_local_user=NO)一个list内的。第二种,是否定所有,只肯定list内的。
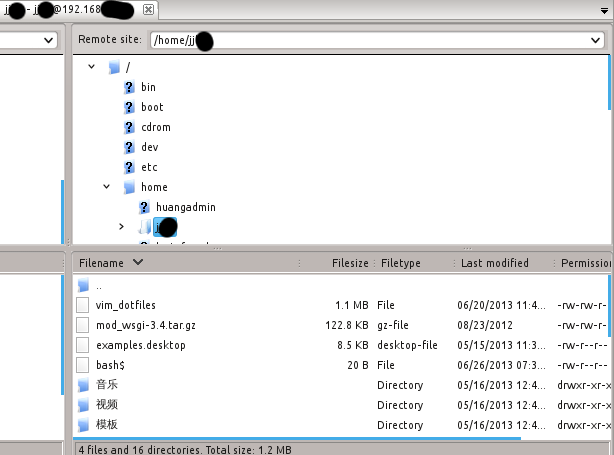
只能访问自己独立账户的ftp的,大体感觉是这样的

开全局访问的权限的ftp服务是这样的:

可以看到上面所有的目录文档,这就是修改了vsftpd.conf 的chroot_ 的不同点。
如果连接失败,
出现错误
500 OOPS:vsftpd:refusing to run with writable anonymous root
可以参考此文,http://crazyidea.iteye.com/blog/1207955
是因为
/home/ftp 目录的权限问题。
drwxrwxrwx 3 root root 4096 2011-08-25 20:15 ftp/
vsFTPd出于安全考虑,是不准让ftp用户的家目录的权限是完全没有限制的。
把/home/ftp 目录的权限改成755就OK了!
这个办法也可以换成下面的办法 ------|
但是,要注意的一点是:
vsftpd 现在的升级版,对一些功能要做限制。如果想只访问某一账户的local目录的话,那么必须
chmod a-w /home/huangadmin
———————————————————
文章参考来源:
今天把vsftpd升级到了v2.3.5,配置文件还是使用原来的.允许本地用户登录ftp,并且使用chroot限制ftp根目录.启动登录之后发现如下错误:
- 500 OOPS: vsftpd: refusing to run with writable root inside chroot()
意思是不能使用chroot限制可写的根目录,看了下vsftpd的更新日志:
- Add stronger checks for the configuration error of running with a writeable root directory inside a chroot(). This may bite people who carelessly turned on chroot_local_user but such is life.
好吧,我们如果启用chroot,必须保证ftp根目录不可写,这样对于ftp根直接为网站根目录的用户不方便,所以建议假如ftp根目录是/home/centos,那么网站结构可以这样分,/home/centos/log为日志目录,/home/centos/web为网站根目录,这样我们就可以去掉/home/centos目录的写入权限而不影响网站的正常运行
转载请标明文章来源:《http://www.centos.bz/2011/12/500-oops-vsftpd-refusing-to-run-with-writable-root-inside-chroot/》
——————————————————
另外,安全起见。需要关掉增加账户的ssh功能。
请参考:http://www.darian-brown.com/vsftpd-disable-ssh-login-and-allow-ftp-access/
http://www.rackspace.com/knowledge_center/article/rackspace-cloud-essentials-5-centos-configuring-a-user-in-vsftpd
比较简单的用法是
————————————————————
文章来源:http://www.rackspace.com/knowledge_center/article/rackspace-cloud-essentials-5-centos-configuring-a-user-in-vsftpd#Disable_SSH_access_for_FTP_users
内容:
Rackspace Cloud Essentials 5 - CentOS - Configuring a user in vsftpd
- Last updated on August 10, 2012
- Authored by: Rackspace Support
In the last article, CentOS - Installing vsftpd, we walked through setting up a working install of vsftpd. This article will be fairly short, we're going to walk through creating a system user and chrooting (jail - isolation to their home directory) them if necessary.
Add your system User
Yes, it is this simple, creating a new user for ftp access in vsftpd is as easy as creating a new valid linux system user.
    # useradd test
    # passwd test
Disable SSH access for FTP users
The default user creation script will give a user the /bin/bash shell, which can be a little too powerful. If you don't want your users logging into your server via SSH, we need to know how to block this access. If you change the shell to /bin/false, the users will only be able to login via ftp or mail if you have that setup. Here is how to modify your users:
usermod -s /sbin/nologin test
Chroot a user
Alright and probably the most important part of this article is the ability to lock a user down to their own home directory so they don't go around mucking with things they aren't supposed to. The beauty of this is it is a function built in to vsftpd and was partially covered in the Installing vsftpd article. All you have to do is add the username to the file /etc/vsftpd/chroot_list, each user on their own line.
That pretty much covers it for vsftpd, and at this point you should be able to create a new system user, set them up for vsftpd and do some basic tweaks to their access level. These last two articles dealt with vsftpd in a CentOS Linux system. Now we will show you how to install vsftpd on a server running Ubuntu.
————————————————————————
上面用法就是usermod -s /sbin/nologin test
如果电脑里面的nologin 不在/sbin里面,那么就用 whereis nologin, 能得到nologin的地址。ubuntu的衍生版一般都在 /usr/sbin/nologin 里面,这个有一点不同吧。
这样,就默认设置远程登录test用户,ssh登录不上了。
附录:
(关于/etc/vsftpd.conf 的中文说明,2006年版,也许有点老,做个简单的介绍也好。摘抄自:http://bbs.chinaunix.net/thread-2162081-1-1.html)
# Example config file /etc/vsftpd.conf
#
# The default compiled in settings are very paranoid. This sample file
# loosens things up a bit, to make the ftp daemon more usable.
#
# Allow anonymous FTP?
anonymous_enable=YES ’是否允许anonymous登录ftp服务器,默认是允许
#
# Uncomment this to allow local users to log in.
local_enable=YES’是否允许本地用户登录ftp服务器,默认是允许,不包含id为500以下用户
#
# Uncomment this to enable any form of FTP write command.
write_enable=YES ‘是否允许用户具有在ftp服务器文件中具有写的权限,默认是允许
#
# Default umask for local users is 077. You may wish to change this to 022,
# if your users expect that (022 is used by most other ftpd's)
local_umask=022 ’设置本地用户的文件生成掩码022
#
# Uncomment this to allow the anonymous FTP user to upload files. This only
# has an effect if the above global write enable is activated. Also, you will
# obviously need to create a directory writable by the FTP user.
#anon_upload_enable=YES ‘是否允许匿名用户上传文件
#
# Uncomment this if you want the anonymous FTP user to be able to create
# new directories.
#anon_mkdir_write_enable=YES ’是否允许匿名用户在ftp中创建目录
#
# Activate directory messages - messages given to remote users when they
# go into a certain directory.
dirmessage_enable=YES ‘激活目录信息,当远程用户更改目录时,将出现提示信息
#
# Activate logging of uploads/downloads.
xferlog_enable=YES ’启用上传和下载日志功能
#
# Make sure PORT transfer connections originate from port 20 (ftp-data).
connect_from_port_20=YES ‘启用ftp数据端口的连接请求
#
# If you want, you can arrange for uploaded anonymous files to be owned by
# a different user. Note! Using "root" for uploaded files is not
# recommended!
#chown_uploads=YES
#chown_username=whoever
#
# You may override where the log file goes if you like. The default is shown
# below.
#xferlog_file=/var/log/vsftpd.log ’设置日志文件的文件名和路径
#
# If you want, you can have your log file in standard ftpd xferlog format
xferlog_std_format=YES ‘是否使用标准的ftpd xferlog日志文件格式
#
# You may change the default value for timing out an idle session.
#idle_session_timeout=600 ’设置空闲的用户会话中断时间,单位是秒
#
# You may change the default value for timing out a data connection.
#data_connection_timeout=120 ‘设置数据连接超时时间,默认是120秒
#
# It is recommended that you define on your system a unique user which the
# ftp server can use as a totally isolated and unprivileged user.
#nopriv_user=ftpsecure
#
# Enable this and the server will recognise asynchronous ABOR requests. Not
# recommended for security (the code is non-trivial). Not enabling it,
# however, may confuse older FTP clients.
#async_abor_enable=YES
#
# By default the server will pretend to allow ASCII mode but in fact ignore
# the request. Turn on the below options to have the server actually do ASCII
# mangling on files when in ASCII mode.
# Beware that turning on ascii_download_enable enables malicious remote parties
# to consume your I/O resources, by issuing the command "SIZE /big/file" in
# ASCII mode.
# These ASCII options are split into upload and download because you may wish
# to enable ASCII uploads (to prevent uploaded scripts etc. from breaking),
# without the DoS risk of SIZE and ASCII downloads. ASCII mangling should be
# on the client anyway..
#ascii_upload_enable=YES
#ascii_download_enable=YES 是否允许使用ASCII格式来上传和下载文件
#
# You may fully customise the login banner string:
#ftpd_banner=Welcome to blah FTP service. ’在ftp服务器中设置欢迎登陆信息。
#
# You may specify a file of disallowed anonymous e-mail addresses. Apparently
# useful for combatting certain DoS attacks.
#deny_email_enable=YES
# (default follows)
#banned_email_file=/etc/vsftpd.banned_emails
#
# You may specify an explicit list of local users to chroot() to their home
# directory. If chroot_local_user is YES, then this list becomes a list of
# users to NOT chroot().
#chroot_list_enable=YES
# (default follows)
#chroot_list_file=/etc/vsftpd.chroot_list ‘如果希望用户登录后不能切换到自己目录以外的其他目录,需要设置该项,如果设置chroot_list_enable=yes,那么只允许/etc/vsftpd。chroot_list中列出的用户具有该功能。如果希望所有的本地用户都执行chroot,可以增加一行:chroot_list_user=YES
#
# You may activate the "-R" option to the builtin ls. This is disabled by
# default to avoid remote users being able to cause excessive I/O on large
# sites. However, some broken FTP clients such as "ncftp" and "mirror" assume
# the presence of the "-R" option, so there is a strong case for enabling it.
#ls_recurse_enable=YES '允许用ls -R命令
pam_service_name=vsftpd'设置pam认证服务的配置文件名称,该文件存放在/etc/pam.d/目录
userlist_enable=YES ‘用户列表中的用户是否允许登陆ftp服务器,默认是不允许
#enable for standalone mode
listen=YES ’使vsftpd处于独立启动模式
tcp_wrappers=YES ‘使用tcp_wrappers作为主机访问控制方式
max_clients=100 '设置同时连接服务器的并发用户为100
max_per_ip=2 '设置每用户同一时间段并发下载线程数为2,同时只能下载2个文件
anon_max_rate=20000 '设置匿名用户的最大传输速率为20kbps
local_max_rate=1000000设置本地用户的最大传输速率为1MBPS |
——————————————————————————————————————————————————————————————————————————————


