Symfony2 WebService(一) 配置篇
系统开发中,想对外提供接口供外部调用,常用到webservice。调用方只需根据接口协议提供参数调用特定的函数,而无需知道方法的内部细节,只考虑返回数据的处理。这在接口开发平台中使用较广。在Symfony2中,自然也少不了webservice的部分,只需进行一些配置,就可以对外提供接口了。
一、在项目中我们可以看到deps文件,里面是该项目所需的组件列表。我们要开发自己的web服务,需要一些组件。打开deps,在里面添加
 1 [AsseticBundle]
 2     git=http://github.com/symfony/AsseticBundle.git
 3     target=/bundles/Symfony/Bundle/AsseticBundle
 4     version=origin/2.0
 5
 6 [BeSimple\SoapCommon]
 7     git=https://github.com/BeSimple/BeSimpleSoapCommon
 8     target=/besimple-soapcommon
 9
10 [BeSimple\SoapClient]
11     git=https://github.com/BeSimple/BeSimpleSoapClient
12     target=/besimple-soapclient
13
14 [BeSimple\SoapServer]
15     git=https://github.com/BeSimple/BeSimpleSoapServer
16     target=/besimple-soapserver
17
18 [Zend\Soap]
19     git=http://github.com/BeSimple/zend-soap.git
20     target=/zend-framework/library/Zend/Soap
21
22 [Zend\Mime]
23     git=http://github.com/BeSimple/zend-mime.git
24     target=/zend-framework/library/Zend/Mime
25
26 [BeSimpleSoapBundle]
27     git=http://github.com/BeSimple/BeSimpleSoapBundle.git
28     target=/bundles/BeSimple/SoapBundle
注:请先安装好git
安装了git,linux环境则通过终端进入项目目录 输入php ./bin/vendors install --reinstall 将自动安装相应组件。
windows则可以通过命令行进入到项目根目录,输入命令即可
二、组件安装好后,还需要进行一些配置
1、在app/config.yml里添加
1 be_simple_soap:
2     services:
3         MYApi:
4             namespace:     http://www.dluf.com/luf/api/1.0/
5             binding:       rpc-literal
6             resource:      "@AcmeDemoBundle/Controller/webservicetestController.php"
7             resource_type: annotation
2、在app/routing.yml里添加
1 _besimple_soap:
2     resource: "@BeSimpleSoapBundle/Resources/config/routing/webservicecontroller.xml"
3     prefix:   /dluf
3、在autoload.php中注册
 1 $loader->registerNamespaces(array(
 2     'Symfony'          => array(__DIR__.'/../vendor/symfony/src', __DIR__.'/../vendor/bundles'),
 3     'Sensio'           => __DIR__.'/../vendor/bundles',
 4     'JMS'              => __DIR__.'/../vendor/bundles',
 5     'Doctrine\\Common' => __DIR__.'/../vendor/doctrine-common/lib',
 6     'Doctrine\\DBAL'   => __DIR__.'/../vendor/doctrine-dbal/lib',
 7     'Doctrine'         => __DIR__.'/../vendor/doctrine/lib',
 8     'Monolog'          => __DIR__.'/../vendor/monolog/src',
 9     'Assetic'          => __DIR__.'/../vendor/assetic/src',
10     'Metadata'         => __DIR__.'/../vendor/metadata/src',
11     'Zend' => __DIR__.'/../vendor/zend-framework/library',
12     'BeSimple\\SoapCommon' => __DIR__ . '/../vendor/besimple-soapcommon/src',
13     'BeSimple\\SoapServer' => __DIR__ . '/../vendor/besimple-soapserver/src',
14     'BeSimple\\SoapClient' => __DIR__ . '/../vendor/besimple-soapclient/src',
15     'BeSimple' => __DIR__.'/../vendor/bundles',
16 ));
4、在DemoBundle\Controller中新建一个Controller webservicetestController
5、在AppKernel.php中添加 new BeSimple\SoapBundle\BeSimpleSoapBundle()
 1 $bundles = array(
 2             new Symfony\Bundle\FrameworkBundle\FrameworkBundle(),
 3             new Symfony\Bundle\SecurityBundle\SecurityBundle(),
 4             new Symfony\Bundle\TwigBundle\TwigBundle(),
 5             new Symfony\Bundle\MonologBundle\MonologBundle(),
 6             new Symfony\Bundle\SwiftmailerBundle\SwiftmailerBundle(),
 7             new Symfony\Bundle\DoctrineBundle\DoctrineBundle(),
 8             new Symfony\Bundle\AsseticBundle\AsseticBundle(),
 9             new Sensio\Bundle\FrameworkExtraBundle\SensioFrameworkExtraBundle(),
10             new JMS\SecurityExtraBundle\JMSSecurityExtraBundle(),
11             new BeSimple\SoapBundle\BeSimpleSoapBundle(),
12         );
6、webservicetestController
 1 <?php
 2
 3 /**
 4  * Description of webservicetestController
 5  *
 6  * @author luf
 7  */
 8
 9 namespace Acme\DemoBundle\Controller;
10
11 use BeSimple\SoapBundle\ServiceDefinition\Annotation as Soap;
12 use Symfony\Bundle\FrameworkBundle\Controller\Controller;
13
14 class webservicetestController extends Controller {
15
16     /**
17      * api
18      * @Soap\Method("api")
19      * @Soap\Param("parameters", phpType = "string")
20      * @Soap\Result(phpType = "string")
21      */
22     public function apiAction($parameters) {
23         $ret = "开始使用接口";
24         if (!empty($parameters)) {
25             $ret = $parameters . $ret;
26         } else {
27             $ret = "Null" . $ret;
28         }
29         return $this->container->get('besimple.soap.response')->setReturnValue($ret);
30     }
31
32 }
33
34 ?>
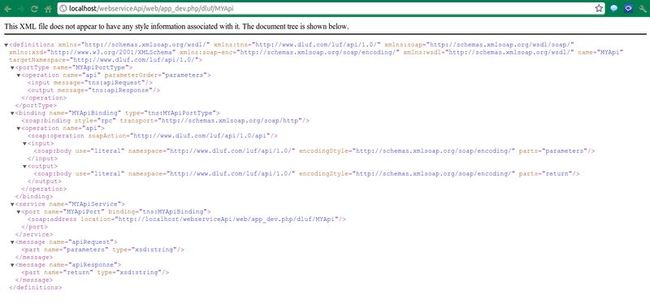
三、配置好后在浏览器中输入 http://localhost/webserviceApi/web/app_dev.php/dluf/MYApi 可以看到
现在Symfony2框架的webservice就配置好了,可以开始编写你自己的接口。

