Jquery不使用ui.js来实现drag功能
摘自
http://css-tricks.com/snippets/jquery/draggable-without-jquery-ui/
======================
这里首先要知道几个东西: pageX, pageY, offset().top, offset().left
pageX and pageY:
Relative the to the top left of the fully rendered content area in the browser. This reference point is below the url bar and back button in the upper left. This point could be anywhere in the browser window and can actually change location if there are embedded scrollable pages embedded within pages and the user moves a scrollbar.
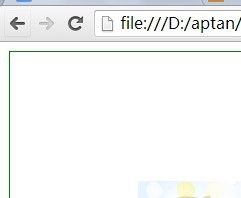
这两个是到浏览器工具栏,也就是下图的后退键左下角边框的距离。
就拿下图来说,
点击左上角的border的边角的时候,会显示
pageX=10px, pageY=10px,
这个10也就是该边角到浏览内容最左边的距离。

而offset().top和offset().left所获取的是当前节点到根节点的距离。
=========================
具体实现代码如下:
使用$("#div").drags()即可
======================
这里首先要知道几个东西: pageX, pageY, offset().top, offset().left
pageX and pageY:
Relative the to the top left of the fully rendered content area in the browser. This reference point is below the url bar and back button in the upper left. This point could be anywhere in the browser window and can actually change location if there are embedded scrollable pages embedded within pages and the user moves a scrollbar.
这两个是到浏览器工具栏,也就是下图的后退键左下角边框的距离。
就拿下图来说,
点击左上角的border的边角的时候,会显示
pageX=10px, pageY=10px,
这个10也就是该边角到浏览内容最左边的距离。

而offset().top和offset().left所获取的是当前节点到根节点的距离。
=========================
具体实现代码如下:
(function($) {
				$.fn.drags = function(opt) {

					opt = $.extend({
						handle : "",
						cursor : "move"
					}, opt);
					if (opt.handle === "") {
						var $el = this;
					} else {
						var $el = this.find(opt.handle);
					};

					return $el.css("cursor", opt.cursor).on("mousedown", function(e) {
						if (opt.handle === "") {
							var $drag = $(this).addClass("draggable");
						} else {
							var $drag = $(this).addClass("active-handle").parent().addClass("draggable");
						};

                        //1. 首先获取了pos_y=$drag.offset().top+drg_h-e.pageY
                        // pos_y代表了鼠标所移动到的位置距离目标最下边的距离。
                        //   .....
                        //   .   .
                        //   .   .
                        //   . M .
                        //   .....
                        //
                        // 就是上图的M到最下面边框的距离。

						var z_idx = $drag.css("z-index"), drg_h = $drag.outerHeight(), drg_w = $drag.outerWidth(), pos_y = $drag.offset().top + drg_h - e.pageY, pos_x = $drag.offset().left + drg_w - e.pageX;

                         //  -- 关于鼠标快速移动丢失图片的问题 --
                         //     当离开父节点范围,快速移动图片时会丢失对图片的控制
                         //
                         //这里由于是$drag.parent().on(xxx), 因此实际上是当鼠标在被选中的图片的父节点中移动的时候,才有效果。
                         //但其实parent()也包含了里面所有的节点。
                         //比如高度为200px的body,里面有一个高度为500px的div,那么我们把图片在500px范围内快速移动,也不会丢失图片。
						$drag.css("z-index", 1000).parent().on("mousemove", function(e) {
						    console.log(e.pageX);
							$(".draggable").offset({
						       //2. e.pageY也就是鼠标移动到的地方距离浏览器顶部的距离。
						       //  将其加上pos_y, 也就是图片下边框到浏览器顶部的距离。
						       //  减去图片高度drg_h, 其结果就可以作为offset().top了。
								top : e.pageY + pos_y - drg_h,
								left : e.pageX + pos_x - drg_w
							}).on("mouseup", function() {
								$(this).removeClass("draggable").css("z-index", z_idx);
							});
						});
						e.preventDefault();
					}).on("mouseup", function() {
						if (opt.handle === "") {
							$(this).removeClass("draggable");
						} else {
							$(this).removeClass("active-handle").parent().removeClass("draggable");
						};
					});
				};
			})(jQuery);
使用$("#div").drags()即可