Spring Security 3系列文章——入门篇(一)
这篇文章我只讲spring security的配置使用,而不会去讨论它的适用场景,spring security主要是面向web开发的一个安全框架,与之相对应的还有Apache的Shrio , 适用范围也更广些。要想从全局上了解某个框架产品的功能特性,适用场景等,最好看它们的overview。
这篇文章会介绍Spirng Security3.1的一些新特性,先列出来
• Support for multiple http elements (支持多个http元素 )
• Added Basic Crypto Module(添加了加密算法的支持,该模块可以单独使用)
• Support clearing cookies on logout(支持登出后清除cookie)
当然了还有很多新特性,具体请参照官方文档。下面就开始我们的step-by-setp.
首先是要把Spring Security的类库加入到我们应用的类路径中,对于使用maven的用户来说,很简单,添加如下依赖即可:
 <properties>
        <springSecurity.version>3.1.0.RELEASE</springSecurity.version>
 </properties>

<!-- Spring Security 3 -->
        <dependency>
            <groupId>org.springframework.security</groupId>
            <artifactId>spring-security-core</artifactId>
            <version>${springSecurity.version}</version>
        </dependency>
        <dependency>
            <groupId>org.springframework.security</groupId>
            <artifactId>spring-security-web</artifactId>
            <version>${springSecurity.version}</version>
        </dependency>
        <dependency>
            <groupId>org.springframework.security</groupId>
            <artifactId>spring-security-config</artifactId>
            <version>${springSecurity.version}</version>
        </dependency>
        <dependency>
            <groupId>org.springframework.security</groupId>
            <artifactId>spring-security-taglibs</artifactId>
            <version>${springSecurity.version}</version>
        </dependency>
第2步,在web.xml中添加一个过滤器:
<!-- Enables Spring Security -->
    <!--
    If you're using some other framework that is also filter-based, then you need to make sure that the Spring
    Security filters come first. Examples are the use of SiteMesh to decorate your web pages
    -->
    <filter>
        <filter-name>springSecurityFilterChain</filter-name>
        <filter-class>org.springframework.web.filter.DelegatingFilterProxy</filter-class>
    </filter>

<filter-mapping>
        <filter-name>springSecurityFilterChain</filter-name>
        <url-pattern>/*</url-pattern>
    </filter-mapping>
这里有两点需要注意下,首先该过滤器类是spring framwork包中提供的,并不属于spring security, 但是filter-name是有特殊含义的,该过滤器类的主要作用就是将web请求拦截下来然后DelegatingFilterProxy会从spring这个大容器中寻找名为springSecurityFilterChain的这个bean来处理安全方面的事情,其实 DelegatingFilterProxy就是在web请求和spring security之间的一座桥梁。第二点要注意的是如果你还是用了其他基于过滤器的框架,比如sitemesh,这时我们一定要确保把springSecurityFilterChain这个过滤器的filter-mapping放在第一位,这是spring security官网文档里提到的,实际中我也遇到过此问题,也是使用了sitemesh结果没放在第一位导致一些问题。
第3步,配置spring security:
<?xml version="1.0" encoding="UTF-8"?>
<beans:beans xmlns="http://www.springframework.org/schema/security"
             xmlns:beans="http://www.springframework.org/schema/beans"
             xmlns:p="http://www.springframework.org/schema/p"
             xmlns:util="http://www.springframework.org/schema/util"
             xmlns:xsi="http://www.w3.org/2001/XMLSchema-instance"
             xsi:schemaLocation="http://www.springframework.org/schema/beans http://www.springframework.org/schema/beans/spring-beans-3.0.xsd
                http://www.springframework.org/schema/util http://www.springframework.org/schema/util/spring-util-3.0.xsd
                http://www.springframework.org/schema/security http://www.springframework.org/schema/security/spring-security-3.1.xsd">


<!-- Spring Security3.1 support multi-http config -->
    <http pattern="/resources/*" security="none"  />
    <http pattern="/login" security="none" />

    <http auto-config="true" use-expressions="true">
        <intercept-url pattern="/" access="permitAll" />
        <intercept-url pattern="/hello.jsp" access="hasRole('ROLE_USER')"/>
        <intercept-url pattern="/admin.jsp" access="hasRole('ROLE_ADMIN')" />
        <intercept-url pattern="/*" access="hasRole('ROLE_USER')" />

        <form-login login-page="/login"
                    login-processing-url="/loginProcess"
                    authentication-failure-url="/login?error=1"
                    default-target-url="/" />

        <remember-me key="SpringSecurityAclDemo-rmkey-BUUttZnBJCa#U=4Dwg@%5_ptCC8wHtlY"
                                 data-source-ref="dataSource" />
        <logout logout-url="/logout" logout-success-url="/" invalidate-session="true" />
    </http>

    <authentication-manager alias="authenticationManager">
        <authentication-provider user-service-ref="jdbcUserService">
            <password-encoder ref="passwordEncoder" />
        </authentication-provider>
    </authentication-manager>


    <beans:bean id="jdbcUserService" class="org.springframework.security.core.userdetails.jdbc.JdbcDaoImpl"
                p:dataSource-ref="dataSource"
                p:enableGroups="true"
                p:enableAuthorities="false" />

</beans:beans>
这里我们使用security作为默认的命名空间,下面简单介绍下里面各种配置元素的作用吧,最好先阅读下官方文档的Part II. Architecture and Implementation 这一章节的内容,从总体上了解spring security的整体架构和一些细节内容。要想详细了解请参考官方文档或者Spring Security 3这本书,这两个pdf文件我都会在附件中给出。其中http的use-expression属性为true表示我们使用spring 3的EL表达式,使用EL表达式可以完成一些比较复杂且有意思的操作。form-login子元素应该很好理解,login-page就表示请求登录页面的url,login-process-url 表示处理登录验证的url,authentication-failure-url,表示认证失败的url,default-target-url表示登录成功后默认重定向到的url,如果我们没登陆就去请求一个受保护的url,那么系统就会缓存我们这次请求的url,然后让我们先登录,登录完成后并且该用户拥有访问该资源的权限,那么系统就会再次将我们重定向到之前访问的url。
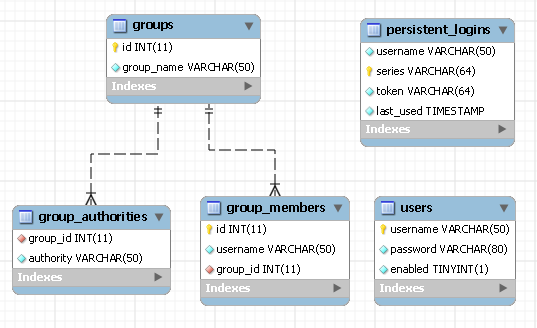
remember-me元素key属性是必须的,为了确保系统的安全性,我们最好将key弄得足够复杂,可以是应用名称加上随机生成的一个字符串(可以找online password generator帮忙) , 如果我们加上了data-source-ref属性,就表示我们会把remember-me的一些信息保存到数据库中,这就需要我们添加一个如下的表结构定义到数据库中:
create table persistent_logins(
    username varchar(50) not null,
    series varchar(64) primary key,
    token varchar(64) not null,
    last_used timestamp not null
);
这样做有几个优点,第一比较安全,第二服务器重启后仍可使用remember-me自动登录。
下面粗略讲讲authentication-manager元素,authentication-provider 的 password-encoder-ref表示用来对密码进行加密处理的一个bean,该bean是crypto模块中的org.springframework.security.crypto.password.StandardPasswordEncoder ,该bean采用的是SHA-256加密算法并随即产生8位byte值作为salt值,加密后密码长度为80位,加密强度非常高,推荐直接使用。该bean实现了org.springframework.security.crypto.password.PasswordEncoder 接口,该接口提供了两个方法:
package org.springframework.security.crypto.password;

/**
 * Service interface for encoding passwords.
 * @author Keith Donald
 */
public interface PasswordEncoder {

    /**
     * Encode the raw password.
     * Generally, a good encoding algorithm applies a SHA-1 or greater hash combined with an 8-byte or greater randomly
     * generated salt.
     */
    String encode(CharSequence rawPassword);

    /**
     * Verify the encoded password obtained from storage matches the submitted raw password after it too is encoded.
     * Returns true if the passwords match, false if they do not.
     * The stored password itself is never decoded.
     *
     * @param rawPassword the raw password to encode and match
     * @param encodedPassword the encoded password from storage to compare with
     * @return true if the raw password, after encoding, matches the encoded password from storage
     */
    boolean matches(CharSequence rawPassword, String encodedPassword);

}
方法很直观,第一个用来获取加密后的密码,第二个用来验证密码是否正确。
对jdbcUserService这个bean得好好说道说道,因为我们采用的是"用户-组-权限"这种方案,对于用户非常少的也可以直接采用"用户-权限" , 像windows操作系统和linux操作系统的用户管理采用的都是前者 。 对于一些历史遗留的表结构,需要做些小的调整,将适配你表结构的sql查询语句通过属性注入到jdbcUserService中去,具体查看下org.springframework.security.core.userdetails.jdbc.JdbcDaoImpl 这个类的文档就可以了,可以仿照原来的sql语句来写,也不复杂。
差点忘了,那个 "用户-组-权限"方案的表定义语句,还没贴出来呢,其实这些都在官方文档的附录中有。
create table users(
    username varchar(50) not null primary key,
    password varchar(80) not null,
    enabled boolean not null default true
);

create table groups(
    id int(11) primary key auto_increment,
    group_name varchar(50) not null
);

create table group_authorities(
    group_id int(11) not null,
    authority varchar(50) not null,

    constraint fk_group_authorities_groups foreign key(group_id) references groups(id)
);

create table group_members(
    id int(11) primary key auto_increment,
    username varchar(50) not null,
    group_id int(11) not null,

    constraint fk_group_members_groups foreign key(group_id) references groups(id)
);
<%@ page contentType="text/html;charset=UTF-8" language="java" %>
<%@ taglib prefix="c" uri="http://java.sun.com/jsp/jstl/core" %>

<!DOCTYPE html PUBLIC "-//W3C//DTD XHTML 1.0 Transitional//EN" "http://www.w3.org/TR/xhtml1/DTD/xhtml1-transitional.dtd">
<html xmlns="http://www.w3.org/1999/xhtml">
<head>
    <title></title>
</head>
<body>
<form action="<c:url value="/loginProcess" />" method="post">
    <c:if test="${not empty param.error}">
        <div id="message" class="error">用户名或密码错误</div>
    </c:if>
    <fieldset>
        <p>
            <label for="j_username" class="label">用户名</label>
            <input type="text" name="j_username" id="j_username"/>
        </p>

        <p>
            <label for="j_password" class="label">密码</label>
        <input type="password" name="j_password" id="j_password"/>
        </p>

        <p>
            <label class="label">两周内自动登录</label>
            <input id="remember_me" name="_spring_security_remember_me" type="checkbox"/>
        </p>

        <p><input id="loginBtn" class="btn" type="submit" value="登录"/></p>
    </fieldset>
</form>
</body>
</html>
form action就是我们在我们在配置文件中的login-processing-url 的url,用户名和密码的name分别为j_username 和j_password ,当然这两个名称也是可以自定义的,那个checkbox的name为_spring_security_remember_me 是remember-me 用来实现自动登录的。
测试sql语句如下:clong的密码是110,admin的密码是admin
insert into users(username, password, enabled) values ('clong', '532bf9d4d3213a14d232f3a548a0cf1aa47fbf105ee7896175587c109e9663522df0cdf9efd5fd97', true);
insert into users(username, password, enabled) values ('admin', '83ed8f60f97d7f1cc03fc583553ad1f71d6db79d2a8b613dc9493f1923c92b27204529dcf21b0877', true);

insert into groups(group_name) values ('User');
insert into groups(group_name) values ('Administrator');

insert into group_authorities(group_id, authority) select id, 'ROLE_USER' from groups where group_name='User';
insert into group_authorities(group_id, authority) select id,'ROLE_USER' from groups where group_name='Administrator';
insert into group_authorities(group_id, authority) select id, 'ROLE_ADMIN' from groups where group_name='Administrator';

insert into group_members(username, group_id) select 'clong', id from groups where group_name='User';
insert into group_members(username, group_id) select 'admin', id from groups where group_name='Administrator';
接下来来做个测试,我们在intercept-url定义了一些访问限制规则,对于请求/的url一律放行,对于请求/hello.jsp的url需要登录后并且所在组为"User"的可以访问,对于请求/admin.jsp需要登录,但是”User“组的和匿名用户都访问不了,只有”Administrator“组的用户才可以访问 。
接下来有时间的话,会分享一下自己学习Spring Security中ACL(Access Control List)的东西,这个acl模块比较强大,复杂的应用肯定不仅仅是控制一些url和方法级别的保护,而是需要让系统知道这个对象是否有权限访问该业务方法,动态地去判断,当然它也有缺点,特别当领域对象的实例超过百万级别的时候, 对数据库的压力比较大,不过对中小规模的系统完全没有问题。附件中提供的源码也包含了一个简单的acl demo,没有将两者分开,自己写在一起了,凑合着看吧,记得改下数据库密码执行下sql就可以运行了。 运行:mvn clean jetty:run,或者打包放到tomcat里直接跑
