原创整理不易,转载请注明出处:整合Spring MVC,mybatis,hibernate,freemarker框架实现的自定义注解Validator验证机制实现对敏感词过滤的代码分享
代码下载地址:http://www.zuidaima.com/share/1755786415246336.htm
服务器端的数据验证,对于一个WEB应用来说是非常重要的,而Spring从3.0开始支持JSR-303规范,它定义了一些标准的验证约束,同时也提供了一个可扩展的自定义方式来满足不同的开发需要,大象以SSM3为基础,结合实例来说明如何通过Spring MVC用自定义约束注解的方式来实现Validator验证。
在实现功能之前,我们需要在pom文件里添加一些必须的依赖:
		<dependency>
			<groupId>javax.validation</groupId>
			<artifactId>validation-api</artifactId>
			<version>1.0.0.GA</version>
		</dependency>
		<dependency>
			<groupId>org.hibernate</groupId>
			<artifactId>hibernate-validator</artifactId>
			<version>4.0.2.GA</version>
		</dependency>
validation-api 是 JSR-303 规范的标准接口, hibernate-validator 则是这套接口的一个实现,而 hibernate-validator 的实现里面又会用到 slf4j ,所以还需要加上这两个 jar 包。有了这些,我们就可以在此基础上实现自定义注解约束扩展了。
本篇还是以 SSM3 为基础,以对角色名称添加屏蔽词为例来说明如何实现这些功能。
首先需要定义这样一个屏蔽词注解:
@Documented
@Constraint(validatedBy = {WordsValidator.class})
@Target({METHOD, FIELD, ANNOTATION_TYPE, CONSTRUCTOR, PARAMETER})
@Retention(RUNTIME)
public @interface Words {

	String message() default "{constraint.default.words.message}";

	Class<?>[] groups() default {};

	Class<? extends Payload>[] payload() default {};

	String filed() default "";
}
上面这个注解类,message(),groups()和payload()这三个方法是注解验证的标准格式,filed()表示验证的字段名称,{constraint.default.words.message}是从ValidationMessages.properties资源文件中获取的,这个文件的位置就在resources目录下面。
现在定义了验证接口,就需要有处理接口的实现,WordsValidator.class就是用来处理这个的:
public class WordsValidator implements ConstraintValidator<Words, String> {

	@Override
	public void initialize(Words wordsAnnotation) {
	}

	@Override
	public boolean isValid(String value, ConstraintValidatorContext context) {
		if (StringUtils.isBlank(value))
			return Boolean.TRUE;
		// 此处可以加载敏感词库,不过只列举了一个
		return !StringUtils.trim(value).equals("最代码");
	}
}
这里大象为了说明实现的方法,简化了处理,实际开发中,可以改进一下,通过使用屏蔽词库对 value 值进行过滤。下面是一个测试类,对此注解进行一个简单的测试。
@Test
public void testWords(){
	AnnotationDescriptor<Words> descriptor = new AnnotationDescriptor<Words>(Words.class);
	Words words = AnnotationFactory.create(descriptor);
	WordsValidator wordsValidator = new WordsValidator();
	wordsValidator.initialize(words);
	Assert.assertTrue(wordsValidator.isValid(null, null));
	Assert.assertTrue(wordsValidator.isValid("", null));
	Assert.assertTrue(wordsValidator.isValid("  ", null));
	Assert.assertFalse(wordsValidator.isValid("  菠萝大象    ", null));
	Assert.assertTrue(wordsValidator.isValid("大象", null));
	Assert.assertTrue(wordsValidator.isValid("   大象  ", null));
}
RoleController 的 save 方法需要加入验证以及错误处理:
@RequestMapping(value = "/save", method = RequestMethod.POST)
public String save(@Valid Role role, BindingResult result, Model model) {
	if (result.hasErrors()) {
		model.addAttribute("entity", role);
		model.addAttribute("error", result.getAllErrors());
		return "base/role_edit";
	}
	roleService.save(role);
	return "redirect:/role";
}
页面上想要显示验证的错误信息,最方便的就是直接使用 spring-webmvc 里的 org.springframework.web.servlet.view.freemarker 下 的 spring.ftl 文件,它里面定义了很多的宏命令,同时还可以添加自定义的宏命令:
<#macro showErrors>
	<#if error?exists>
	<script type="text/javascript">
		<#list error as e>
		$("[for='${e.field}']").show().text("${e.defaultMessage}");
		</#list>
	</script>
	</#if>
</#macro>
role_edit.html 这个页面的变动不大,主要就是四点,具体的可以查看源码。
1 、引入并定义 < #import"/common/spring.ftl" as spring/>
2 、在角色名 input 后面增加 < label class="error" for="name" style="display:none;"></label>
3 、然后加入 jquery.js ,用来解析 showErrors 中的脚本
4 、使用 < @spring.showErrors/>
最后,要想让这些功能都能正常的运行起来,需要改下 servlet-context.xml 文件
 <bean class="org.springframework.web.servlet.mvc.annotation.AnnotationMethodHandlerAdapter">
		<property name="webBindingInitializer">
			<bean class="org.springframework.web.bind.support.ConfigurableWebBindingInitializer">
				<property name="validator" ref="validator" />
			</bean>
		</property>
	</bean>

	<bean id="validator" class="org.springframework.validation.beanvalidation.LocalValidatorFactoryBean" />
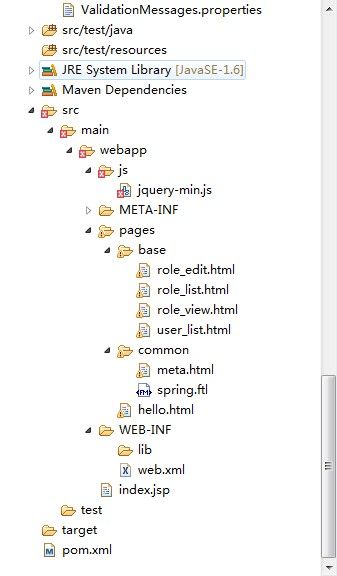
项目截图:
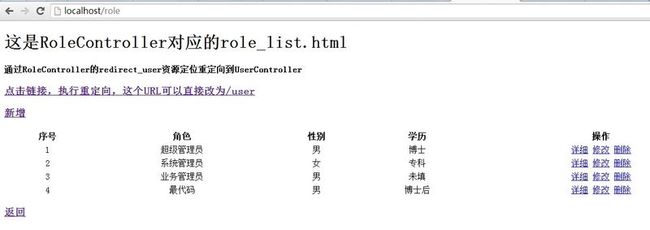
运行截图:
首页:http://localhost:端口/项目名称/hello
user_list.html
role_list.html
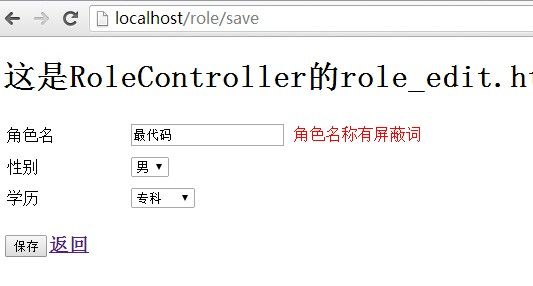
新增角色时有敏感词:最代码时提示出错!
数据库脚本:
use zuidaima_springmvc_validator;

CREATE TABLE `role` (
  `id` int(11) NOT NULL AUTO_INCREMENT,
  `name` varchar(50) DEFAULT NULL,
  `sex` char(1) DEFAULT NULL,
  `edu` char(1) DEFAULT NULL,
  PRIMARY KEY (`id`)
) ENGINE=InnoDB AUTO_INCREMENT=6 DEFAULT CHARSET=utf8;

-- ----------------------------
-- Records of role
-- ----------------------------
INSERT INTO role VALUES ('1', '超级管理员', '1', '4');
INSERT INTO role VALUES ('2', '系统管理员', '2', '1');
INSERT INTO role VALUES ('3', '业务管理员', '1', '0');
INSERT INTO role VALUES ('4', '最代码', '1', '5');

-- ----------------------------
-- Table structure for `user`
-- ----------------------------
DROP TABLE IF EXISTS `user`;
CREATE TABLE `user` (
  `id` int(11) NOT NULL AUTO_INCREMENT,
  `username` varchar(20) DEFAULT NULL,
  `role_id` int(11) DEFAULT NULL,
  PRIMARY KEY (`id`)
) ENGINE=InnoDB AUTO_INCREMENT=4 DEFAULT CHARSET=utf8;

-- ----------------------------
-- Records of user
-- ----------------------------
INSERT INTO user VALUES ('1', '张三', '1');
INSERT INTO user VALUES ('2', '李四', '2');
INSERT INTO user VALUES ('3', '王五', '1');


