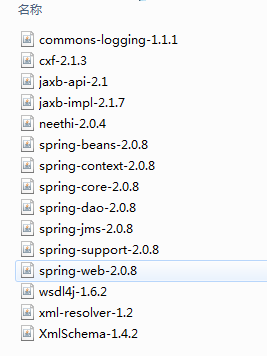
1、将cxf与spring相关的架包拷到lib目录下,我用的是cxf提供的jar包,可以到官网直接下载。
<?xml version="1.0" encoding="UTF-8"?>
<web-app xmlns:xsi="http://www.w3.org/2001/XMLSchema-instance"
xmlns="http://java.sun.com/xml/ns/javaee"
xsi:schemaLocation="http://java.sun.com/xml/ns/javaee http://java.sun.com/xml/ns/javaee/web-app_2_5.xsd"
id="WebApp_ID" version="2.5">
<display-name>testWS_CXF</display-name>
<welcome-file-list>
<welcome-file>index.html</welcome-file>
</welcome-file-list>
<!-- 加载Spring容器配置 -->
<listener>
<listener-class>org.springframework.web.context.ContextLoaderListener</listener-class>
</listener>
<!-- 设置Spring容器加载配置文件路径 -->
<context-param>
<param-name>contextConfigLocation</param-name>
<param-value>classpath*:applicationContext-server.xml</param-value>
</context-param>
<listener>
<listener-class>org.springframework.web.util.IntrospectorCleanupListener</listener-class>
</listener>
<servlet>
<servlet-name>CXFService</servlet-name>
<servlet-class>org.apache.cxf.transport.servlet.CXFServlet</servlet-class>
</servlet>
<!--url-pattern:配置服务接口的访问路径 -->
<servlet-mapping>
<servlet-name>CXFService</servlet-name>
<url-pattern>/*</url-pattern>
</servlet-mapping>
</web-app>
3、在项目src目录下建立applicationContext-server.xml文件(服务代码已省略),注意红色部分。
<?xml version="1.0" encoding="UTF-8"?>
<beans xmlns="http://www.springframework.org/schema/beans"
xmlns:xsi="http://www.w3.org/2001/XMLSchema-instance" xmlns:jaxws="http://cxf.apache.org/jaxws"
xsi:schemaLocation="
http://www.springframework.org/schema/beans
http://www.springframework.org/schema/beans/spring-beans.xsd
http://cxf.apache.org/jaxws http://cxf.apache.org/schemas/jaxws.xsd">
<!-- 引入cxf标准规范: 这些xml文件在cxf-2.1.3.jar的META-INF目录下 -->
<import resource="classpath:META-INF/cxf/cxf.xml" />
<import resource="classpath:META-INF/cxf/cxf-extension-soap.xml" />
<import resource="classpath:META-INF/cxf/cxf-servlet.xml" />
<!-- 配置接口服务 -->
<!-- id:指在spring配置的bean的ID;Implementor:指明具体的实现类; Address:指明这个web service的相对地址; -->
<jaxws:endpoint id="helloWorld" implementor="com.farben.HelloWorldImpl"
address="/HelloWorld" />
</beans>
4、后面附件已经上传了项目代码,可以直接运行,供参考。
