google guice入门
1. 依赖注入
1.1 类依赖注入
所谓的绑定就是将一个接口绑定到具体的类中,这样客户端不用关心具体的实现,而只需要获取相应的接口完成其服务即可。
HelloWorld.java
2
3 String sayHello();
4 }
5
然后是具体的实现,HelloWorldImpl.java
2
3 @Override
4 public String sayHello() {
5 return " Hello, world! " ;
6 }
7 }
8
写一个测试例子看看,HelleWorldTest.java
2
3 @Test
4 public void testSayHello() {
5 Injector inj = Guice.createInjector( new Module() {
6 @Override
7 public void configure(Binder binder) {
8 binder.bind(HelloWorld. class ).to(HelloWorldImpl. class );
9 }
10 });
11 HelloWorld hw = inj.getInstance(HelloWorld. class );
12 Assert.assertEquals(hw.sayHello(), " Hello, world! " );
13 }
14 }
15
这个例子非常简单,通俗的将就是将一个HelloWorldImpl的实例与HelloWorld关联起来,当想Guice获取一个HelloWorld实例的时候,Guice就返回一个HelloWorldImpl的实例,然后我们就可以调用HelloWorld服务的方法了。
问题(1)HelloWorld是单例的么?测试下。
2 Assert.assertEquals(hw.sayHello(), " Hello, world! " );
3 HelloWorld hw2 = inj.getInstance(HelloWorld. class );
4 System.out.println(hw.hashCode() + " -> " + hw2.hashCode());
5 Assert.assertEquals(hw.hashCode(), hw2.hashCode());
解答(1)测试结果告诉我们,HelloWorld不是单例的,每次都会返回一个新的实例。
问题(2)HelloWorld的实例是HelloWorldImpl么?可以强制转型么?
HelloWorld hw = inj.getInstance(HelloWorld. class );
System.out.println(hw.getClass().getName());
解答(2),结果输出cn.imxylz.study.guice.helloworld.HelloWorldImpl,看来确实只是返回了一个正常的实例,并没有做过多的转换和代理。
问题(3),如果绑定多个实现到同一个接口上会出现什么情况?
2 @Override
3 public String sayHello() {
4 return " Hello world again. " ;
5 }
6 }
binder.bind(HelloWorld. class ).to(HelloWorldImplAgain. class );
解答(3),很不幸,Guice目前看起来不允许多个实例绑定到同一个接口上了。
com.google.inject.CreationException: Guice creation errors:
1) A binding to cn.imxylz.study.guice.helloworld.HelloWorld was already configured at cn.imxylz.study.guice.helloworld.HelleWorldTest$1.configure(HelleWorldTest.java:28).
at cn.imxylz.study.guice.helloworld.HelleWorldTest$1.configure(HelleWorldTest.java:29)
问题(4),可以绑定一个实现类到实现类么?
1 Injector inj = Guice.createInjector( new Module() {
2 @Override
3 public void configure(Binder binder) {
4 binder.bind(HelloWorldImpl. class ).to(HelloWorldImpl. class );
5 }
6 });
7 HelloWorld hw = inj.getInstance(HelloWorldImpl. class );
8 System.out.println(hw.sayHello());
非常不幸,不可以自己绑定到自己。
1) Binding points to itself.
at cn.imxylz.study.guice.helloworld.HelleWorldTest$1.configure(HelleWorldTest.java:28)
我们来看看bind的语法。
也就是说只能绑定一个类的子类到其本身。改造下,改用子类替代。
2
3 @Override
4 public String sayHello() {
5 return " @HelloWorldSubImpl " ;
6 }
7 }
8
2 @Override
3 public void configure(Binder binder) {
4 binder.bind(HelloWorldImpl. class ).to(HelloWorldSubImpl. class );
5 }
6 });
7 HelloWorldImpl hw = inj.getInstance(HelloWorldImpl. class );
8 System.out.println(hw.sayHello());
太好了,支持子类绑定,这样即使我们将一个实现类发布出去了(尽管不推荐这么做),我们在后期仍然有办法替换实现类。
使用bind有一个好处,由于JAVA 5以上的泛型在编译器就确定了,所以可以帮我们检测出绑定错误的问题,而这个在配置文件中是无法检测出来的。
这样看起来Module像是一个Map,根据一个Key获取其Value,非常简单的逻辑。
问题(5),可以绑定到我们自己构造出来的实例么?
解答(5)当然可以!看下面的例子。
2 @Override
3 public void configure(Binder binder) {
4 binder.bind(HelloWorld. class ).toInstance( new HelloWorldImpl());
5 }
6 });
7 HelloWorld hw = inj.getInstance(HelloWorld. class );
8 System.out.println(hw.sayHello());
问题(6),我不想自己提供逻辑来构造一个对象可以么?
解答(6),可以Guice提供了一个方式(Provider<T>),允许自己提供构造对象的方式。
2 @Override
3 public void configure(Binder binder) {
4 binder.bind(HelloWorld. class ).toProvider( new Provider < HelloWorld > () {
5 @Override
6 public HelloWorld get() {
7 return new HelloWorldImpl();
8 }
9 });
10 }
11 });
12 HelloWorld hw = inj.getInstance(HelloWorld. class );
13 System.out.println(hw.sayHello());
问题(7),实现类可以不经过绑定就获取么?比如我想获取HelloWorldImpl的实例而不通过Module绑定么?
解答(7),可以,实际上Guice能够自动寻找实现类。
HelloWorld hw = inj.getInstance(HelloWorldImpl. class );
System.out.println(hw.sayHello());
问题(8),可以使用注解方式完成注入么?不想手动关联实现类。
解答(8),好,Guice提供了注解的方式完成关联。我们需要在接口上指明此接口被哪个实现类关联了。
2 public interface HelloWorld {
3
4 String sayHello();
5 }
6
HelloWorld hw = inj.getInstance(HelloWorld. class );
System.out.println(hw.sayHello());
事实上对于一个已经被注解的接口我们仍然可以使用Module来关联,这样获取的实例将是Module关联的实例,而不是@ImplementedBy注解关联的实例。这样仍然遵循一个原则,手动优于自动。
问题(9)再回头看问题(1)怎么绑定一个单例?
1 Injector inj = Guice.createInjector( new Module() {
2
3 @Override
4 public void configure(Binder binder) {
5 binder.bind(HelloWorld. class ).to(HelloWorldImplAgain. class ).in(Scopes.SINGLETON);
6 }
7 });
8 HelloWorld hw = inj.getInstance(HelloWorld. class );
9 HelloWorld hw2 = inj.getInstance(HelloWorld. class );
10 System.out.println(hw.hashCode() + " -> " + hw2.hashCode());
11
可以看到现在获取的实例已经是单例的,不再每次请求生成一个新的实例。事实上Guice提供两种Scope,com.google.inject.Scopes.SINGLETON和com.google.inject.Scopes.NO_SCOPE,所谓没有scope即是每次生成一个新的实例。
对于自动注入就非常简单了,只需要在实现类加一个Singleton注解即可。
1 @Singleton
2 public class HelloWorldImpl implements HelloWorld {
3
4 @Override
5 public String sayHello() {
6 return " Hello, world! " ;
7 }
8 }
9
附:【前沿】本教程的依赖注入部分基于老菜鸟叮咚的教程,原文在此http://www.family168.com/tutorial/guice/html/。原文主要基于Google Guice 1.0版本的,本文基于Google Guice 2.0版本进行学习和讨论。
1.2 属性注入(Field Inject)
1.2.1 基本属性注入
首先来看一个例子。Service.java
2 public interface Service {
3 void execute();
4 }
ServiceImpl.java
2 @Override
3 public void execute() {
4 System.out.println( " This is made by imxylz (www.imxylz.cn). " );
5 }
6 }
FieldInjectDemo.java
2 * @author xylz (www.imxylz.cn)
3 * @version $Rev: 71 $
4 */
5 public class FieldInjectDemo {
6 @Inject
7 private Service servcie;
8 public Service getServcie() {
9 return servcie;
10 }
11 public static void main(String[] args) {
12 FieldInjectDemo demo = Guice.createInjector().getInstance(FieldInjectDemo. class );
13 demo.getServcie().execute();
14 }
15 }
这个例子比较简单。具体来说就是将接口Service通过@Inject注解注入到FieldInjectDemo类中,然后再FieldInjectDemo类中使用此服务而已。当然Service服务已经通过@ImplementedBy注解关联到ServiceImpl 类中,每次生成一个新的实例(非单例)。注意,这里FieldInjectDemo类没有通过Module等关联到Guice中,具体可以查看《》。
意料之中得到了我们期待的结果。
同样,我们通过问答的方式来加深理解(注意,入门教程我们只是强调怎么使用,至于原理和底层的思想我们放到高级教程中再谈)。
问题(1):可以自己构造FieldInjectDemo 对象而不通过Guice么?
2 * @author xylz (www.imxylz.cn)
3 * @version $Rev: 73 $
4 */
5 public class FieldInjectDemo2 {
6 @Inject
7 private Service servcie;
8 public Service getServcie() {
9 return servcie;
10 }
11 public static void main(String[] args) {
12 FieldInjectDemo2 fd = new FieldInjectDemo2();
13 fd.getServcie().execute();
14 }
15 }
就像上面的例子中一样,然后运行下看看?非常不幸,我们得到了一个谁都不喜欢的结果。
at cn.imxylz.study.guice.inject.FieldInjectDemo2.main(FieldInjectDemo2.java: 22 )
很显然,由于FieldInjectDemo2不属于Guice容器(暂且称为容器吧)托管,这样Service服务没有机会被注入到FieldInjectDemo2类中。
问题(2):可以注入静态属性么?
看下面的代码。
2 @Inject
3 private static Service servcie;
4 public static Service getServcie() {
5 return servcie;
6 }
7 public static void main(String[] args) {
8 FieldInjectDemo2 fd = Guice.createInjector().getInstance(FieldInjectDemo2. class );
9 FieldInjectDemo2.getServcie().execute();
10 }
11 }
很不幸!运行结果告诉我们Guice看起来还不支持静态字段注入。
好了,上面两个问题我们暂且放下,我们继续学习其它注入功能。
1.2.2 构造函数注入(Constructor Inject)
继续看例子。例子是说明问题的很好方式。
2 * $Id: ConstructorInjectDemo.java 75 2009-12-23 14:22:35Z xylz $
3 * xylz study project (www.imxylz.cn)
4 */
5 package cn.imxylz.study.guice.inject;
6
7 import com.google.inject.Guice;
8 import com.google.inject.Inject;
9
10 /** a demo with constructor inject
11 * @author xylz (www.imxylz.cn)
12 * @version $Rev: 75 $
13 */
14 public class ConstructorInjectDemo {
15
16 private Service service;
17 @Inject
18 public ConstructorInjectDemo(Service service) {
19 this .service = service;
20 }
21 public Service getService() {
22 return service;
23 }
24 public static void main(String[] args) {
25 ConstructorInjectDemo cid = Guice.createInjector().getInstance(ConstructorInjectDemo. class );
26 cid.getService().execute();
27 }
28
29 }
30
31
我们在构造函数上添加@Inject来达到自动注入的目的。构造函数注入的好处是可以保证只有一个地方来完成属性注入,这样可以确保在构造函数中完成一些初始化工作(尽管不推荐这么做)。当然构造函数注入的缺点是类的实例化与参数绑定了,限制了实例化类的方式。
问题(3):构造函数中可以自动注入多个参数么?
2
3 private Service service;
4 private HelloWorld helloWorld;
5 @Inject
6 public ConstructorInjectDemo(Service service,HelloWorld helloWorld) {
7 this .service = service;
8 this .helloWorld = helloWorld;
9 }
10 public Service getService() {
11 return service;
12 }
13 public HelloWorld getHelloWorld() {
14 return helloWorld;
15 }
16 public static void main(String[] args) {
17 ConstructorInjectDemo cid = Guice.createInjector().getInstance(ConstructorInjectDemo. class );
18 cid.getService().execute();
19 System.out.println(cid.getHelloWorld().sayHello());
20 }
21 }
22
23
非常完美的支持了多参数构造函数注入。当然了没有必要写多个@Inject,而且写了的话不能通过编译。
1.2.3 Setter注入(Setter Method Inject)
有了上面的基础我们再来看Setter注入就非常简单了,只不过在setter方法上增加一个@Inject注解而已。
2
3 private Service service;
4
5 @Inject
6 public void setService(Service service) {
7 this .service = service;
8 }
9
10 public Service getService() {
11 return service;
12 }
13
14 public static void main(String[] args) {
15 SetterInjectDemo sid = Guice.createInjector().getInstance(SetterInjectDemo. class );
16 sid.getService().execute();
17 }
18
19 }
20
21
好了我们再回头看问题2的静态注入(static inject)。下面的例子演示了如何注入一个静态的字段。
2 * @author xylz (www.imxylz.cn)
3 * @version $Rev: 78 $
4 */
5 public class StaticFieldInjectDemo {
6
7 @Inject
8 private static Service service;
9
10 public static void main(String[] args) {
11 Guice.createInjector( new Module() {
12 @Override
13 public void configure(Binder binder) {
14 binder.requestStaticInjection(StaticFieldInjectDemo. class );
15 }
16 });
17 StaticFieldInjectDemo.service.execute();
18 }
19 }
20
21
非常棒!上面我们并没有使用Guice获取一个StaticFieldInjectDemo实例(废话),实际上static字段(属性)是类相关的,因此我们需要请求静态注入服务。但是一个好处是在外面看起来我们的服务没有Guice绑定,甚至client不知道(或者不关心)服务的注入过程。
再回到问题(1),参考上面静态注入的过程,我们可以使用下面的方式来注入实例变量的属性。
2
3 @Inject
4 private Service service;
5 public static void main(String[] args) {
6 final InstanceFieldInjectDemo ifid = new InstanceFieldInjectDemo();
7 Guice.createInjector( new Module() {
8 @Override
9 public void configure(Binder binder) {
10 binder.requestInjection(ifid);
11 }
12 });
13 ifid.service.execute();
14 }
15 }
16
17
实际上这里有一种简便的方法来注入字段,实际上此方法也支持Setter注入。
2
3 @Inject
4 private Service service;
5 public static void main(String[] args) {
6 InstanceFieldInjectDemo ifid = new InstanceFieldInjectDemo();
7 Guice.createInjector().injectMembers(ifid);
8 ifid.service.execute();
9 }
10 }
11
12
好了既然是入门教程,我们就不讨论更深层次的东西了。
1.3 更多话题
1.3.1 接口多实现
如果一个接口有多个实现,这样通过@Inject和Module都难以直接实现,但是这种现象确实是存在的,于是Guice提供了其它注入方式来解决此问题。比如下面的自定义注解。
2
3 void execute();
4 }
5
6
2 @Override
3 public void execute() {
4 System.out.println( " home.imxylz.cn " );
5 }
6 }
2 @Override
3 public void execute() {
4 System.out.println( " www.imxylz.cn " );
5 }
6 }
2 @Target({FIELD,PARAMETER})
3 @BindingAnnotation
4 public @ interface Home {
5 }
2 @Target({FIELD,PARAMETER})
3 @BindingAnnotation
4 public @ interface Www {
5 }
上面的代码描述的是一个Service服务,有WwwService和HomeService两个实现,同时有Www和Home两个注解(如果对注解各个参数不明白的需要单独去学习JAVA 5注解)。好了下面请出我们的主角。
2 * $Id: MultiInterfaceServiceDemo.java 82 2009-12-24 06:55:16Z xylz $
3 * xylz study project (www.imxylz.cn)
4 */
5 package cn.imxylz.study.guice.inject.more;
6
7 import com.google.inject.Binder;
8 import com.google.inject.Guice;
9 import com.google.inject.Inject;
10 import com.google.inject.Module;
11
12 /** a demo with multi interfaces
13 * @author xylz (www.imxylz.cn)
14 * @version $Rev: 82 $
15 */
16 public class MultiInterfaceServiceDemo {
17 @Inject
18 @Www
19 private Service wwwService;
20 @Inject
21 @Home
22 private Service homeService;
23 public static void main(String[] args) {
24 MultiInterfaceServiceDemo misd = Guice.createInjector( new Module() {
25 @Override
26 public void configure(Binder binder) {
27 binder.bind(Service. class ).annotatedWith(Www. class ).to(WwwService. class );
28 binder.bind(Service. class ).annotatedWith(Home. class ).to(HomeService. class );
29 }
30 }).getInstance(MultiInterfaceServiceDemo. class );
31 misd.homeService.execute();
32 misd.wwwService.execute();
33 }
34 }
35
36
此类的结构是注入两个Service服务,其中wwwService是注入@Www注解关联的WwwService服务,而homeService是注入@Home注解关联的HomeService服务。
同样关于此结构我们要问几个问题。
问题(1)静态注入多个服务怎么写?
其实,参照教程02,我们可以使用下面的例子。
2 @Inject
3 @Www
4 private static Service wwwService;
5 @Inject
6 @Home
7 private static Service homeService;
8 public static void main(String[] args) {
9 Guice.createInjector( new Module() {
10 @Override
11 public void configure(Binder binder) {
12 binder.bind(Service. class ).annotatedWith(Www. class ).to(WwwService. class );
13 binder.bind(Service. class ).annotatedWith(Home. class ).to(HomeService. class );
14 binder.requestStaticInjection(StaticMultiInterfaceServiceDemo. class );
15 }
16 });
17 StaticMultiInterfaceServiceDemo.homeService.execute();
18 StaticMultiInterfaceServiceDemo.wwwService.execute();
19 }
20 }
问题(2):如果不小心一个属性绑定了多个接口怎么办?
非常不幸,你将得到类似一下的错误,也就是说不可以绑定多个服务。
at cn.imxylz.study.guice.inject.more.StaticMultiInterfaceServiceDemo.wwwService(StaticMultiInterfaceServiceDemo.java: 17 )
问题(3):我太懒了不想写注解来区分多个服务,怎么办?
程序员都是懒惰的,于是Google帮我们提供了一个Names的模板来生成注解。看下面的例子。
2 @Inject
3 @Named( " Www " )
4 private static Service wwwService;
5 @Inject
6 @Named( " Home " )
7 private static Service homeService;
8 public static void main(String[] args) {
9 Guice.createInjector( new Module() {
10 @Override
11 public void configure(Binder binder) {
12 binder.bind(Service. class ).annotatedWith(Names.named( " Www " )).to(WwwService. class );
13 binder.bind(Service. class ).annotatedWith(Names.named( " Home " )).to(HomeService. class );
14 binder.requestStaticInjection(NoAnnotationMultiInterfaceServiceDemo. class );
15 }
16 });
17 NoAnnotationMultiInterfaceServiceDemo.homeService.execute();
18 NoAnnotationMultiInterfaceServiceDemo.wwwService.execute();
19 }
20 }
上面的例子中我们使用Named来标注我们的服务应该使用什么样的注解,当然前提是我们已经将相应的服务与注解关联起来了。
1.3.2 Provider注入
在教程第一篇中我们提到了可以通过Provider注入一个服务,这里详细说说这种模式。
首先我们需要构造一个Provider<T>出来。
2
3 @Override
4 public Service get() {
5 return new WwwService();
6 }
7 }
8
9
上面的Provider的意思很简单,每次新建一个新的WwwService对象出来。
注入的过程看下面的代码。
2
3 @Inject
4 private Service service;
5
6 public static void main(String[] args) {
7 Injector inj = Guice.createInjector( new Module() {
8 @Override
9 public void configure(Binder binder) {
10 binder.bind(Service. class ).toProvider(WwwServiceProvider. class );
11 }
12 });
13 ProviderServiceDemo psd = inj.getInstance(ProviderServiceDemo. class );
14 psd.service.execute();
15 }
16
17 }
18
19
很显然如果这东西和线程绑定就非常好了,比如我们可以使用ThreadLocal来做线程的对象交换。
当然如果想自动注入(不使用Module手动关联)服务的话,可以使用@ProviderBy注解。
2 public interface Service {
3
4 void execute();
5 }
6
7
这样我们就不必使用Module将Provider绑定到Service上,获取服务就很简单了。
psd.service.execute();
除了上述两种方式我们还可以注入Provider,而不是注入服务,比如下面的例子例子中,属性不再是Service,而是一个Provider<Service>。
2
3 @Inject
4 private Provider < Service > provider;
5
6 public static void main(String[] args) {
7 ProviderServiceDemo psd = Guice.createInjector( new Module() {
8 @Override
9 public void configure(Binder binder) {
10 binder.bind(Service. class ).toProvider(WwwServiceProvider. class );
11 }
12 }).getInstance(ProviderServiceDemo. class );
13 psd.provider.get().execute();
14 }
15 }
16
17
当然了,由于我们WwwServiceProvider每次都是构造一个新的服务出来,因此在类ProviderServiceDemo中的provider每次获取的服务也是不一样的。
1.3.3 绑定常量
看看下面的例子,演示了一个绑定整数值到实例的例子。
2
3 @Inject
4 @Named( " v " )
5 private int v;
6 public static void main(String[] args) {
7
8 ConstantInjectDemo cid = Guice.createInjector( new Module() {
9 @Override
10 public void configure(Binder binder) {
11 binder.bindConstant().annotatedWith(Names.named( " v " )).to( 12 );
12 }
13 }).getInstance(ConstantInjectDemo. class );
14 System.out.println(cid.v);
15 }
16 }
17
18
当然,既然可以使用Named,也就可以使用自己写注解了。但是看起来好像没有多大作用。除了上述写法,也可以用下面的方式实现。
binder.bind(int.class).annotatedWith(Names.named("v")).toInstance(12);
除了可以绑定int外,在ConstantBindingBuilder类中还可以绑定其它的基本类型。
com.google.inject.binder.ConstantBindingBuilder.to( long )
com.google.inject.binder.ConstantBindingBuilder.to( boolean )
com.google.inject.binder.ConstantBindingBuilder.to( double )
com.google.inject.binder.ConstantBindingBuilder.to( float )
com.google.inject.binder.ConstantBindingBuilder.to( short )
com.google.inject.binder.ConstantBindingBuilder.to( char )
1.3.4 绑定Properties
除了可以绑定基本类型外,还可以绑定一个Properties到Guice中,当然了,由于Properties本质上时一个Map<String,String>,因此Guice也允许绑定一个Map<String,String>。
2 @Named( " web " )
3 private String web;
4
5 public static void main(String[] args) {
6
7 ConstantInjectDemo cid = Guice.createInjector( new Module() {
8 @Override
9 public void configure(Binder binder) {
10 Properties properties = new Properties();
11 properties.setProperty( " web " , " www.imxylz.cn " );
12 Names.bindProperties(binder, properties);
13 }
14 }).getInstance(ConstantInjectDemo. class );
15 System.out.println(cid.web);
16 }
17
18
本章节继续讨论依赖注入的其他话题,包括作用域(scope,这里有一个与线程绑定的作用域例子)、立即初始化(Eagerly Loading Bindings)、运行阶段(Stage)、选项注入(Optional Injection)等等。
1.3.5 Scope(作用域)
在1.1章节中我们初步了解了对象的单例模式,在Guice中提供了一些常见的作用域,比如对于单例模式有下面两个作用域。
com.google.inject.Scopes.NO_SCOPE
在使用上,可以使用Module的bind来实现,看下面的例子。
2 public static void main(String[] args) {
3
4 Service service = Guice.createInjector( new Module() {
5 @Override
6 public void configure(Binder binder) {
7 binder.bind(Service. class ).to(WwwService. class ).in(Scopes.SINGLETON);
8 }
9 }).getInstance(Service. class );
10 service.execute();
11 }
12 }
13
14
当然单例模式还可以似乎用@Singleton注解。
在com.google.inject.binder.ScopedBindingBuilder.in(Scope)方法中,一个Scope除了可以使上面的SINGLETION和NO_SCOPE外,还可以是自己定义的Scope。下面的例子演示了一个与线程绑定的Scope例子。
2 * $Id: ThreadScopeDemo.java 90 2009-12-25 08:12:21Z xylz $
3 * xylz study project (www.imxylz.cn)
4 */
5 package cn.imxylz.study.guice.inject.more;
6
7 import com.google.inject.Binder;
8 import com.google.inject.Guice;
9 import com.google.inject.Injector;
10 import com.google.inject.Key;
11 import com.google.inject.Module;
12 import com.google.inject.Provider;
13 import com.google.inject.Scope;
14
15 /** a demo with thread-scope
16 * @author xylz (www.imxylz.cn)
17 * @version $Rev: 90 $
18 */
19 public class ThreadScopeDemo {
20
21 static class ThreadServiceScope implements Scope {
22
23 static ThreadLocal < Object > threadLocal = new ThreadLocal < Object > ();
24
25 @Override
26 public < T > Provider < T > scope( final Key < T > key, final Provider < T > unscoped) {
27 return new Provider < T > () {
28 @Override
29 public T get() {
30 T instance = (T) threadLocal.get();
31 if (instance == null ) {
32 instance = unscoped.get();
33 threadLocal.set(instance);
34 }
35 return instance;
36 }
37 };
38 }
39
40 @Override
41 public String toString() {
42 return " Scopes.ThreadServiceScope " ;
43 }
44 }
45
46 public static void main(String[] args) {
47 final Injector inj = Guice.createInjector( new Module() {
48 @Override
49 public void configure(Binder binder) {
50 binder.bind(Service. class ).to(WwwService. class ).in( new ThreadServiceScope());
51 }
52 });
53 for ( int i = 0 ;i < 3 ;i ++ ) {
54 new Thread( " Thread- " + i) {
55 public void run() {
56 for ( int m = 0 ;m <3 ;m ++ ) {
57 System.out.println(String.format( " %s-%d:%d " , //
58 getName() //
59 ,m //
60 ,inj.getInstance(Service. class ).hashCode()));
61 try {
62 Thread.sleep( 50L );
63 } catch (Exception e) {
64 }
65 }
66 }
67 }.start();
68 }
69 }
70 }
71
注意,这里用到了《Google Guice 入门教程03 - 依赖注入》的中的两个类Service和WwwService。在本例中ThreadServiceScope类是一个与线程绑定的作用域(利用ThreadLocal特性),当当前线程中没有构造一个对象的时候先构造一个出来,然后放入线程上下文中,以后每次都从线程中获取对象。第50行是将WwwService服务以ThreadServiceScope的作用域绑定到Service服务上。第57-60行输出当前对象的hashCode,如果此类是同一对象的话就应该输出相同的hashCode。为了看到效果,我们使用3个线程,每个线程输出三次来看结果。
Thread-1-0:23473608
Thread-2-0:21480956
Thread-1-1:23473608
Thread-0-1:18303751
Thread-2-1:21480956
Thread-1-2:23473608
Thread-2-2:21480956
Thread-0-2:18303751
我们看到对于同一个线程(比如说Thread-0)的三次都输出了相同的对象(hashCode为18303751),而与线程2和线程3的hashCode不同。
(特别说明:如果两个线程输出了同一个hashCode不必惊慌,那是因为可能前一个线程生成的对象的地址空间被GC释放了,结果下一个线程使用了上一个线程的相同空间,所以这里使用Thread.sleep来降低这种可能性)
事实上在guice-servlet-2.0.jar中有与request和session绑定的scope。
com.google.inject.servlet.ServletScopes.SESSION
1.3.6 Eagerly Loading Bindings (立即初始化)
除了可以绑定scope外,对象默认在第一次调用时被创建,也即所谓的延时加载,Guice也允许对象在注入到Guice容器中时就被创建出来(显然这是针对单例模式才有效)。
2
3 public EagerSingletonDemo() {
4 System.out.println( " constuctor: " + System.nanoTime());
5 }
6 void doit() {
7 System.out.println( " doit: " + System.nanoTime());
8 }
9 public static void main(String[] args) throws Exception{
10 Injector inj = Guice.createInjector( new Module() {
11 @Override
12 public void configure(Binder binder) {
13 binder.bind(EagerSingletonDemo. class ).asEagerSingleton();
14 }
15 });
16 System.out.println( " before call: " + System.nanoTime());
17 Thread.sleep( 100L );
18 inj.getInstance(EagerSingletonDemo. class ).doit();
19 }
20 }
结果输出如下:
before call: 26996967713635
doit: 26997069993702
可以看到我们的对象在调用getInstance之前就已经被构造出来了。
1.3.7 Stages (运行阶段)
Guice还有一个特效,可以指定Guice运行模式来控制Guice的加载速度。在com.google.inject.Stage枚举中提供了TOOL,DEVELOPMENT,PRODUCTION三种模式。
TOOL描述的是带有IDE等插件的运行模式;DEVELOPMENT是指在开发阶段只加载自己需要的功能(对于非立即初始化单例对象采用延后加载),这样来降低加载不需要功能的时间;而PRODUCTION模式是指完全加载所有功能(对于单例对象采用立即加载方式),这样可以更早的发现问题,免得等需要某些功能的时候才发现问题(要知道我们某些功能可能需要特定的条件才能触发)。
其实只有比较多的单例对象,并且单例对象构造比较耗时的情况下才能有用。大部分情况下这点性能可能都忽略不计了。
默认情况下Guice采用DEVELOPMENT模式。
1.3.8 Optional Injection (选项注入 )
选项注入描述的是如果不能从Guice容器中注入一个对象,那么可以使用一个默认的对象。看下面的例子。
2 @Inject(optional = true )
3 Service service = new WwwService();
4 public static void main(String[] args) {
5 Guice.createInjector( new Module() {
6 public void configure(Binder binder) {
7 // binder.bind(Service.class).to(HomeService.class);
8 }
9 }).getInstance(OptionalInjectionDemo. class ).service.execute();
10 }
11 }
上述例子中第2行描述的是选项注入,如果不能从Guice容器中获取一个Service服务那么就使用默认的WwwService,否则就是用获取的服务。如果将第7行注释去掉我们就可以看到实际上调用的是HomeService服务了。
2 AOP 面向切面编程
2.1 AOP入门
在前面的章节主要讲Guice的依赖注入,有了依赖注入的基础后我们再来看Guice的AOP。我们先从一个例子入手,深入浅出的去理解Guice的AOP的原理和实现。
首先我们定义服务Service,这个服务有一个简单的方法sayHello,当然了我们有一个服务的默认实现ServiceImpl,然后使用@ImplementedBy将服务和默认实现关联起来,同时将服务的实现标注为单例模式。
2 public interface Service {
3 void sayHello();
4 }
在服务的实现ServiceImpl中,我们sayHello方法就是输出一行信息,这行信息包含服务的类名,hashCode以及方法名称和执行的时间。
2 public class ServiceImpl implements Service {
3
4 @Override
5 @Named( " log " )
6 public void sayHello() {
7 System.out.println(String.format( " [%s#%d] execute %s at %d " , this .getClass().getSimpleName(),hashCode(), " sayHello " ,System.nanoTime()));
8 }
9
10 }
11
接下来定义一个AOP的实现。在Aopalliance中(大家都认可的AOP联盟)实现我们的方法拦截器。这个拦截器LoggerMethodInterceptor 也没有做什么特别的事情,只是记录些执行的时间,当然了由于执行时间比较短我们用纳秒来描述(尽管不是那么精确)。
在MethodInvocation中我们一定要调用proceed()方法,这样我们的服务才能被执行。当然了如果为了做某些控制我们就能决定是否调用服务代码了。
2
3 import org.aopalliance.intercept.MethodInterceptor;
4 import org.aopalliance.intercept.MethodInvocation;
5
6 public class LoggerMethodInterceptor implements MethodInterceptor {
7
8 @Override
9 public Object invoke(MethodInvocation invocation) throws Throwable {
10 String methodName = invocation.getMethod().getName();
11 long startTime = System.nanoTime();
12 out.println(String.format( " before method[%s] at %s " , methodName, startTime));
13 Object ret = null ;
14 try {
15 ret = invocation.proceed();
16 } finally {
17 long endTime = System.nanoTime();
18 out.println(String.format( " after method[%s] at %s, cost(ns):%d " , methodName, endTime,(endTime - startTime)));
19 }
20 return ret;
21 }
22 }
23
最后才是我们的客户端程序,注意在这里我们需要绑定一个拦截器,这个拦截器匹配任何类的带有log注解的方法。所以这就是为什么我们服务的实现方法需要用log标注的原因了。
2 @Inject
3 private Service service;
4
5 public static void main(String[] args) {
6 Injector inj = Guice.createInjector( new Module() {
7 @Override
8 public void configure(Binder binder) {
9 binder.bindInterceptor(Matchers.any(), //
10 Matchers.annotatedWith(Names.named( " log " )), //
11 new LoggerMethodInterceptor());
12 }
13 });
14 inj.getInstance(AopDemo. class ).service.sayHello();
15 inj.getInstance(AopDemo. class ).service.sayHello();
16 inj.getInstance(AopDemo. class ).service.sayHello();
17 }
18 }
19
我们的程序输出了我们期望的结果。
[ServiceImpl$$EnhancerByGuice$$ 96717882 # 33353934 ] execute sayHello at 7811321912287
after method[sayHello] at 7811322140825 , cost(ns): 16073369
before method[sayHello] at 7811322315064
[ServiceImpl$$EnhancerByGuice$$ 96717882 # 33353934 ] execute sayHello at 7811322425280
after method[sayHello] at 7811322561835 , cost(ns): 246771
before method[sayHello] at 7811322710141
[ServiceImpl$$EnhancerByGuice$$ 96717882 # 33353934 ] execute sayHello at 7811322817521
after method[sayHello] at 7811322952455 , cost(ns): 242314
关于此结果有几点说明。
(1)由于使用了AOP我们的服务得到的不再是我们写的服务实现类了,而是一个继承的子类,这个子类应该是在内存中完成的。
(2)除了第一次调用比较耗时外(可能guice内部做了比较多的处理),其它调用事件为0毫秒(我们的服务本身也没做什么事)。
(3)确实完成了我们期待的AOP功能。
我们的例子暂且说到这里,来看看AOP的相关概念。
2.2 AOP相关概念
老实说AOP有一套完整的体系,光是概念就有一大堆,而且都不容易理解。这里我们结合例子和一些场景来大致了解下这些概念。
通知(Advice)
所谓通知就是我们切面需要完成的功能。比如2.1例子中通知就是记录方式执行的耗时,这个功能我们就称之为一个通知。
比如说在很多系统中我们都会将操作者的操作过程记录下来,但是这个记录过程又不想对服务侵入太多,这样就可以使用AOP来完成,而我们记录日志的这个功能就是一个通知。通知除了描述切面要完成的工作外还需要描述何时执行这个工作,比如是在方法的之前、之后、之前和之后还是只在有异常抛出时。
连接点(Joinpoint)
连接点描述的是我们的通知在程序执行中的时机,这个时机可以用一个“点”来描述,也就是瞬态。通常我们这个瞬态有以下几种:方法运行前,方法运行后,抛出异常时或者读取修改一个属性等等。总是我们的通知(功能)就是插入这些点来完成我们额外的功能或者控制我们的执行流程。比如说2.1中的例子,我们的通知(时间消耗)不仅在方法执行前记录执行时间,在方法的执行后也输出了时间的消耗,那么我们的连接点就有两个,一个是在方法运行前,还有一个是在方法运行后。
切入点(Pointcut)
切入点描述的是通知的执行范围。如果通知描述的是“什么时候”做“什么事”,连接点描述有哪些“时候”,那么切入点可以理解为“什么地方”。比如在2.1例子中我们切入点是所有Guice容器管理的服务的带有@Named(“log”)注解的方法。这样我们的通知就限制在这些地方,这些地方就是所谓的切入点。
切面(Aspect)
切面就是通知和切入点的结合。就是说切面包括通知和切入点两部分,由此可见我们所说的切面就是通知和切入点。通俗的讲就是在什么时候在什么地方做什么事。
引入(Introduction)
引入是指允许我们向现有的类添加新的方法和属性。个人觉得这个特性尽管很强大,但是大部分情况下没有多大作用,因为如果一个类需要切面来增加新的方法或者属性的话那么我们可以有很多更优美的方式绕过此问题,而是在绕不过的时候可能就不是很在乎这个功能了。
目标(Target)
目标是被通知的对象,比如我们2.1例子中的ServiceImpl 对象。
代理(Proxy)
代理是目标对象被通知引用后创建出来新的对象。比如在2.1例子中我们拿到的Service对象都不是ServiceImpl本身,而是其包装的子类ServiceImpl$$EnhancerByGuice$$96717882。
织入(Weaving)
所谓织入就是把切面应用到目标对象来创建新的代理对象的过程。通常情况下我们有几种实际来完成织入过程:
编译时:就是在Java源文件编程成class时完成织入过程。AspectJ就存在一个编译器,运行在编译时将切面的字节码编译到目标字节码中。
类加载时:切面在目标类加载到JVM虚拟机中时织入。由于是在类装载过程发生的,因此就需要一个特殊的类装载器(ClassLoader),AspectJ就支持这种特性。
运行时:切面在目标类的某个运行时刻被织入。一般情况下AOP的容器会建立一个新的代理对象来完成目标对象的功能。事实上在2.1例子中Guice就是使用的此方式。
Guice支持AOP的条件是:
- 类必须是public或者package (default)
- 类不能是final类型的
- 方法必须是public,package或者protected
- 方法不能使final类型的
- 实例必须通过Guice的@Inject注入或者有一个无参数的构造函数
2.3 切面注入依赖
如果一个切面(拦截器)也需要注入一些依赖怎么办?没关系,Guice允许在关联切面之前将切面的依赖都注入。比如看下面的例子。
我们有一个前置服务,就是将所有调用的方法名称输出。
2 public interface BeforeService {
3
4 void before(MethodInvocation invocation);
5 }
6
2
3 @Override
4 public void before(MethodInvocation invocation) {
5 System.out.println( " before method " + invocation.getMethod().getName());
6 }
7 }
8
然后有一个切面,这个切面依赖前置服务,然后输出一条方法调用结束语句。
2 @Inject
3 private BeforeService beforeService;
4 @Override
5 public Object invoke(MethodInvocation invocation) throws Throwable {
6 beforeService.before(invocation);
7 Object ret = null ;
8 try {
9 ret = invocation.proceed();
10 } finally {
11 System.out.println( " after " + invocation.getMethod().getName());
12 }
13 return ret;
14 }
15 }
在AopDemo2中演示了如何注入切面的依赖。在第9行,AfterMethodInterceptor 请求Guice注入其依赖。
2 @Inject
3 private Service service;
4 public static void main(String[] args) {
5 Injector inj = Guice.createInjector( new Module() {
6 @Override
7 public void configure(Binder binder) {
8 AfterMethodInterceptor after = new AfterMethodInterceptor();
9 binder.requestInjection(after);
10 binder.bindInterceptor(Matchers.any(), //
11 Matchers.annotatedWith(Names.named( " log " )), //
12 after);
13 }
14 });
15 AopDemo2 demo = inj.getInstance(AopDemo2. class );
16 demo.service.sayHello();
17 }
18 }
尽管切面允许注入其依赖,但是这里需要注意的是,如果切面依赖仍然走切面的话那么程序就陷入了死循环,很久就会堆溢出。
2.4 Matcher
Binder绑定一个切面的API是
com.google.inject.Binder.bindInterceptor(Matcher<? super Class<?>>, Matcher<? super Method>, MethodInterceptor...)
第一个参数是匹配类,第二个参数是匹配方法,第三个数组参数是方法拦截器。也就是说目前为止Guice只能拦截到方法,然后才做一些切面工作。
对于Matcher有如下API:
- com.google.inject.matcher.Matcher.matches(T)
- com.google.inject.matcher.Matcher.and(Matcher<? super T>)
- com.google.inject.matcher.Matcher.or(Matcher<? super T>)
其中第2、3个方法我没有发现有什么用,好像Guice不适用它们,目前没有整明白。
对于第一个方法,如果是匹配Class那么这里T就是一个Class<?>的类型,如果是匹配Method就是一个Method对象。不好理解吧。看一个例子。
2 @Override
3 public Matcher < Class <?>> and(Matcher <? super Class <?>> other) {
4 return null ;
5 }
6 @Override
7 public boolean matches(Class <?> t) {
8 return t == ServiceImpl. class ;
9 }
10 @Override
11 public Matcher < Class <?>> or(Matcher <? super Class <?>> other) {
12 return null ;
13 }
14 }
在前面的例子中我们是使用的Matchers.any()对象匹配所有类而通过标注来识别方法,这里可以只匹配ServiceImpl类来控制服务运行流程。
事实上Guice里面有一个Matcher的抽象类com.google.inject.matcher.AbstractMatcher<T>,我们只需要覆盖其中的matches方法即可。
大多数情况下我们只需要使用Matchers提供的默认类即可。Matchers中有如下API:
- com.google.inject.matcher.Matchers.any():任意类或者方法
- com.google.inject.matcher.Matchers.not(Matcher<? super T>):不满足此条件的类或者方法
- com.google.inject.matcher.Matchers.annotatedWith(Class<? extends Annotation>):带有此注解的类或者方法
- com.google.inject.matcher.Matchers.annotatedWith(Annotation):带有此注解的类或者方法
- com.google.inject.matcher.Matchers.subclassesOf(Class<?>):匹配此类的子类型(包括本身类型)
- com.google.inject.matcher.Matchers.only(Object):与指定类型相等的类或者方法(这里是指equals方法返回true)
- com.google.inject.matcher.Matchers.identicalTo(Object):与指定类型相同的类或者方法(这里是指同一个对象)
- com.google.inject.matcher.Matchers.inPackage(Package):包相同的类
- com.google.inject.matcher.Matchers.inSubpackage(String):子包中的类(包括此包)
- com.google.inject.matcher.Matchers.returns(Matcher<? super Class<?>>):返回值为指定类型的方法
通常只需要使用上面的方法或者组合方法就能满足我们的需求。
通过上面的学习可以看出,Guice的AOP还是很弱的,目前仅仅支持方法级别上的,另外灵活性也不是很高。
3 Web 和 Servlet
3.1 快速开始
我们从一个例子开始Guice Web的开发。
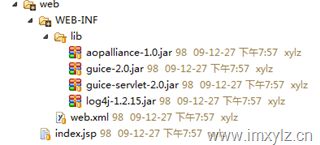 首先准备我们的环境,由于是web开发,因此我们需要guice-servlet的jar包。log4j不是必须的,只是为了方便日志记录而已(Guice内部是使用jdk内部的logging包来完成日志记录的)。
必可避免的要在web.xml中都一些手脚,这里先配置一个filter吧。
< filter - name > guiceFilter </ filter - name >
< filter - class > com.google.inject.servlet.GuiceFilter </ filter - class >
</ filter >
< filter - mapping >
< filter - name > guiceFilter </ filter - name >
< url - pattern > /* </url-pattern>
</filter-mapping>
GuiceFilter中并没有帮我们完成Guice的初始化工作,因此我们必须手动完成Guice的模块注入。
2
3 @Override
4 protected Injector getInjector() {
5 return Guice.createInjector( new ServletModule());
6 }
7 }
8
继续在web.xml中添加东西。
< listener-class > cn.imxylz.study.guice.web.MyGuiceServletContextListener </ listener-class >
</ listener >
显然我们需要将某个PATH映射到一个Servlet上,于是需要在ServletModule上做点事情。
2
3 @Override
4 protected Injector getInjector() {
5 return Guice.createInjector( new ServletModule() {
6 protected void configureServlets() {
7 serve( " /helloworld " ).with(HelloWorldServlet. class );
8 }
9 });
10 }
11 }
12
这里将/helloworld这个地址映射到HelloWorldServlet上。好吧,先写个 “HelloWorld”的Servlet吧。
2 public class HelloWorldServlet extends HttpServlet{
3 private static final long serialVersionUID = 1L ;
4 @Override
5 protected void doGet(HttpServletRequest req, HttpServletResponse resp) throws ServletException,
6 IOException {
7 resp.getWriter().append( " Hello, guice! " + new Date());
8 }
9 }
注意,根据Guice的Servlet要求,每一个Servlet必须是单例的,因此这里强制加上@Singleton。
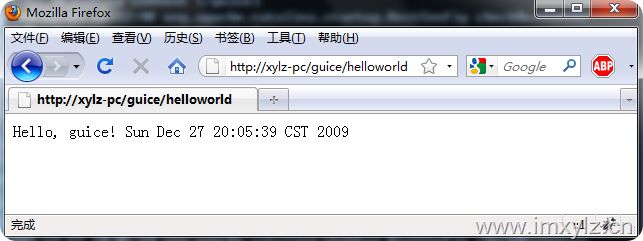
好了,我们来看看输出。
3.2 注入服务
当然了,既然是一个IOC的容器,那么在Guice中也是可以注入服务的。
首先定义一个服务。
2 public interface HelloWorld {
3
4 void execute() throws IOException;
5 }
6
接着是服务的实现,注意在我们的服务中需要request和response对象,并且我们的服务假定是与request绑定的,采用@RequestScoped标签来标识。
2 public class HelloWorldImpl implements HelloWorld {
3
4 private HttpServletRequest request;
5 private HttpServletResponse response;
6 @Inject
7 public HelloWorldImpl(HttpServletRequest request, HttpServletResponse response) {
8 super ();
9 this .request = request;
10 this .response = response;
11 }
12
13 public void execute() throws IOException{
14 String name = request.getParameter( " user " );
15 if (name == null || name.length() < 1 )name = " Guest " ;
16 response.getWriter().append(String.format( " Hello, %s. %s -> sessionId=%s,hashCode=%d " n " , name,new Date(),request.getSession().getId(),hashCode()));
17 }
18
19 }
20
然后在我们的Servlet中可以采用如下实现。
2 public class HelloWorldServlet extends HttpServlet{
3 private static final long serialVersionUID = 1L ;
4 @Inject
5 private Injector inj;
6 @Override
7 protected void doGet(HttpServletRequest req, HttpServletResponse resp) throws ServletException,
8 IOException {
9 inj.getInstance(HelloWorld. class ).execute();
10 inj.getInstance(HelloWorld. class ).execute();
11 }
12 }
这里我们自动注入Injector对象,然后通过Inject对象获取我们的服务,注意我们没有将HttpServletRequest和HttpServletResponse手动注入到我们的服务中。
好了,我们再来看看输出。可以看到我们的对象是与request绑定,同一个request使用的同一个HelloWorld服务,不同的request那么是同一个session获取的服务也是不一样的。
老实说,Guice关于WEB的东西其实大概就这么多。其它的关于多规则匹配顺序,正则表达式匹配等等其实不谈也罢,都很弱,用处不大。
3.3 整合Struts 2
Guice可以与Struts 2整合,当然了理论上可以与其它MVC框架整合,只是Guice官方提供了一个Struts 2的插件。
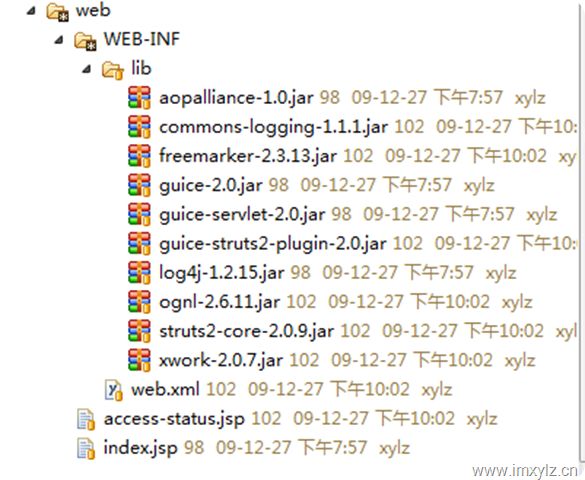
aopalliance-1.0.jar是guice-servlet依赖的,因此guice需要aopalliance/guice/guice-servlet/guice-struts2-plugin等包,struts2启动依赖commons-logging/freemarker/ognl/struts2-core/xwork等jar包。lo4j只是为了记录日志方便而已。
首先定义一个服务,服务很简单输出服务器的状态。
2
3 String getStatus();
4 }
5
2
3 public String getStatus() {
4 return " I'am running. " ;
5 }
6 }
7
然后写一个Module绑定服务及其实现,当然如果偷懒可以使用@ImplementedBy,这里为了说明如果在配置文件中配置Module,所以单写一个Module。
2 @Override
3 public void configure(Binder binder) {
4 binder.bind(Service. class ).to(ServiceImpl. class );
5 }
6 }
然后写一个SessionScope级别的对象绑定访问次数。
2 public class AccessCounter {
3
4 private AtomicInteger count = new AtomicInteger( 0 );
5
6 public int visit() {
7 return count.incrementAndGet();
8 }
9
10 @Override
11 public String toString() {
12 return String.format( " AccessCounter#%s:%d " , this .hashCode(), count.get());
13 }
14 }
15
好了,我们的Servlet出场了。
2
3 import com.google.inject.Inject;
4
5 public class AccessStatusAction {
6
7 final AccessCounter counter;
8 final Service service;
9 String message;
10
11 @Inject
12 public AccessStatusAction(AccessCounter counter, Service service) {
13 this .counter = counter;
14 this .service = service;
15 }
16
17 public String execute() {
18 return " success " ;
19 }
20
21 public int getCount() {
22 return counter.visit();
23 }
24
25 public String getStatus() {
26 return service.getStatus();
27 }
28
29 public String getMessage() {
30 return message;
31 }
32
33 public void setMessage(String message) {
34 this .message = message;
35 }
36 }
37
可以看到我们很简单的服务又被Guice给入侵了,所以说Guice对我们业务逻辑的侵入是很大,估计这也是很多程序员不愿意推广Guice的一个原因吧。
要写的Java代码就这么多,剩下的就是一堆的配置了。
首先web.xml中配置struts2的filter,注意这里我们没必要再配置一个guice的listener了,因为在guice的struts2的插件中已经配置一个ServletModule了。
2 < web-app xmlns ="http://java.sun.com/xml/ns/javaee" xmlns:xsi ="http://www.w3.org/2001/XMLSchema-instance"
3 xsi:schemaLocation ="http://java.sun.com/xml/ns/javaee http://java.sun.com/xml/ns/javaee/web-app_2_5.xsd"
4 version ="2.5" >
5
6 < display-name > guice </ display-name >
7 < description > xylz study project - guice </ description >
8
9 < filter >
10 < filter-name > guiceFilter </ filter-name >
11 < filter-class > com.google.inject.servlet.GuiceFilter </ filter-class >
12 </ filter >
13 < filter-mapping >
14 < filter-name > guiceFilter </ filter-name >
15 < url-pattern > /* </ url-pattern >
16 </ filter-mapping >
17 < filter >
18 < filter-name > struts2 </ filter-name >
19 < filter-class > org.apache.struts2.dispatcher.FilterDispatcher
20 </ filter-class >
21 </ filter >
22 < filter-mapping >
23 < filter-name > struts2 </ filter-name >
24 < url-pattern > /* </ url-pattern >
25 </ filter-mapping >
26 <!-- listener>
27 <listener-class>cn.imxylz.study.guice.web.MyGuiceServletContextListener</listener-class>
28 </listener -->
29 </ web-app >
30
下面该配置struts.xml了。
2 "-//Apache Software Foundation//DTD Struts Configuration 2.0//EN"
3 "http://struts.apache.org/dtds/struts-2.0.dtd" >
4
5 < struts >
6
7 < constant name ="guice.module" value ="cn.imxylz.study.guice.web.struts2.ServiceModule" />
8
9 < package name ="default" extends ="struts-default" >
10 < action name ="access-status"
11 class ="cn.imxylz.study.guice.web.struts2.AccessStatusAction" >
12 < result > access-status.jsp </ result >
13 </ action >
14 </ package >
15
16 </ struts >
17
在这里先配置我们的Module,我们的Module就是完成Guice的注入过程。在guice的Struts2插件中类com.google.inject.struts2.GuiceObjectFactory有以下逻辑:
void setModule(String moduleClassName) {
try {
// Instantiate user's module.
@SuppressWarnings({ " unchecked " })
Class <? extends Module > moduleClass =
(Class <? extends Module > ) Class.forName(moduleClassName);
this .module = moduleClass.newInstance();
} catch (Exception e) {
throw new RuntimeException(e);
}
}
这段逻辑就是完成我们Module的注入过程。
当然了我们需要配置一个Struts2的action类cn.imxylz.study.guice.web.struts2.AccessStatusAction,访问地址access-status.action正确的时候渲染access-status.jsp页面。
2
3 < html >
4 < body >
5 < h1 > Access Status </ h1 >
6 < h3 >< b > Access in this session: </ b >
7 < s:property value ="count" /></ h3 >
8
9 < h3 >< b > Status: </ b >
10 < s:property value ="status" /></ h3 >
11
12 < h3 >< b > Message: </ b >
13 < s:property value ="message" /></ h3 >
14 < h4 > <% = " sessionId= " + session.getId() %> </ h4 >
15 </ body >
16 </ html >
17
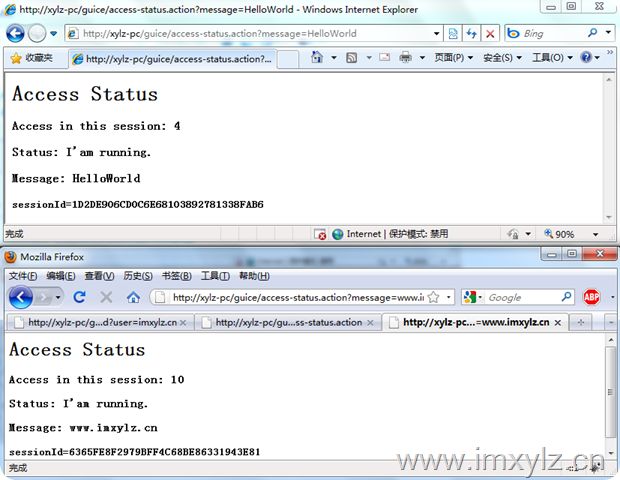
所有的工作就完成了,我们看看浏览器中的渲染结果。
即使如此,Guice整合Struts 2还是比较弱的。
4 整合第三方组件
在《Google Guice 入门教程06 – Web 和Servlet》 中我们看到了Guice 整合Struts 2的应用。本章节继续讨论Guice整合其它第三方组件的应用。
本章节重点谈Guice与DWR和Spring的整合。
4.1 整合DWR
DWR作为Ajax远程调用的服务端得到了很多程序员的追捧,在DWR的2.x版本中已经集成了Guice的插件。
老套了,我们还是定义一个HelloWorld的服务吧,哎,就喜欢HelloWorld,不怕被别人骂!
2
3 String sayHello();
4
5 Date getSystemDate();
6 }
7
然后写一个简单的实现吧。
2
3 @Override
4 public Date getSystemDate() {
5 return new Date();
6 }
7
8 @Override
9 public String sayHello() {
10 return " Hello, guice " ;
11 }
12 }
13
然后是与dwr有关的东西了,我们写一个dwr的listener来注入我们的模块。
2
3 import org.directwebremoting.guice.DwrGuiceServletContextListener;
4
5 /**
6 * @author xylz (www.imxylz.cn)
7 * @version $Rev: 105 $
8 */
9 public class MyDwrGuiceServletContextListener extends DwrGuiceServletContextListener{
10
11 @Override
12 protected void configure() {
13 bindRemotedAs( " helloworld " , HelloWorld. class ).to(HelloWorldImpl. class ).asEagerSingleton();
14 }
15 }
16
这里使用bindRemotedAs来将我们的服务开放出来供dwr远程调用。
剩下的就是修改web.xml,需要配置一个dwr的Servlet并且将我们的listener加入其中。看看全部的内容。
2 < web-app xmlns ="http://java.sun.com/xml/ns/javaee" xmlns:xsi ="http://www.w3.org/2001/XMLSchema-instance"
3 xsi:schemaLocation ="http://java.sun.com/xml/ns/javaee http://java.sun.com/xml/ns/javaee/web-app_2_5.xsd"
4 version ="2.5" >
5
6 < display-name > guice-dwr </ display-name >
7 < description > xylz study project - guice </ description >
8
9 < listener >
10 < listener-class > cn.imxylz.study.guice.web.dwr.MyDwrGuiceServletContextListener
11 </ listener-class >
12 </ listener >
13 < servlet >
14 < servlet-name > dwr-invoker </ servlet-name >
15 < servlet-class > org.directwebremoting.guice.DwrGuiceServlet </ servlet-class >
16 < init-param >
17 < param-name > debug </ param-name >
18 < param-value > true </ param-value >
19 </ init-param >
20 </ servlet >
21 < servlet-mapping >
22 < servlet-name > dwr-invoker </ servlet-name >
23 < url-pattern > /dwr/* </ url-pattern >
24 </ servlet-mapping >
25
26 </ web-app >
27
非常简单,也非常简洁,其中DwrGuiceServlet的debug参数只是为了调试方便才开放的,实际中就不用写了。
好了,看看我们的效果。
2 < head >< title > dwr - test (www.imxylz.cn) </ title >
3 < script type ='text/javascript' src ='/guice-dwr/dwr/interface/helloworld.js' ></ script >
4 < script type ='text/javascript' src ='/guice-dwr/dwr/engine.js' ></ script >
5 < script type ='text/javascript' src ='/guice-dwr/dwr/util.js' ></ script >
6 < script type ='text/javascript' >
7 var showHello = function (data){
8 dwr.util.setValue('result',dwr.util.toDescriptiveString(data, 1 ));
9 }
10 var getSystemDate = function (data){
11 dwr.util.setValue('systime',dwr.util.toDescriptiveString(data, 2 ));
12 }
13 </ script >
14 < style type ='text/css' >
15 input.button { border : 1px outset ; margin : 0px ; padding : 0px ; }
16 span { background : #ffffdd ; white-space : pre ; padding-left : 20px ; }
17 </ style >
18 </ head >
19 < body onload ='dwr.util.useLoadingMessage()' >
20 < p >
21 < h2 > Guice and DWR </ h2 >
22 < input class ='button' type ='button' value ="Call HelloWorld 'sayHello' service" onclick ="helloworld.sayHello(showHello)" />
23 < span id ='result' ></ span >
24 </ p >
25 < p >
26 < input class ='button' type ='button' value ="Call HelloWorld 'getSystemDate' service" onclick ="helloworld.getSystemDate(getSystemDate)" />
27 < span id ='systime' ></ span >
28 </ P >
29 </ body >
30 </ html >
我们通过两个按钮来获取我们的远程调用的结果。
 我对DWR的认识也仅限于此就不献丑了。有兴趣的可以研究http://directwebremoting.org/dwr/。
4.2 整合Spring
仍然使用我们的HelloWorld服务。
2
3 String sayHello(String user);
4 }
5
2
3 @Override
4 public String sayHello(String user) {
5 return String.format( " Welcome to Guice with spring, %1$s. Now is %2$tF %2$tH:%2$tM:%2$tS. " , user, new Date());
6 }
7 }
8
当然了,我们定义一个简单的spring配置文件,只有一个bean。
2 < beans xmlns ="http://www.springframework.org/schema/beans"
3 xmlns:xsi ="http://www.w3.org/2001/XMLSchema-instance"
4 xsi:schemaLocation ="http://www.springframework.org/schema/beans
5 http://www.springframework.org/schema/beans/spring-beans-2.0.xsd" >
6 < bean id ="helloworld" class ="cn.imxylz.study.guice.spring.HelloWorldImpl"
7 scope ="singleton" />
8 </ beans >
然后看我们的Demo程序。
2
3 final ApplicationContext context = new ClassPathXmlApplicationContext( " /applicationContext.xml " , GuiceSpringDemo. class );
4 Injector injector = Guice.createInjector( new AbstractModule() {
5 protected void configure() {
6 bind(BeanFactory. class ).toInstance(context);
7 bind(HelloWorld. class ).toProvider(SpringIntegration.fromSpring(HelloWorld. class , " helloworld " ));
8 }
9 });
10 HelloWorld hw1 = injector.getInstance(HelloWorld. class );
11 String msg = hw1.sayHello( " xylz " );
12 System.out.println(msg);
13 HelloWorld hw2 = (HelloWorld)context.getBean( " helloworld " );
14 String msg2 = hw2.sayHello( " xylz " );
15 System.out.println(msg2);
16 System.out.println(hw1 == hw2);
17 }
18
最后我们通过Injector和ApplicationContext都能够得到我们的服务,并且我们的服务hw1==hw2。
如果闲一个个服务的注入麻烦,这里还有一个简便的方法,一次将spring中的所有服务都注入。
Injector injector = Guice.createInjector( new Module() {
@Override
public void configure(Binder binder) {
SpringIntegration.bindAll(binder, context);
}
});
但是Guice获取服务的方式就不一样了。
String msg=injector.getInstance(Key.get(HelloWorldImpl.class, Names.named("helloworld"))).sayHello("xylz");
System.out.println(msg);
这里我们不能getInstance(HelloWorld.class)来获取一个服务了,为什么呢?因为注入所有服务的时候,Guice并不能知道我们的服务是什么类型,于是将当作实际的类型注入了,另外由于spring允许一种类型的多个服务(bean)存在,所以自动注入的时候为了区分就需要带一个命名的注解,比如我们的helloworld,这个名称就是spring中的id。在Injector中为了获取一个带注解的类型服务,我们需要com.google.inject.Key<T>对象,此对象可以讲类型和注解关联起来,这样我们就能从Guice容器中获取一个服务了。
那如果我们想屏蔽真实的服务代码,也就是我们只是想客户端拿到HelloWorld服务而不是HelloWorldImpl实现怎么做?
目前只能在spring中使用代理服务。
2 < beans xmlns ="http://www.springframework.org/schema/beans"
3 xmlns:xsi ="http://www.w3.org/2001/XMLSchema-instance"
4 xsi:schemaLocation ="http://www.springframework.org/schema/beans
5 http://www.springframework.org/schema/beans/spring-beans-2.0.xsd" >
6 < bean id ="helloworldTarget" class ="cn.imxylz.study.guice.spring.HelloWorldImpl"
7 scope ="singleton" />
8 < bean id ="helloworld" class ="org.springframework.aop.framework.ProxyFactoryBean" >
9 < property name ="proxyInterfaces" value ="cn.imxylz.study.guice.spring.HelloWorld" />
10 < property name ="target" ref ="helloworldTarget" />
11 </ bean >
12 </ beans >
然后我们在Guice中这样获取服务:
System.out.println(msg);
显然,如果客户端知道服务的实际类型并且知道spring中的id,那么仍然可以调用我们的服务,比如下面的例子:
System.out.println(msg3);
4.3 Guice与JMX
Guice官方提供一个JMX的插件guice-jmx-2.0.jar。在这个插件中我们可以很方便的将我们的服务发不成JMX可管理的MBean。本教程中我们继续探讨这个话题。
老套了,我们的HelloWorld服务,注意这个服务为了满足JMX的规范,接口名称以MBean结尾,而实现类必须不带MBean。
2 String sayHello();
3 }
然后是实现类HelloWorld。
2
3 @Override
4 public String sayHello() {
5 return " Hello, guice " ;
6 }
7 @Inject
8 public void register(MBeanServer server) {
9 try {
10 server.registerMBean( this , new ObjectName( " xylz guice demo:type=HelloWorld " ));
11 } catch (Exception e) {
12 e.printStackTrace();
13 }
14 }
15 }
16
这里比较关键的是我们要将我们的服务注入到JMX服务器中。
然后写一个JMX的服务端例子。
2
3 public static void main(String[] args) throws Exception{
4 Injector inj = Guice.createInjector( new Module() {
5 @Override
6 public void configure(Binder binder) {
7 binder.bind(MBeanServer. class ).toInstance(ManagementFactory.getPlatformMBeanServer());
8 binder.bind(HelloWorldMBean. class ).to(HelloWorld. class );
9 }
10 });
11 //
12 Manager.manage( " guice-jmx-demo " , inj);
13 //
14 Thread.sleep( 10000 * 600 ); // sleep for ten minute
15 }
16
17 }
18
在这个例子中我们绑定MBeanServer到Guice中,然后通过Guice的JMX插件将我们的HelloWorldMBean服务到JMX中。最后暂停10分钟阻止我们的程序立即退出,当然你可以写一个while的死循环。
特别注意,在eclipse中需要设置JVM的参数才能正确启动我们的JMX服务。见下面。
- Dcom.sun.management.jmxremote.port = 4321
- Dcom.sun.management.jmxremote.authenticate = false
- Dcom.sun.management.jmxremote.ssl = false
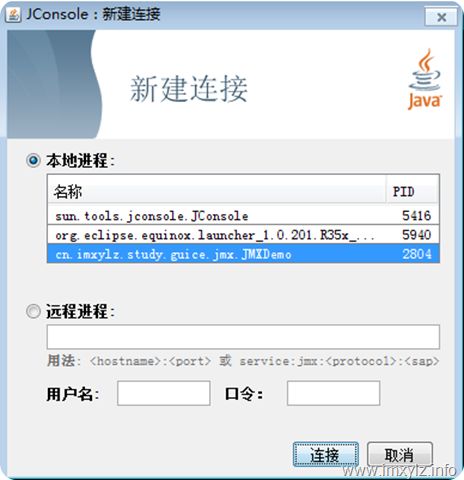
然后使用我们的jconsole来查看我们的JMX服务。
在这里我们就可以看到我们的JMXDemo的进程了。然后选择连接。
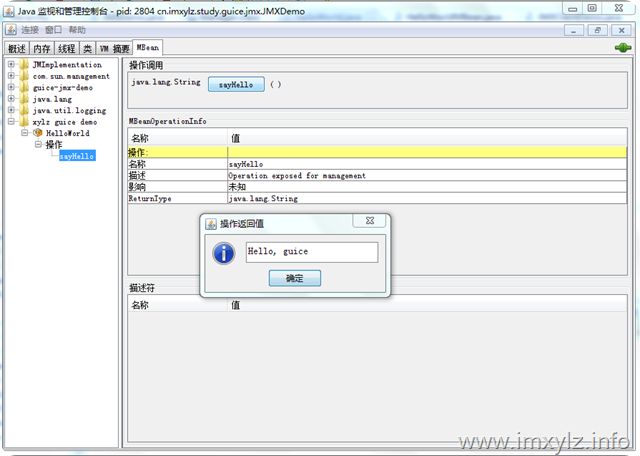
下面的图显示了我们执行sayHello方法的结果。
当然了我们可以自己写一个client的程序来处理我们的服务。
2
3 public static void main(String[] args) throws Exception{
4 JMXServiceURL url = new JMXServiceURL( " service:jmx:rmi:///jndi/rmi://127.0.0.1:4321/jmxrmi " );
5 JMXConnector jmxc = JMXConnectorFactory.connect(url, null );
6 MBeanServerConnection mbsc = jmxc.getMBeanServerConnection();
7 //
8 ObjectName mbeanName = new ObjectName( " xylz guice demo:type=HelloWorld " );
9 //
10 HelloWorldMBean helloWorld = JMX.newMBeanProxy(mbsc, mbeanName, HelloWorldMBean. class , true );
11 String msg = helloWorld.sayHello();
12 System.out.println(msg);
13 }
14
15 }
16
