heartbeat+varnish搭建demo
1,环境介绍
linux:ubuntu 11.10 server
heartbeat:0.91-ubuntu1(apt-get安装)
varnish:3.0.0(apt-get安装)
server:varnish0 varnish1
2,varnish0 网络环境
root@varnish0:~# vim /etc/network/interfaces
root@varnish0:~# vim /etc/resolv.conf
3,varnish0 配置heartbeat
root@varnish0:~# vim /etc/ha.d/authkeys
root@varnish0:~# cat /etc/ha.d/ha.cf
root@varnish0:~# cat /etc/ha.d/haresources
4,varnish1 网络及heartbeat配置
将第2步,第3步在varnish1上面重复
5,启动及测试heartbeat
在 varnish0 及 varnish1上面分别启动
测试
ping 192.168.0.80
varnish0断电,varnish0通电,varnish1断电,通电 观察两个server ifconfig变化
恭喜你,heartbeat 成功了
6,我们开始varnish搭建之旅
root@varnish0:~# vim /etc/varnish/test.vcl
7,启动varnish0
root@varnish0:~# cat /bin/init.test
8,varnish1配置varnish
重复第6步,第7步
9,启动及测试varnish
启动

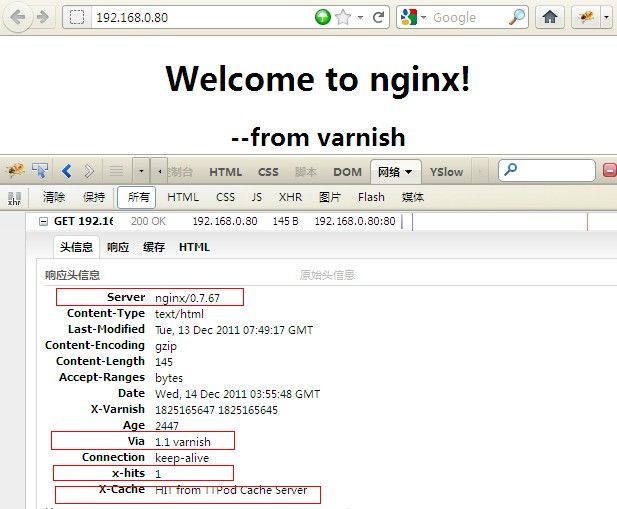
如图效果,又恭喜你varnish成功了
10,heartbeat+varnish整体测试
重复第5步
到这儿heartbeat+varnish 成功了
linux:ubuntu 11.10 server
heartbeat:0.91-ubuntu1(apt-get安装)
varnish:3.0.0(apt-get安装)
server:varnish0 varnish1
2,varnish0 网络环境
root@varnish0:~# vim /etc/network/interfaces
# This file describes the network interfaces available on your system
# and how to activate them. For more information, see interfaces(5).
# The loopback network interface
auto lo
iface lo inet loopback
# The primary network interface
auto eth0
#iface eth0 inet dhcp
iface eth0 inet static
address 192.168.0.83
netmask 255.255.0.0
network 192.168.0.0
broadcast 192.168.255.255

auto eth1
iface eth1 inet static
address 10.0.0.3
netmask 255.255.255.0
network 10.0.0.0
broadcast 10.0.0.255
gateway 10.0.0.1
root@varnish0:~# vim /etc/resolv.conf
domain lan
search lan
nameserver 10.0.0.1
3,varnish0 配置heartbeat
root@varnish0:~# vim /etc/ha.d/authkeys
auth 3
3 md5 ttpod
root@varnish0:~# cat /etc/ha.d/ha.cf
logfile /var/log/heartbeat/ha-log
keepalive 1
warntime 2
deadtime 5
initdead 120
udpport 39001

bcast  eth1

auto_failback on
node    varnish0
node    varnish1
root@varnish0:~# cat /etc/ha.d/haresources
varnish0 192.168.0.80/24/eth0
4,varnish1 网络及heartbeat配置
将第2步,第3步在varnish1上面重复
5,启动及测试heartbeat
在 varnish0 及 varnish1上面分别启动
/etc/init.d/networking restart
/etc/init.d/heartbeat restart
测试
ping 192.168.0.80
varnish0断电,varnish0通电,varnish1断电,通电 观察两个server ifconfig变化
恭喜你,heartbeat 成功了
6,我们开始varnish搭建之旅
root@varnish0:~# vim /etc/varnish/test.vcl
backend b_72 {
    .host = "192.168.1.72";
    .port = "80";
}

acl local {
    "127.0.0.1";
    "192.168.1.1"/16;
}

sub vcl_recv {
    if (req.http.host ~ "^192.168.0.80$") {
        set req.backend = b_72;
    } else {
        error 404 "Unknown HostName!";
    }

    if (req.request == "PURGE") {
        if (!client.ip ~ local) {
            error 405 "Not Allowed.";
            return (lookup);
        }
    }

    if (req.request == "GET" && req.url ~ "\.(jpg|png|gif|swf|jpeg|ico)$") {
        unset req.http.cookie;
    }

    if (req.request != "GET" && req.request != "HEAD" && req.request != "PUT" && req.request != "POST" && req.request != "TRACE" && req.request != "OPTIONS" && req.request != "DELETE") {
        return (pipe);
    }

    if (req.request != "GET" && req.request != "HEAD") {
        return (pass);
    }

    if (req.http.Authorization || req.http.Cookie) {
        return (pass);
    }

    return (lookup);
}

sub vcl_deliver {
    set resp.http.x-hits = obj.hits ;
    if (obj.hits > 0) {
        set resp.http.X-Cache = "HIT from TTPod Cache Server";
    } else {
        set resp.http.X-Cache = "MISS from TTPod Cache Server";
    }
}
7,启动varnish0
root@varnish0:~# cat /bin/init.test
#!/bin/sh
set -e
PATH=/usr/local/sbin:/usr/local/bin:/usr/sbin:/usr/bin:/sbin:/bin

pkill varnishd
varnishd -u varnish -g varnish -f /etc/varnish/test.vcl -a :80 -s file,/data/cache/varnish/test,2G -w 1024,51200,10 -t 3600 -T 127.0.0.1:39101

varnishncsa -w /var/log/varnish/access.log &

exit 0
8,varnish1配置varnish
重复第6步,第7步
9,启动及测试varnish
启动
/bin/sh /bin/varnish start

如图效果,又恭喜你varnish成功了
10,heartbeat+varnish整体测试
重复第5步
到这儿heartbeat+varnish 成功了