基于RESTful Web Service 的Jersey框架与Spring完美整合
前几天一时兴起,看到一个基于RESTful web Service的很不错的框架 jersey .并且做了一个小小的案例.
说起jersey,应该首先简要的阐述一下REST,REST概念是由加州大学的Roy Fielding 在2000年提出,REST不是一种技术,它是一种开发方式和风格,REST 定义了一组体系架构原则,您可以根据这些原则设计以系统资源为中心的 Web 服务,包括使用不同语言编写的客户端如何通过 HTTP 处理和传输资源状态,也已经普遍地取代了基于 SOAP 和 WSDL 的接口设计。而Jersey是一个REST 很好的轻量级实现框架.
刚听说jersey的时候,我并不是很倾向,因为在此之前基于RESTful的实现框架有很多,比如XFire,Restlet,Resteasy等等,但我还是使用了之后,觉得它与Spring完美集成,让我们在开发中提高了很多小于,也相对的减少非法侵入.
下面我们来搭建一个jersey的web service Project:
我的IDE环境是myeclipse,jre 在jdk1.6上 web 服务器是tomcat 6
一、第一步新建一个web project 。
二、然后将相关的spring jar包导入项目中, spring-core,aop,beans,jdbc,context,asm,orm,web等去官网下载http://www.springsource.org/download/ list 中所有的jar包
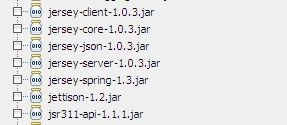
三、下载jersey 相关的jar包
四、 导入aopalliance.jar 不然会报错 找不到相关文件,log4j jar 和log4j.properties
五、 创建自己的应用程序
我现在直接写一个helloworld对象 将helloworl 对象通过webservice 访问来返回相关数据格式的数据
package com.jerrys.jerseyrest.entity;


import java.io.Serializable;
import java.util.HashMap;
import java.util.Map;

import javax.xml.bind.annotation.XmlRootElement;

@XmlRootElement
public class Helloworld implements Serializable {
	private String content;
	private Map<String, Object> helloMap = new HashMap<String, Object>();

	public Helloworld() {
		helloMap.put("xiaoming", "我是小明:");
		helloMap.put("xiaoqiang", "我是小强:");
	}

	public Object getHelloByName(String name) {
		return helloMap.get(name);
	}

	public String getContent() {
		return content;
	}

	public void setContent(String content) {
		this.content = content;
	}

	public Map<String, Object> getHelloMap() {
		return helloMap;
	}

	public void setHelloMap(Map<String, Object> helloMap) {
		this.helloMap = helloMap;
	}

}
@XmlRootElement 是jax-rs中 提供将对象的属性绑定返回时将已json或者xml等数据返回.
package com.jerrys.jerseyrest.webservice;

import javax.ws.rs.GET;
import javax.ws.rs.Path;
import javax.ws.rs.Produces;
import javax.ws.rs.core.MediaType;

import org.apache.log4j.Logger;

import com.jerrys.jerseyrest.entity.Helloworld;

@Path("/helloService")
public class HelloRestService {
	public static Logger log = Logger.getLogger(HelloRestService.class);

	/**
	 * 获取helloworld
	 */
	@GET
	@Path("/hello")
	@Produces( { MediaType.APPLICATION_JSON })
	public Helloworld getHelloworld() {
		Helloworld hi = null;
		try {
			hi = new Helloworld();

			hi.setContent((String) hi.getHelloByName("xiaoqiang"));

		} catch (Exception e) {
			log.error(e.getMessage(), e);
			e.printStackTrace();
		}
		return hi;
	}
}
@Path("/helloWervice") 是你访问该HelloRestService 资源的uri 标识对应的url访问路径是: http://localhost:8080/projectName/helloWervice
@Path(/hello) 是 HelloRestService 中getHelloworld()方法上是访问该方法资源的uri标识,对应的url路径是
http://localhost:8080/projectName/helloWervice/hello
我们可以定义该方法是用来获取资源数据的所以我们可以定义成@GET,如果是@PUT那就是更新,@DELETE是删除资源,@POST创建。也可以叠加
@Produces({ MediaType.APPLICATION_JSON }定义了我们返回的数据格式.这边我们直接用的变量,我们也可以直接写"application/xml","application/json","text/html"
当然我们也可以定义参数@PathParam("name") 定义传值的参数
接下来我们来配置Web.xml
<?xml version="1.0" encoding="UTF-8"?>
<web-app version="2.5" xmlns="http://java.sun.com/xml/ns/javaee"
	xmlns:xsi="http://www.w3.org/2001/XMLSchema-instance"
	xsi:schemaLocation="http://java.sun.com/xml/ns/javaee
	http://java.sun.com/xml/ns/javaee/web-app_2_5.xsd">
	<display-name>jax-rs</display-name>
	<!-- Helps locate the applicationContext.xml file -->
	<context-param>
		<param-name>contextConfigLocation</param-name>
		<param-value>classpath:applicationContext.xml</param-value>
	</context-param>

	<listener>
		<listener-class>org.springframework.web.context.ContextLoaderListener</listener-class>
	</listener>

	<listener>
		<listener-class>org.springframework.web.context.request.RequestContextListener</listener-class>
	</listener>
	<filter>
		<filter-name>encodingFilter</filter-name>
		<filter-class>org.springframework.web.filter.CharacterEncodingFilter</filter-class>
		<init-param>
			<param-name>encoding</param-name>
			<param-value>UTF-8</param-value>
		</init-param>
		<init-param>
			<param-name>forceEncoding</param-name>
			<param-value>true</param-value>
		</init-param>
	</filter>
	<filter-mapping>
		<filter-name>encodingFilter</filter-name>
		<url-pattern>/*</url-pattern>
	</filter-mapping>
	<!-- Configuration for Jersey Web Services starts here -->
	<servlet>
		<servlet-name>jersey</servlet-name>
		<servlet-class>com.sun.jersey.spi.container.servlet.ServletContainer</servlet-class>
		<init-param>
			<param-name>com.sun.jersey.config.property.packages</param-name>
			<!-- The package in which the Resource classes located-->
			<param-value>com.jerrys.jerseyrest.webservice</param-value>
		</init-param>
		<load-on-startup>1</load-on-startup>
	</servlet>

	<servlet-mapping>
		<servlet-name>jersey</servlet-name>
		<!--
			Enables us to access the WS by pointing your browser to this URL :
			http://localhost:8080/any_name/{service-path}
		-->
		<url-pattern>/*</url-pattern>
	</servlet-mapping>
	<!-- Configuration for Jersey Web Services ends here -->
	<session-config>
		<session-timeout>10</session-timeout>
	</session-config>
	<welcome-file-list>
		<welcome-file>index.jsp</welcome-file>
	</welcome-file-list>
</web-app>
加载jersey 和Srping 的servlet
然后在创建 applicationContext.xml 的spring配置文件
<?xml version="1.0" encoding="UTF-8"?>
<beans xmlns="http://www.springframework.org/schema/beans"
	xmlns:xsi="http://www.w3.org/2001/XMLSchema-instance" xmlns:p="http://www.springframework.org/schema/p"
	xmlns:context="http://www.springframework.org/schema/context" xmlns:tx="http://www.springframework.org/schema/tx"
	xsi:schemaLocation="http://www.springframework.org/schema/beans
	http://www.springframework.org/schema/beans/spring-beans-3.0.xsd
	http://www.springframework.org/schema/context
	http://www.springframework.org/schema/context/spring-context-3.0.xsd
	http://www.springframework.org/schema/tx
	http://www.springframework.org/schema/tx/spring-tx-3.0.xsd"
	default-lazy-init="true" >
	<!-- 使用Annotation(注解)自动注册Bean(自注入) ,并检查@Required,@Autowired的属性已被注入 -->
	<context:component-scan base-package="com.jerrys.jerseyrest"></context:component-scan>
	<!-- JOTM本地实例 -->
	<bean id="jotm" class="org.springframework.transaction.jta.JotmFactoryBean" />

	<bean id="txManager"
		class="org.springframework.transaction.jta.JtaTransactionManager">
		<property name="userTransaction" ref="jotm"></property>
	</bean>


	<bean id="jta1Datasource" class="org.enhydra.jdbc.pool.StandardXAPoolDataSource"
		destroy-method="shutdown">
		<property name="dataSrouce">
			<bean class="org.enhydra.jdbc.standard.StandardXADataSource"
				destroy-method="shutdown">
				<property name="transactionManager" ref="jotm" />
				<property name="driverName" value="com.mysql.jdbc.Driver" />
				<property name="url" value="jdbc:mysql://192.168.1.20:3306/jtatest1" />

			</bean>
		</property>
		<property name="user" value="root"></property>
		<property name="password" value="zgjf168"></property>
	</bean>


	<bean id="jta2Datasource" class="org.enhydra.jdbc.pool.StandardXAPoolDataSource"
		destroy-method="shutdown">
		<property name="dataSrouce">
			<bean class="org.enhydra.jdbc.standard.StandardXADataSource"
				destroy-method="shutdown">
				<property name="transactionManager" ref="jotm" />
				<property name="driverName" value="com.mysql.jdbc.Driver" />
				<property name="url" value="jdbc:mysql://192.168.1.20:3306/jtatest2" />

			</bean>
		</property>
		<property name="user" value="root"></property>
		<property name="password" value="zgjf168"></property>
	</bean>

	<bean id="jta1Template" class="org.springframework.jdbc.core.JdbcTemplate">
		<property name="datasource" ref="jta1Datasource" />
	</bean>
	<bean id="jta2Template" class="org.springframework.jdbc.core.JdbcTemplate">
		<property name="datasource" ref="jta2Datasource" />
	</bean>

	<!-- 注解事务驱动 -->
	<tx:annotation-driven transaction-manager="txManager"
		proxy-target-class="true" />
</beans>
我在jersey与spring整合同时,我也提到了使用JTA分布式事务 的配置,但这边只是一个案例,仅提供参考,所以没有集成整合Hibernate 所以请包涵.
对于JTA分布式事务 的详细概念 我在这就不一一阐述了.请参见http://www.ibm.com/developerworks/cn/webservices/ws-transjta/
功能还待完善,如有不正确的观点,请予以点评.

