这篇是第七篇 (过渡篇)
主要的内容:
整改下项目 spring_security 的结构. 修正下以前项目遗留的Bug 也为下篇的内容 做好准备工作:
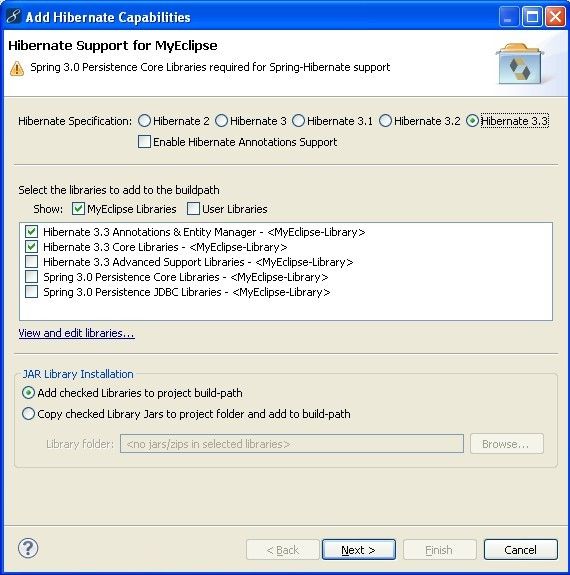
1,给项目添加Hibernate 的支持 .
可以右键点击项目 ——选择MyEclipse ——add Hibernate Capabilities
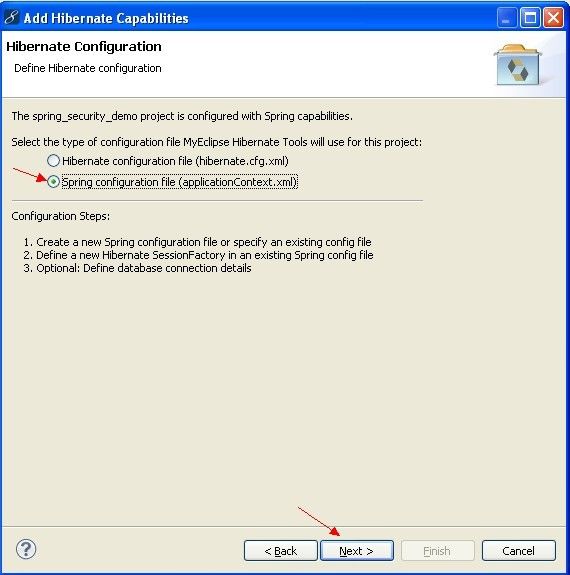
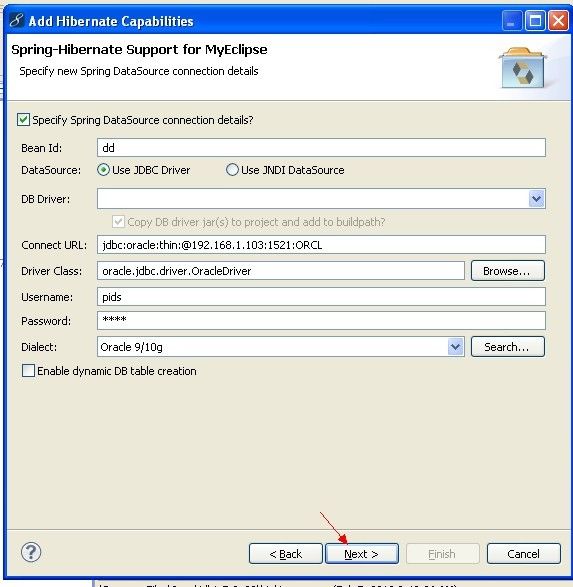
这里点击下一步 .
以前配置过数据源 所以 这次的名字 换一个 生成后的dd 数据源配置dd删除掉.
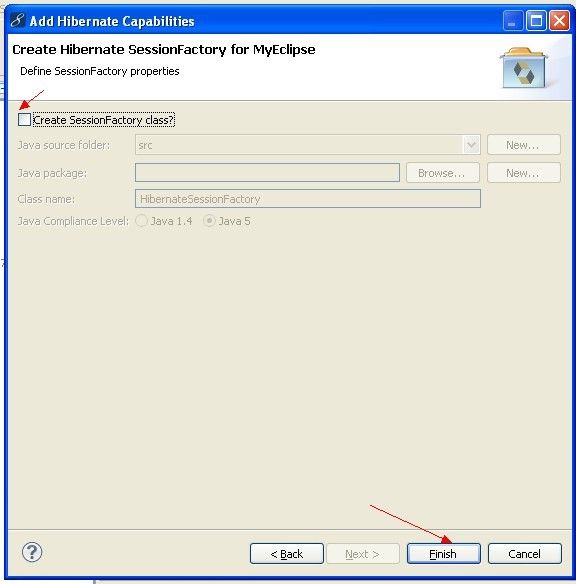
这里不需要生成 SessionFactoryClass 点击finish 后 项目会报错 是因为缺少spring -orm -xx.jar
2.选择项目右键 —— Bulid path—— Add Lib,,——MyEclipse Lib,,——Spring 3.0 Persistence Core lib。。点击 Finish
成功后 选择 打开 可以看到":
3, 我们可以看到 上面 有的spring-jdbc-3.0.5.jar 是第三篇中说要导入的spring-jdbc-2.5.6.jar 的版本不一致
现在必须要删除自己以前导入的jar(spring-jdbc-2.5.6.jar)
4.分离applicationContext.xml
现在的applicationContext.xml 看上去很乱 ,配置的 东西也挺乱的.
将它 分成 applicationContext.xml 和 applicationContext-security.xml
4.1 applicationContext.xml
<?xml version="1.0" encoding="UTF-8"?>
<beans xmlns="http://www.springframework.org/schema/beans"
	xmlns:context="http://www.springframework.org/schema/context"
	xmlns:xsi="http://www.w3.org/2001/XMLSchema-instance" xmlns:p="http://www.springframework.org/schema/p"
	xsi:schemaLocation="http://www.springframework.org/schema/beans http://www.springframework.org/schema/beans/spring-beans-3.0.xsd
	http://www.springframework.org/schema/context
	http://www.springframework.org/schema/context/spring-context-3.0.xsd">

	<context:annotation-config />
	<context:component-scan base-package="zyk" />

	<!-- 数据库连接池 (DBCP) -->
	<bean id="dataSource" class="org.apache.commons.dbcp.BasicDataSource"
		destroy-method="close">
		<property name="driverClassName" value="oracle.jdbc.driver.OracleDriver" />
		<property name="url" value="jdbc:oracle:thin:@192.168.1.103:1521:ORCL" />
		<property name="username" value="pids" />
		<property name="password" value="pids" />
	</bean>

	<!-- 配置SessionFactory -->
	<bean id="sessionFactory"
		class="org.springframework.orm.hibernate3.annotation.AnnotationSessionFactoryBean">
             <!-- 因为要使用 Annotation 所以上面SessionFactory的类 要换成 AnnotationSessionFactoryBean-->
		<property name="dataSource">
			<ref bean="dataSource"/>
		</property>
		<property name="hibernateProperties">
			<props>
				<prop key="hibernate.dialect">
					org.hibernate.dialect.Oracle9Dialect
				</prop>
				<!-- 设置二级缓存 -->
				<prop key="hibernate.cache.provider_class">org.hibernate.cache.EhCacheProvider</prop>
				<prop key="hibernate.cache.use_second_level_cache">true</prop>
				<!-- <prop key="hibernate.use_sql_comments">true </prop> -->
				<!-- <prop key="hibernate.cache.use_query_cache">true</prop> -->
			</props>
		</property>
		<property name="annotatedClasses">
			<list>
				<value>zyk.entity.User</value>
				<value>zyk.entity.Role</value>
			</list>
		</property>
		<!-- <property name="packagesToScan"> -->
		<!-- <list> -->
		<!-- <value>zyk.entity.*</value> -->
		<!-- </list> -->
		<!-- </property> -->
	</bean>

<!-- 	<bean id="helloService" class="zyk.service.impl.HelloServiceImpl" /> -->

<!-- 	<bean id="userDetailsService" class="zyk.security.MyUserDetailsService"> -->
<!-- 		<property name="sessionFactory" ref="sessionFactory" /> -->
<!-- 	</bean> -->

</beans>
这是它主要配置公用的 配置在里面 例如 dataSource和 sessionFactory
对于 二级缓存可也参考: http://www.iteye.com/topic/18904
4.2 applicationContext-security.xml
<?xml version="1.0" encoding="UTF-8"?>
<beans xmlns="http://www.springframework.org/schema/beans"
	xmlns:security="http://www.springframework.org/schema/security"
	xmlns:xsi="http://www.w3.org/2001/XMLSchema-instance" xmlns:p="http://www.springframework.org/schema/p"
	xsi:schemaLocation="http://www.springframework.org/schema/beans http://www.springframework.org/schema/beans/spring-beans-3.0.xsd
	http://www.springframework.org/schema/security http://www.springframework.org/schema/security/spring-security-3.0.xsd">

	<!-- 启用annotation -->
	<!-- <security:global-method-security -->
	<!-- secured-annotations="enabled" jsr250-annotations="enabled" /> -->

	<!-- XML 的方式 -->
	<security:global-method-security>
		<!-- 拥有ROLE_USER或者ROLE_ADMIN 权限的用户 可以访问 包 zyk.service 下的任意个类 里 返回值类型为任意类型
			并 方法名为sayHi 的方法 -->
		<security:protect-pointcut access="ROLE_USER,ROLE_ADMIN"
			expression="execution(* zyk.service.*.sayHi(..))" />
		<!-- 第一个* :表示返回任意类型 第二个 * :表示任意的类 第三个* : 以say开头的任意方法 名 对应的是 : 拥有ROLE_ADMIN
			权限的用户 可以访问 包 zyk.service 下的任意个类 里 返回值类型为任意类型 并以say开头的方法 (例如 sayHi 和 sayBye) -->
		<security:protect-pointcut access="ROLE_ADMIN"
			expression="execution(* zyk.service.*.say*(..))" />
	</security:global-method-security>

	<security:http auto-config="true" access-denied-page="/accessDenied.jsp">
		<!-- login-page 指定登录页面 -->
		<security:form-login login-page="/login.jsp" />

		<!-- 对于登录页面不进行拦截 至于后面的* 在访问loing.jsp时可能会传入一些参数 -->
		<security:intercept-url pattern="/login.jsp*"
			filters="none" />
		<security:intercept-url pattern="/admin.jsp*"
			access="ROLE_ADMIN" />
		<security:intercept-url pattern="/**"
			access="ROLE_USER,ROLE_ADMIN" />
		<security:session-management
			invalid-session-url="/sessionTimeout.html">
			<security:concurrency-control
				max-sessions="1" error-if-maximum-exceeded="true" />
		</security:session-management>
	</security:http>

	<!--配置认证管理器 -->
	<security:authentication-manager>
		<security:authentication-provider
			user-service-ref="userDetailsService">
			<security:password-encoder hash="md5" />

			<!-- <security:jdbc-user-service -->
			<!-- data-source-ref="dataSource" -->
			<!-- users-by-username-query="select u.c_username username,u.c_password -->
			<!-- password,u.c_enabled enabled -->
			<!-- from tb_users u where u.c_username=?" -->
			<!-- authorities-by-username-query="select u.c_username -->
			<!-- username,r.c_authority -->
			<!-- authority -->
			<!-- from tb_users u , tb_role r ,tb_user_role ur -->
			<!-- where u.id=ur.c_user_id and r.id=ur.c_role_id and u.c_username=?" /> -->


			<!-- <security:user-service> -->
			<!-- <security:user name="user" password="ee11cbb19052e40b07aac0ca060c23ee" -->
			<!-- authorities="ROLE_USER" /> -->
			<!-- </security:user-service> -->
		</security:authentication-provider>
	</security:authentication-manager>


	<!-- 这里定义的messageSource对象 是 spring Security框架内部使用消息类。 -->
	<bean id="messageSource"
		class="org.springframework.context.support.ReloadableResourceBundleMessageSource">
		<property name="basename" value="classpath:message_zh_CN" />
	</bean>


</beans>
而它却更专注的配置 Spring Security 配置信息
5.web.xml
修改contextConfigLocation 使得上面的分离的文件能够组织在一起,.
	<context-param>
		<param-name>contextConfigLocation</param-name>
		<param-value>
		classpath:applicationContext.xml
		classpath:applicationContext-security.xml
		</param-value>
	</context-param>
最后整个项目的目录看上去是这样的:


