一、拦截器
上篇博文中已经说到过可以继承HandlerInterceptorAdapter类或者实现HandlerInterceptor接口。
这里想说的是对于其方法中一个参数的说明。
 /**
     * Controller之前执行
     */
    @Override
    public boolean preHandle(HttpServletRequest request,
            HttpServletResponse response, Object handler) throws Exception {}
request、response自不必多说。这里有个handler,据我多方了解,可以确定此handler为下一步要执行的拦截器或者Controller。我们都知道拦截器可以配置多个,就有个拦截器链,按照顺序去执行这么多拦截器(不知是不是按照你配置的先后顺序来执行的),如果你正在执行的拦截器完成后,下面还有个拦截器等待执行,那么handler就是那个拦截器类;如果这个拦截器执行完了,就执行controller,那么这个handler就是那个Controller类了。
二、错误异常(2种方式)
目前大家常用的错误异常捕捉可能是在web.xml中配置:
<error-page>
   <error-code></error-code>
   <location></location>
</error-page>
或者
<error-page>
   <exception-type></exception-type>
   <location></location>
</error-page>
当springMVC内部抛出自定义的运行时异常,如:NoSuchRequestHandlingMethodException(错误代码404),无法根据web.xml配置的404代码跳转到相应页面,那么我们就需要配置springMVC提供的错误异常日志处理类。
第一种,配置文件形式:看配置文件:
<!-- 系统错误转发配置[并记录错误日志]   -->
<bean class="org.springframework.web.servlet.handler.SimpleMappingExceptionResolver">
<property name="defaultErrorView" value="error"></property>   <!-- 默认为500,系统错误(error.jsp)  -->
<property name="defaultStatusCode" value="500"></property>
<property name="statusCodes"><!-- 配置多个statusCode -->
  <props>
      <prop key="error">500</prop>  <!-- error.jsp -->
      <prop key="error1">404</prop>    <!-- error1.jsp -->
  </props>
</property>
<property name="exceptionMappings">
	<props>
		<!-- 这里你可以根据需要定义N多个错误异常转发 -->
		<prop key="java.sql.SQLException">dbError</prop> <!-- 数据库错误(dbError.jsp) -->
		<prop key="org.springframework.web.bind.ServletRequestBindingException">bizError</prop> <!-- 参数绑定错误(如:必须参数没传递)(bizError.jsp) -->
		<prop key="java.lang.IllegalArgumentException">bizError</prop>  <!-- 参数错误(bizError.jsp) -->
		<prop key="org.springframework.validation.BindException">bizError</prop>  <!-- 参数类型有误(bizError.jsp) -->
		<prop key="java.lang.Exception">unknowError</prop>  <!-- 其他错误为'未定义错误'(unknowError.jsp)  -->
	</props>
</property>
</bean>
注意:
1、这里需要说明一点的是,它只能转发到jsp页面,不能转发到Controller;
2、如果错误不能转发到对应的错误页面,请查看你的错误类是否写正确了,如org.springframework.validation.BindException是否写正确。
3、传递到错误页面不能传递参数,如<prop key="java.lang.Exception">unknowError?flag=1</prop>,这么写就不会转发到unknowError.jsp页面了。
4、如果错误页面没有记录错误日志,那么你的log4j日志文件也是不会记录错误日志的,那么我们需要自己手动在错误页面中记录,代码如下:
<%@ page language="java" import="org.apache.log4j.Logger" pageEncoding="UTF-8" contentType="text/html; charset=utf-8"%>
<%
	Exception exception = (Exception)request.getAttribute("exception");
	final Logger logger = Logger.getRootLogger();
	logger.error(exception.getMessage(),exception);
%>
说明:根据SimpleMappingExceptionResolver类的源码可知,它将错误日志放在了request的属性变量中,变量名为exception,类型为Exception,需要引入org.apache.log4j.Logger包,这样的话,log4j日志就会记录错误日志了。
5、当然也需要这个配置文件(定义jsp文件的位置):
<bean class="org.springframework.web.servlet.view.InternalResourceViewResolver">
	<property name="prefix" value="/WEB-INF/views/"></property>
	<property name="suffix" value=".jsp"></property>
</bean>
第二种,注解形式:
以上基于配置文件形式配置异常处理机制,适用于项目全局。而注解形式主要适用于局部,如果想适用于全局,需要首先声明一个BaseController类,加入注解异常处理机制,其他Controller继承该BaseController。具体使用方式,看代码:
@ExceptionHandler(Exception.class)   //在Controller类中添加该注解方法即可(注意:添加到某个controller,只针对该controller起作用)
	public void exceptionHandler(Exception ex,HttpServletResponse response,HttpServletRequest request) throws IOException{
		log.error(ex.getMessage(), ex);
		if(ex.getClass() == NoSuchRequestHandlingMethodException.class){
			response.sendRedirect(request.getContextPath()+"/common/view/404.jsp");
		}else{
			response.sendRedirect(request.getContextPath()+"/common/view/500.jsp");
		}
	}
spring自定义的异常类对应的错误代码如下:
***  SpringMVC自定义异常对应的status code
           Exception	                   HTTP Status Code
ConversionNotSupportedException	        500 (Internal Server Error)
HttpMediaTypeNotAcceptableException	    406 (Not Acceptable)
HttpMediaTypeNotSupportedException	    415 (Unsupported Media Type)
HttpMessageNotReadableException	        400 (Bad Request)
HttpMessageNotWritableException	        500 (Internal Server Error)
HttpRequestMethodNotSupportedException	405 (Method Not Allowed)
MissingServletRequestParameterException	400 (Bad Request)
NoSuchRequestHandlingMethodException	404 (Not Found)
TypeMismatchException	                400 (Bad Request)
三、数据绑定
上篇博文中有提到在BaseController中定义全局的数据转换(如String转换为Date或者Calendar;如果String转换为JavaBean等),只要注册一个方法protected void ininBinder(WebDataBinder binder){ },并且添加注解@InitBinder,就可以实现全局Controller的数据转换。
下面详细介绍下两种方式实现数据的绑定:
1、全局数据绑定
第一种方式,定义一个BaseController,在里面注册一个protected void ininBinder(WebDataBinder binder){},添加注解@InitBinder。【注解式】
第二种方式,定义一个类MyBinder实现WebBindingInitializer接口,同时实现其方法public void initBinder(WebDataBinder binder, WebRequest arg1) {}。【声明式】
接下来需要在spring-mvc.xml中配置,这里要多说一点。
一般大家可能省事,直接写了<mvc:annotation-driven/>来激活@Controller模式,它默认会自动注册DefaultAnnotationHandlerMapping与AnnotationMethodHandlerAdapter两个bean,它们是springMVC为@Controllers分发请求所必须的。但是如果你想用声明式注册一个数据绑定,你需要手动注册AnnotationMethodHandlerAdapter和DefaultAnnotationHandlerMapping。
<bean class="org.springframework.web.servlet.mvc.annotation.DefaultAnnotationHandlerMapping"></bean>  <!-- 这个类里面你可以注册拦截器什么的 -->
<bean id="jacksonMessageConverter" class="org.springframework.http.converter.json.MappingJacksonHttpMessageConverter"></bean>
<bean class="org.springframework.web.servlet.mvc.annotation.AnnotationMethodHandlerAdapter">
	<property name="webBindingInitializer">
		<bean class="packagename.MyBinder"></bean>  <!-- 这里注册自定义数据绑定类 -->
	</property>
	<property name="messageConverters">
	  <list>
	    <ref bean="jacksonMessageConverter"/>    <!-- 注册JSON  Converter-->
	  </list>
	</property>
</bean>
说明:这里我还引用了org.springframework.http.converter.json.MappingJacksonHttpMessageConverter,也在这里说明一下。项目中我使用了springMVC为人津津乐道的可以直接返回JSON字符串的功能,就是在Controller的方法前面加@ResponseBody。但是我发现我引用了自定义数据绑定类,运行时候不会返回JSON字符串,并且报错(好像就是缺少了个XXXConverter),经过多方寻找,原来是需要手动注册一个json的Converter。如果你想用它的这个功能,需要引入两个jar包。jackson-core-asl.jar和jackson-mapper-asl.jar。
2、局部数据绑定
这个就简单了,直接在需要的绑定的Controller中,添加protected void ininBinder(WebDataBinder binder){ },并且添加注解@InitBinder就可以实现。例如:
@Controller
public class TestController{

   //日期转换器,这样就会作用到这个Controller里所有方法上
   @InitBinder
    public void initBinder(WebDataBinder binder) {
        SimpleDateFormat dateFormat = new SimpleDateFormat("yyyy-MM-dd");
        dateFormat.setLenient(false);
        binder.registerCustomEditor(Date.class, new CustomDateEditor(dateFormat, false));
    }

 ...各种增删改查方法
}
四、转换器
Spring提供了很多默认转换器,如StringToBooleanConverter,ObjectToStringConverter,NumberToCharacterConverter,ArrayToCollectionConverter,StringToArrayConverter,ObjectToCollectionConverter,ObjectToObjectConverter等等,如果需要自定义转换器,需要实现接口
- public interface Converter<S, T> { //S是源类型 T是目标类型
- T convert(S source); //转换S类型的source到T目标类型的转换方法
- }
我目前用到的转换器和数据绑定,基本都是对字段类型转换,两种方式都可以实现字符串到日期的转换。如:
public class CustomDateConverter implements Converter<String, Date> {

	private String dateFormatPattern;  //转换的格式

    public CustomDateConverter(String dateFormatPattern) {
            this.dateFormatPattern = dateFormatPattern;
    }

	@Override
	public Date convert(String source) {
		 if(!StringUtils.hasLength(source)) {
             return null;
		 }
	     DateFormat df = new SimpleDateFormat(dateFormatPattern);
	     try {
	    	 return df.parse(source);
	     } catch (ParseException e) {
	         throw new IllegalArgumentException(String.format("类型转换失败,需要格式%s,但格式是[%s]", dateFormatPattern, source));
	     }
	}
}
配置文件有两种方式,
第一种比较简单:
   <mvc:annotation-driven conversion-service="conversionService"/>
   <bean id="conversionService" class="org.springframework.format.support.FormattingConversionServiceFactoryBean">
	   <property name="converters">
	         <list>
			<bean class="packagename.CustomDateConverter">
				<constructor-arg value="yyyy-MM-dd"></constructor-arg>
			</bean>
		</list>
	   </property>
   </bean>
第二种,稍微麻烦点:
<bean id="conversionService" class="org.springframework.format.support.FormattingConversionServiceFactoryBean">
   <property name="converters">
	<list>
		<bean class="packagename.CustomDateConverter">
			<constructor-arg value="yyyy-MM-dd"></constructor-arg>
		</bean>
	</list>
   </property>
</bean>
<bean id="myBinder" class="org.springframework.web.bind.support.ConfigurableWebBindingInitializer">
    <property name="conversionService" ref="conversionService"/>
</bean>
<bean class="org.springframework.web.servlet.mvc.method.annotation.RequestMappingHandlerAdapter">
    	<property name="webBindingInitializer" ref="myBinder"></property>
</bean>
五、属性编辑器
1、在第三条中说了数据绑定,那么怎么能做到将String转换为Calendar或者Date呢。这里需要说的就是Spring的属性编辑器,感觉跟struts2的那个数据转换差不多。先看一段代码:
public void initBinder(WebDataBinder binder, WebRequest arg1) {
	//这里我定义了一个匿名属性编辑器将String转为为Calendar
        binder.registerCustomEditor(Calendar.class, new PropertyEditorSupport(){
		@Override
		public void setAsText(String text) throws IllegalArgumentException {
			Calendar cal = null;
			Date date = Util.convertDate(text);
			if(date != null){
				cal = new GregorianCalendar();
				cal.setTime(date);
			}
			setValue(cal);
		}
	});
}
说明:用binder.registerCustomEditor()注册一个属性编辑器,来进行数据的转换操作。它有2种方式。
第一种binder.registerCustomEditor(Class clz,String field,PropertyEditor propertyEditor);这种方式可以针对bean中的某一个属性进行转换操作。clz为类的class,field为bean中的某一个属性,propertyEditor为编辑器。
第二种binder.registerCustomEditor(Class clz,PropertyEditor propertyEditor)。这种方式可以针对某种数据类型进行数据转换操作。如:将传递过来的String字符串转换为Calendar,这里就需要将clz设置为Calendar.class,propertyEditor为编辑器。
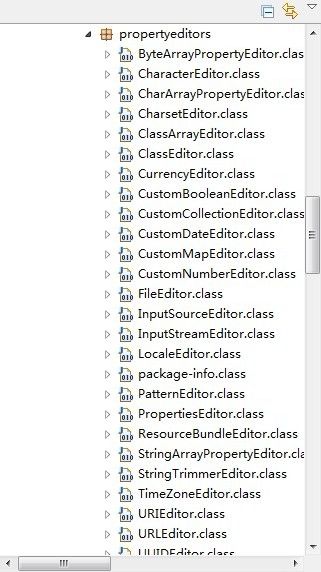
2、默认spring提供了很多种属性编辑器,可以在Spring-beans-3.0.5.jar的org.springframework.beans.propertyeditors包中看到。直接使用即可,如将String转换为Date类型:
SimpleDateFormat sdf = new SimpleDateFormat("yyyy-MM-dd HH:mm:ss");
binder.registerCustomEditor(Date.class, new CustomDateEditor(sdf, false));
当然也可以自定义属性编辑器,你只需继承PropertyEditorSupport类(推荐)或者实现PropertyEditor接口;然后实现其setAsText(String text)方法做自己的操作。
