写这篇文章只是大概记录一下,安装的步骤以及问题
安装hadoop步骤
1、实现linux的ssh无密码验证配置.(如果不是分布式模式,这一步其实可以不那么强求)
2、在linux下安装jdk,并配好环境变量
3、修改linux的机器名,并配置 /etc/hosts
4、在windows下下载hadoop 1.0.4(其他版本也行,但是这个版本是一个稳定版本),并修改hadoop-env.sh,core-site.xml,hdfs-site.xml,
mapred-site.xml,masters,slaves文件的配置
5、把修改好的hadoop整个文件夹传到linux下
6、把hadoop的bin加入到环境变量
7、格式化hadoop,启动hadoop
8、验证是否启动,并执行wordcount
9、eclipse 连接Linux下的Hadoop
这个顺序并不是一个写死的顺序,就得按照这个来,如果你知道原理,可以打乱顺序来操作,总之一句话,咱们的目的是为了将环境打起来,至于是你怎么搭的无所谓的了
现在一步步介绍
1、实现linux的ssh无密码验证配置
在我的 “Hadoop环境搭建(Eclipse+Linux)问题总结”一文中已有介绍,不再介绍
2、在linux下安装jdk,并配好环境变量
先在linux下面建一个目录用来安装jdk,我建的目录是 /usr/program,就是以后jdk安装到这个目录下面。
去下载一个linux下面的jdk版本,我的是jdk-6u6-linux-i586.bin, 也有-rpm.bin 结尾的,这种结尾的安装不如直接.bin的简单,这个怎么下,就不说了,网上一大堆的,下载1.6包括1.6以上的哦~~,然后用工具传到linux的 /usr/program这个目录下,就是刚才我新建的那个,上传工具好多,ftp也行,ssh 客户端也行.我用的是vmware tools.他支持Windows与虚拟机中的Linux系统相互拖拽,很是方便
登录到linux下,进入 /usr/program 目录下,发现多了一个文件,就是jdk-6u6-linux-i586.bin,
然后开始安装。
1. 去http://java.sun.com/j2se/1.4.2/download.html 下载一个Linux Platform的JDK,建议下载RPM自解压格式的(RPM in self-extracting file,j2sdk-1_4_2_06-linux-i586-rpm.bin);
2. 上载到Linux服务器上,在shell下执行命令:
| [root@LinuxServer rpm]# chmod 755 j2sdk-1_4_2_06-linux-i586-rpm.bin [root@LinuxServer rpm]# ./j2sdk-1_4_2_06-linux-i586-rpm.bin |
这时会有一段Sun的协议,敲几次空格键,当询问是否同意的时候,敲yes就可以了。
| Sun Microsystems, Inc. Binary Code License Agreement for the JAVATM 2 SOFTWARE DEVELOPMENT KIT (J2SDK), STANDARD EDITION, VERSION 1.4.2_X … Do you agree to the above license terms? [yes or no]yes Unpacking... Checksumming... 0 0 Extracting... UnZipSFX 5.40 of 28 November 1998, by Info-ZIP ([email protected]). inflating: j2sdk-1_4_2_06-linux-i586.rpm Done. |
3. 程序会自动生成一个j2sdk-1_4_2_06-linux-i586.rpm文件,这是主程序包,下面来安装;
| [root@LinuxServer rpm]#rpm –ivh j2sdk-1_4_2_06-linux-i586.rpm Preparing... ########################################### [100%] 1:j2sdk ########################################### [100%] |
4. 设置环境变量
开始配置环境变量
1)、执行 cd /etc, 进入/etc 目录下。
2)、执行 vi profile, 修改profile文件
在里面加入以下四行
export JAVA_HOME=/usr/program/jdk1.6.0_06

export PATH=$JAVA_HOME/bin:$JAVA_HOME/jre/bin:$PATH

export CLASSPATH=.:$JAVA_HOME/lib:$JAVA_HOME/jre/lib(后续也需要将hadoop的路径补上)
3)、执行 chmod +x profile ,把profile变成可执行文件
4)、执行 source profile,把profile里的内容执行生效
5)、执行,java、javac、java -version 查看是否安装成功.
3. 修改linux机器名
个人单机情况觉得这一步也不是必要的,反正我在这一部被弄得 很迷糊,最好放弃修改了
下面说说怎么修改redhat linux下的机器名,下面的方法只适合修改redhat的,别的版本改机器名不是这样的
1)、执行 cd /etc/sysconfig,进入/etc/sysconfig 目录下
2)、执行 vi network,修改network文件,
NETWORKING=yes
HOSTNAME=hadoopName
4.在windows下下载hadoop 1.0.4,并修改hadoop-env.sh,core-site.xml,hdfs-site.xml,
mapred-site.xml,masters,slaves文件的配置(当然在linux下配置也是极好的,只是笔者习惯了在Windows下操作,才这么做的)
下载的过程自然不必说了,那么我们就直接来说说需要配置的这几个文件
解压下载后的文件,进入conf目录里面,
修改hadoop-env.sh文件,加入如下一行
- export JAVA_HOME=/usr/program/jdk1.6.0_06
其实hadoop-env.sh里面有这一行,默认是被注释的,你只需要把注释去掉,并且把JAVA_HOME 改成你的java安装目录即可。
修改core-site.xml
默认的core-site.xml是如下这样的
- <?xml version="1.0"?>
- <?xml-stylesheet type="text/xsl" href="configuration.xsl"?>
- <!-- Put site-specific property overrides in this file. -->
- <configuration>
- </configuration>
<?xml version="1.0"?>
<?xml-stylesheet type="text/xsl" href="configuration.xsl"?>

<!-- Put site-specific property overrides in this file. -->

<configuration>

</configuration>
现在要改成如下
- <?xml version="1.0"?>
- <?xml-stylesheet type="text/xsl" href="configuration.xsl"?>
- <!-- Put site-specific property overrides in this file. -->
- <configuration>
- <property>
- <name>hadoop.tmp.dir</name>
- <value>/usr/local/hadoop/hadooptmp</value>
- <description>A base for other temporary directories.</description>
- </property>
- <property>
- <name>fs.default.name</name>
- <value>hdfs://192.168.133.128:9000</value>
- <description>The name of the default file system. A URI whose
- scheme and authority determine the FileSystem implementation. The
- uri's scheme determines the config property (fs.SCHEME.impl) naming
- the FileSystem implementation class. The uri's authority is used to
- determine the host, port, etc. for a filesystem.</description>
- </property>
- </configuration>
<?xml version="1.0"?>
<?xml-stylesheet type="text/xsl" href="configuration.xsl"?>

<!-- Put site-specific property overrides in this file. -->

<configuration>
<property>
  <name>hadoop.tmp.dir</name>
  <value>/usr/local/hadoop/hadooptmp</value>
  <description>A base for other temporary directories.</description>
</property>
<property>
  <name>fs.default.name</name>
  <value>hdfs://192.168.133.128:9000</value>
  <description>The name of the default file system.  A URI whose
  scheme and authority determine the FileSystem implementation.  The
  uri's scheme determines the config property (fs.SCHEME.impl) naming
  the FileSystem implementation class.  The uri's authority is used to
  determine the host, port, etc. for a filesystem.</description>
</property>
</configuration>
修改hdfs-site.xml
默认的hdfs-site.xml是如下这样的
- <?xml version="1.0"?>
- <?xml-stylesheet type="text/xsl" href="configuration.xsl"?>
- <!-- Put site-specific property overrides in this file. -->
- <configuration>
- </configuration>
<?xml version="1.0"?>
<?xml-stylesheet type="text/xsl" href="configuration.xsl"?>

<!-- Put site-specific property overrides in this file. -->

<configuration>

</configuration>
要改成如下这样的
- <?xml version="1.0"?>
- <?xml-stylesheet type="text/xsl" href="configuration.xsl"?>
- <!-- Put site-specific property overrides in this file. -->
- <configuration>
- <property>
- <name>dfs.replication</name>
- <value>1</value>
- <description>Default block replication.
- The actual number of replications can be specified when the file is created.
- The default is used if replication is not specified in create time.
- </description>
- </property>
- </configuration>
<?xml version="1.0"?>
<?xml-stylesheet type="text/xsl" href="configuration.xsl"?>

<!-- Put site-specific property overrides in this file. -->

<configuration>
<property>
  <name>dfs.replication</name>
  <value>1</value>
  <description>Default block replication.
  The actual number of replications can be specified when the file is created.
  The default is used if replication is not specified in create time.
  </description>
</property>

</configuration>
修改mapred-site.xml
默认的mapred-site.xml是如下这样的
- <?xml version="1.0"?>
- <?xml-stylesheet type="text/xsl" href="configuration.xsl"?>
- <!-- Put site-specific property overrides in this file. -->
- <configuration>
- </configuration>
<?xml version="1.0"?>
<?xml-stylesheet type="text/xsl" href="configuration.xsl"?>

<!-- Put site-specific property overrides in this file. -->

<configuration>

</configuration>
要改成如下这样的
- <?xml version="1.0"?>
- <?xml-stylesheet type="text/xsl" href="configuration.xsl"?>
- <!-- Put site-specific property overrides in this file. -->
- <configuration>
- <property>
- <name>mapred.job.tracker</name>
- <value>192.168.133.128:9001</value>
- <description>The host and port that the MapReduce job tracker runs
- at. If "local", then jobs are run in-process as a single map
- and reduce task.
- </description>
- </property>
- </configuration><SPAN style="FONT-FAMILY: Verdana, Arial, Helvetica, sans-serif; COLOR: #000000; FONT-SIZE: 12px">
- </SPAN>
<?xml version="1.0"?>
<?xml-stylesheet type="text/xsl" href="configuration.xsl"?>

<!-- Put site-specific property overrides in this file. -->

<configuration>
<property>
  <name>mapred.job.tracker</name>
  <value>192.168.133.128:9001</value>
  <description>The host and port that the MapReduce job tracker runs
  at.  If "local", then jobs are run in-process as a single map
  and reduce task.
  </description>
</property>
</configuration>
修改完这三个文件了,就一些注意的要点说一下
1)、其实core-site.xml 对应有一个core-default.xml, hdfs-site.xml对应有一个hdfs-default.xml,
mapred-site.xml对应有一个mapred-default.xml。这三个defalult文件里面都有一些默认配置,现在我们修改这三个site文件,目的就覆盖default里面的一些配置,
2)、hadoop分布式文件系统的两个重要的目录结构,一个是namenode上名字空间的存放地方,一个是datanode数据块的存放地方,还有一些其他的文件存放地方,这些存放地方都是基于hadoop.tmp.dir目录的,比如namenode的名字空间存放地方就是 ${hadoop.tmp.dir}/dfs/name, datanode数据块的存放地方就是 ${hadoop.tmp.dir}/dfs/data,所以设置好hadoop.tmp.dir目录后,其他的重要目录都是在这个目录下面,这是一个根目录。我设置的是 /usr/local/hadoop/hadooptmp,当然这个目录必须是存在的。
3)、fs.default.name,这个是设置namenode位于哪个机器上,端口号是什么hdfs://192.168.133.128:9000,格式一定要这样写,网上很多资料说ip地址写localhost也行,笔者建议最好写ip,因为后期讲到windows下 eclipse连接hadoop 的时候,如果写localhost,就会连接不到。
4)、mapred.job.tracker,这个是设置jobtracker位于哪个机器上,端口号是什么,192.168.133.128:9001,格式和上一个不一样,这个也必须这样写,同样localhost和ip的分别和上述一样
5)、dfs.replication,这个是设置数据块的复制次数,默认是3,因为笔者这里就一台机器,所以只能存在一份,就改成了1
然后修改 masters和slaves文件
master文件里就把集群中的namenode所在的机器ip,这里就写 192.168.133.128, 不要写localhost,写了localhost,windows 下eclipse 连接不到hadoop
slaves文件里就把集群中所有的nodedata所在的机器ip,这里就写192.168.133.128,因为这里是单机,同样最好别写localhost
5、把修改好的hadoop整个文件夹传到linux下
上述文件修改好之后,把haoop整个目录copy草linux下,记得建个目录放这个,我建的目录是 /usr/local/hadoop,把hadoop的整个目录copy到这个下面,然后就是这样的形式
6、把hadoop的bin加入到环境变量
把hadoop的执行命令加到环境变量里,这样就能直接在命令行里执行hadoop的命令了
操作跟把java的bin加入环境变量一样
1、执行 cd /etc, 进入/etc 目录下。
2、执行 vi profile, 修改profile文件
步骤跟JDK安装一样,只要将hadoop安装路径/bin加到classpath中即可
3、执行 chmod +x profile ,把profile变成可执行文件
4、执行 source profile,把profile里的内容执行生效
7、格式化hadoop,启动hadoop
格式化hadoop
在命令行里执行,hadoop namenode -format,
笔者在格式化的时候出现了一个错误 Invalid byte 2 of 2-byte UTF-8 sequence,经调查,是因为在修改那3个xml 的时候,用非utf-8 编码保存了,所以出错,用editplus打开从新以uft-8的形式保存,在上传到linux上,再执行 hadoop namenode -format 就行了,执行成功之后,去/usr/local/hadoop/hadooptmp 下会自动生成dfs文件夹,进去会有name文件夹,里面还有别的其他namenode上保存名字空间的文件
启动hadoop
在命令行里执行执行start-dfs.sh,再执行start-mapred.sh。
如果SSH没有设置免密码登陆,这一步就得需要手工的输入密码。
在命令行里输入 jps,如果出现一下内容,则说明启动成功。
[root@hadoopName ~]# jps
4505 NameNode
4692 SecondaryNameNode
4756 JobTracker
4905 Jps
4854 TaskTracker
4592 DataNode
执行 hadoop fs -ls命令,查看当前hdfs分布式文件系统的 文件目录结构,刚执行会说no such dictionary,
你要先建一个文件夹,用命令 haoop fs -mkdir testdir ,然后再执行hadoop fs -ls,就会展示/user/root/testdir
当前用户是root,所以hdfs的根目录就是 /user/root
8、执行wordcount
hadoop安装成功了,来执行一下自带的例子,
执行之前要有输入 输出目录,
建立输入目录: hadoop fs -mkdir input
在这个目录里放入文件:hadoop fs -put /usr/test_in/*.txt input(把本地/usr/test_in目录里的所有txt文件copy到 hdfs分布式文件系统的 /user/root/input 目录里面,因为当前目录就是root 所以 直接写input 就代表/user/root/input)
进入 /usr/local/hadoop/hadoop1.0.4目录下,
执行 hadoop jar hadoop-1.0.4examples.jar wordcount input ouput
执行完毕之后,执行hadoop fs -ls output,会发现如下
[root@hadoopName hadoop-1.0.4# hadoop fs -ls output
Found 2 items
drwxr-xr-x - root supergroup 0 2011-05-08 05:20 /user/root/output/_logs
-rw-r--r-- 1 root supergroup 1688 2011-05-08 05:21 /user/root/output/part-r-00000
9、eclipse 连接Linux下的Hadoop
环境及配置:
Eclipse选择
非常重要,、我在网上查了相关资料,有人说需要3.3版本以上的才可以,恰好本人电脑上时3.4,一试就成功了,非常的开心呐
Hadoop Eclipse插件
不建议使用Hadoop自带的,不好用,我下了一个hadoop-eclipse-plugin-1.0.4.jar。非常好用。下载后,将jar包放到Eclipse安装目录下的plugins包下,重启Eclipse即可。
以下内容摘自别人的blog,基本上跟我 的操作是一样的
打开Eclipse
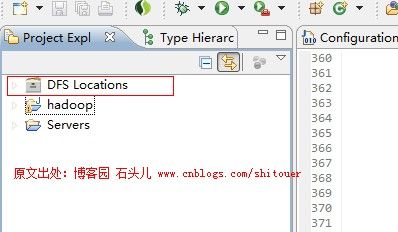
如果在Project Explorer中出现DFS Locations图标(需点击open perspective,选择MapReduce),则说明安装正确,如图:
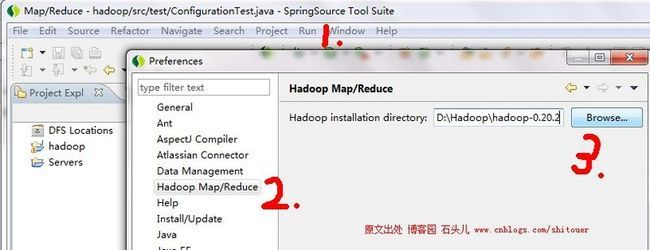
③ 之后,点击Windows-->Preferrence-->hadoop map/reduce, Brower 选择下载的hadoop所在的路径:
④ 配置相关参数,点击 Windows-->Show View -->Other --> Map/Reduce Location,打开Hadoop的MapReduce View
点击Ok之后,出现如下图
⑤ 上一步你不应该看到hadoopLoc, 应该什么都没有,右键点击空白处-->New Hadoop Location, 你会看到一个填写MapReduce Location参数的一个界面:
其中:
PS:HOST 的ip地址需与你在dfs-core.xml中设置的一致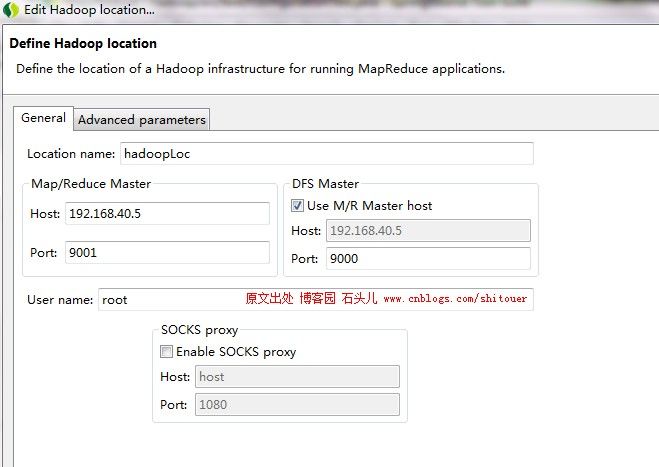
Location Name:
这个不用在意,就是对这个MapReduce的标示,只要能帮你记忆即可
Map/Reduce Master 部分相关定义:
Host:上一节搭建的集群中JobTracker所在的机器的IP地址
port:JobTracker的端口
两个参数就是 mapred-site.xml中mapred.job.tracker的ip和端口
DFS Master部分:
Host:就是上一节集群搭建中Namenode所在机器IP
Port:就是namenode的端口
这两个参数是在 core-site.xml里fs.default.name里面的ip和端口
User Name:
就是搭建Hadoop集群是所用的用户名,我这里用的是root
⑥ 填写完以上信息以后,关闭Eclipse,然后重新启动。
为什么这么做呢?因为如果不重新启动,Advanced Parameters里,有些重要的选项不能显示,重启后,来配制Advanced Parameters信息:
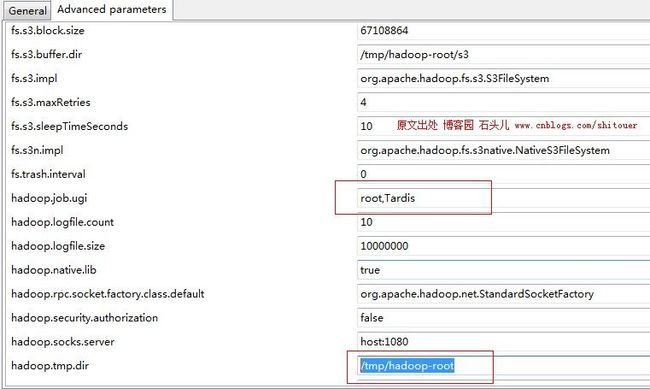
可看到大部分选项都已经预设值好了,其中有一下几个选项,必须注意填写,其他的选项,要么默认,要么会根据我们填写的以下几个选项自动修改:
dfs.replication:
这个这里默认是3,但是要根据你的Datanode的个数来定,如果你仅有2个datanode,那么就写2,如果只有一个,就写1,大于或者等于3个,写3
hadoop.tmp.dir:
这个要跟上节建立的Hadoop集群配置中core-site.xml 中的hadoop.tmp.dir设置一样,上节填写的是/tmp/hadoop-root,这里也如是填写
hadoop.job.ugi:
填成root,Tardis,其中root是我们的用户名,后边的",Tardis"一定要这么写,不能改
这些都填写完了之后,点击保存,重新启动Eclipse,会发现,很多Advanced Parameters里的好多选项都根据hadoop.tmp.dir重新进行了设置。
hadoop1.0.3之后这个选项就没有了,此选项没有了,如果不设置,就会出现以下错误
Exception in thread "main" org.apache.hadoop.security.AccessControlException: Permission denied: user=d, access=WRITE, inode="data":zxg:supergroup:rwxr-xr-x
at org.apache.hadoop.hdfs.server.namenode.FSPermissionChecker.check(FSPermissionChecker.java:207)
解决方法:
管理DFS system目录。目前做法是将hadoop服务集群关闭权限认证,修改hadoop安装
集群master的hadoop/conf/mapred-site.xml,增加:(实际应用中这个方法不可取啊,文章最后我们有介绍其他的方式)
- <property>
- <name>dfs.permissions</name>
- <value>false</value>
- </property>
正式发布时,可以在服务器创建一个和hadoop集群用户名一致的用户,即可不用修改master的permissions策略。
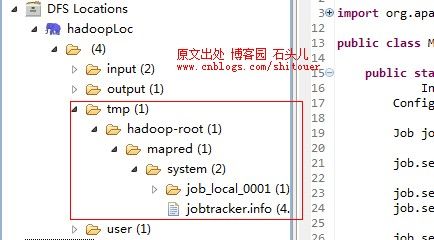
⑦ 重新启动后,在Project Explorer中,会有如下显示:
注意,第一次初始化打开,并不会有user, input, output 这些文件夹,之后红圈圈出的部分,也没有job_local_0001(1).如果是这样显示说明你已经连接成功,否则,展开所有tmp文件夹,会发现最后有错误信息提示。
注意:如果连接不上,有可能是由于linux设置的防火墙有关
2012.10.26修改:
hadoop1.0.3此时还会出错,是plugin中jar包不够,可做如下修改:
1.打开Eclipse Plugins中的hadoop-eclipse-plugin-1.0.0.jar,发现只有发现只有commons-cli-1.2.jar和hadoop-core.jar两个包,将%HADOOP_HOME%/lib下的 commons-configuration-1.6.jar , commons-httpclient-3.0.1.jar , commons-lang-2.4.jar , jackson-core-asl-1.8.8.jar 和 jackson-mapper-asl-1.0.8.jar五个jar包打入hadoop-eclipse-plugin-1.0.0.jar中。
2.修改hadoop-eclipse-plugin-1.0.0.jar中META-INF目录下的MANIFEST.MF,将classpath修改为以下内容:Bundle-ClassPath: classes/,lib/hadoop-core.jar,lib/commons-cli-1.2.jar,lib/commons-httpclient-3.0.1.jar,lib/jackson-core-asl-1.0.1.jar,lib/jackson-mapper-asl-1.0.1.jar,lib/commons-configuration-1.6.jar,lib/commons-lang-2.4.jar
3.重启Eclipse即可。
⑧ 在Eclipse中编写调试第一个Hadoop的HelloWorld程序:wordcount
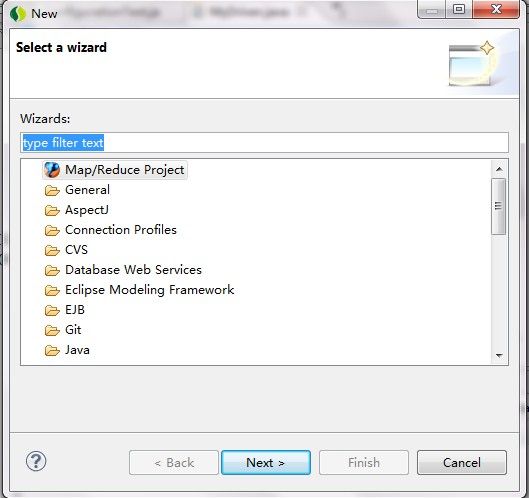
建立Map/Reduce 工程
定义WordCount.Java类
这里,我下载了Hadoop源码,直接拷贝了其WordCount.java文件,代码如下:
package org.apache.hadoop.examples;

import java.io.IOException;
import java.util.StringTokenizer;

import org.apache.hadoop.conf.Configuration;
import org.apache.hadoop.fs.Path;
import org.apache.hadoop.io.IntWritable;
import org.apache.hadoop.io.Text;
import org.apache.hadoop.mapreduce.Job;
import org.apache.hadoop.mapreduce.Mapper;
import org.apache.hadoop.mapreduce.Reducer;
import org.apache.hadoop.mapreduce.lib.input.FileInputFormat;
import org.apache.hadoop.mapreduce.lib.output.FileOutputFormat;
import org.apache.hadoop.util.GenericOptionsParser;

public class WordCount {

    public static class TokenizerMapper extends
            Mapper<Object, Text, Text, IntWritable> {

        private final static IntWritable one = new IntWritable(1);
        private Text word = new Text();

        public void map(Object key, Text value, Context context)
                throws IOException, InterruptedException {
            String line = value.toString();
            StringTokenizer itr = new StringTokenizer(line);
            while (itr.hasMoreTokens()) {
                word.set(itr.nextToken().toLowerCase());
                context.write(word, one);
            }
        }
    }

    public static class IntSumReducer extends
            Reducer<Text, IntWritable, Text, IntWritable> {
        private IntWritable result = new IntWritable();

        public void reduce(Text key, Iterable<IntWritable> values,
                Context context) throws IOException, InterruptedException {
            int sum = 0;
            for (IntWritable val : values) {
                sum += val.get();
            }
            result.set(sum);
            context.write(key, new IntWritable(sum));
        }
    }

    public static void main(String[] args) throws Exception {
        Configuration conf = new Configuration();
        String[] otherArgs = new GenericOptionsParser(conf, args)
                .getRemainingArgs();
        if (otherArgs.length != 2) {
            System.err.println("Usage: wordcount <in> <out>");
            System.exit(2);
        }
        Job job = new Job(conf, "word count");
        job.setJarByClass(WordCount.class);
        job.setMapperClass(TokenizerMapper.class);
        job.setCombinerClass(IntSumReducer.class);
        job.setReducerClass(IntSumReducer.class);
        job.setOutputKeyClass(Text.class);
        job.setOutputValueClass(IntWritable.class);
        FileInputFormat.addInputPath(job, new Path(otherArgs[0]));
        FileOutputFormat.setOutputPath(job, new Path(otherArgs[1]));
        System.exit(job.waitForCompletion(true) ? 0 : 1);
    }
}
为了使程序成功运行,我们需要做一下工作
设置输入:
在命令行中,像hadoop中添加一个文本文件:
hadoop fs -mkdir /input #在HDFS用户根目录下建立input文件夹 (我的位置是/user/root/input/)
hadoop fs -put test.txt /input/ #向input文件夹里放入所在路径的test.txt文件(我的位置是 /user/root/output2/)
该步骤也可以在Eclipse中建立,首先右键点击Project Explorer中大象图标下第一个没有名字的文件夹,点击 Create New Directory,创建input文件夹,后再右键该文件夹,上传test.txt文件。此时到hadoop DFS中查看,也会发现创建成功。
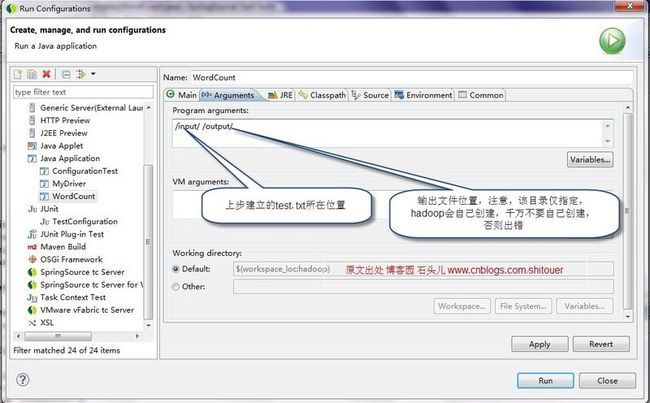
Eclipse中设置输入参数
设置WordCount.java的执行参数如图
下图的位置信息不对啊,应该是:/user/root/input/ /user/root/output2/
在Eclipse中执行
如图,点击 Run on Hadoop
在控制台,会有以下输出
OK,至此,Congratulations,你已经建立起自己在Windows中Eclipse下进行Hadoop MapReduce开发的基本环境设置工作,并且输出了一个属于自己的HelloWorld程序,并且稍微了解了一些hadoop日志分析的信息,你已经开始进入Hadoop的世界,剩下的,就是要不断地深入学习了。(本部分内容转自博客园 石头儿,中间加了一点自己搭建是遇到的情况)
Eclipse 连接hadoop一些错误的处理方式:
这时如果我们运行MaxTemperature类,会报如下错:
| 12/04/24 15:32:44 WARN util.NativeCodeLoader: Unable to load native-hadoop library for your platform... using builtin-java classes where applicable 12/04/24 15:32:44 ERROR security.UserGroupInformation: PriviledgedActionException as:Administrator cause:java.io.IOException: Failed to set permissions of path: \tmp\hadoop-Administrator\mapred\staging\Administrator-519341271\.staging to 0700 Exception in thread "main" java.io.IOException: Failed to set permissions of path: \tmp\hadoop-Administrator\mapred\staging\Administrator-519341271\.staging to 0700 |
这个是Windows下文件权限问题,在Linux下可以正常运行,不存在这样的问题。
解决方法是,修改hadoop-1.0.4/src/core/org/apache/hadoop/fs/FileUtil.java里面的checkReturnValue,注释掉即可(有些粗暴,在Window下,可以不用检查):
重新编译打包hadoop-core-1.0.4.jar,替换掉hadoop-1.0.4根目录下的hadoop-core-1.0.4.jar即可。(我重新打包的时候出了点问题,就直接以从网上下载的hadoop-core-1.0.2.jar代替hadoop-core-1.0.4.jar了,这样也可以正常运行,下载地址:https://skydrive.live.com/?cid=cf7746837803bc50&id=CF7746837803BC50%211276)
(其实还有另一种简单的办法,我们只需要把hadoop-1.0.4/src/core/org/apache/hadoop/fs/FileUtil.java修改之后重新编译过的class文件加入到原来的hadoop-core-1.0.4.jar包中代替原来的FileUtil.class文件即可,这里有一个已经做好的适合于windows环境的hadoop-core-1.0.4.jar包了,你可以直接下载)
还有一种最简单的处理方式:
在代码中加入:Configuration conf = new Configuration();
conf.set("mapred.job.tracker", "server:9001");
"server:9001"中的server"为Hadoop集群Master的IP地址。
另外,我还遇到了这么一个错误:
| org.apache.hadoop.security.AccessControlException:Permission denied:user=Administrator,access=WRITE,inode="tmp":root:supergroup:rwxr-xr-x 。 |
这个错误有些蹊跷,因为我已经在map/reduce locations中配置了用户名是hadoop(hadoop就是我linux上运行hadoop集群的用户名),不知道它为什么还是以Administrator用户身份来方位hadoop的,解决办法如下:
问题原因:本地用户administrator(本机windows用户)想要远程操作hadoop系统,没有权限引起的。
解决办法:
a、如果是测试环境,可以取消hadoop hdfs的用户权限检查。打开conf/hdfs-site.xml,找到dfs.permissions属性修改为false(默认为true)OK了。
b、修改hadoop location参数,在advanced parameter选项卡中,找到hadoop.job.ugi项,将此项改为启动hadoop的用户名即可。(注意第一次设置的时候可能没有hadoop.job.ugi参数,报错后在去看就有了。)
c、因为Eclipse使用hadoop插件提交作业时,会默认以 DrWho 身份去将作业写入hdfs文件系统中,对应的也就是 HDFS 上的/user/hadoop , 由于 DrWho 用户对hadoop目录并没有写入权限,所以导致异常的发生。解决方法为:放开 hadoop 目录的权限 , 命令如下 :$ hadoop fs -chmod 777
