Flex用BlazeDS与JAVA交互
以前我整FLEX项目时都是用MYECLIPSE的,FLEX代码跟JAVA代码都写到一个项目里
项目结构图就象,这样
现在我们分开写FB就写FLEX代码,ECLIPSE就写JAVA代码
这里也不需要用到SPRING也不需要添加我们的SpringFactory.java,对于新手,这种方式比较容易理解。
首页我们需要把BlazeDS.WAR放到TOMCAT的webapps下,并解压
用MYECLIPSE新建JAVA项目,注意不是web project 是java project我想很多WEB开发人员很少建JAVA Project吧
安以下方式新建项目
点NEXT
在根目录下新建一source folder名为src,并指定WEB-INF/classes为输出目录
点击FINISH
新建一个名为HelloWrold.java的JAVA类
public class HelloWorld {

	public String sayHello(String name){
		return "Hello,"+name;
	}
	public static void main(String[] args) {
		HelloWorld hw=new HelloWorld();
		String t=hw.sayHello("zwh");
		System.out.println(t);
	}

}
然后找到WEB-INF/flex的remoting-config.xml在里面进入如下配置
<?xml version="1.0" encoding="UTF-8"?>
<service id="remoting-service"
    class="flex.messaging.services.RemotingService">

    <adapters>
        <adapter-definition id="java-object" class="flex.messaging.services.remoting.adapters.JavaAdapter" default="true"/>
    </adapters>

    <default-channels>
        <channel ref="my-amf"/>
    </default-channels>

	 <destination id="HelloWorld">
		<properties>
			<source>HelloWorld</source>
		</properties>
	 </destination>
</service>
然后启动TOMCAT这样我们的SERVER端代码就OK了
在FLEX中如何使用呢
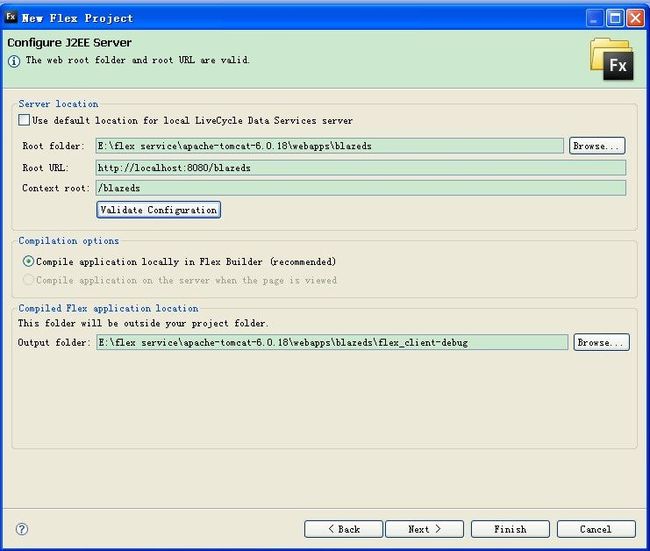
在FLEX Builder里创建FLEX PROJECT,选择Application server type为J2EE
点击NEXT进行如下配置
点击FINISH
输入几行FLEX代码进入测试
<?xml version="1.0" encoding="utf-8"?>
<mx:Application xmlns:mx="http://www.adobe.com/2006/mxml" layout="vertical">
	<mx:RemoteObject id="ro" destination="HelloWorld"/>
	<mx:TextInput id="inputText" change="ro.sayHello(inputText.text)"/>
	<mx:Label text="{ro.sayHello.lastResult}"/>
</mx:Application>
其中<mx:RemoteObject id="ro" destination="HelloWorld"/>
中的destination就是对应我们服务器端的remoting-config.xml里的配置
OK了,运行一下吧


