android 3d 旋转
在javaeye里看到了关于3d旋转的文章,可是博主没有透入什么技术细节。由于一直想做出那种旋转效果,所以就想啊想,终于想出来了(![]() 我是个小菜鸟)。呵呵,不管怎样,希望对想做还没做出来的朋友一些帮助。
我是个小菜鸟)。呵呵,不管怎样,希望对想做还没做出来的朋友一些帮助。
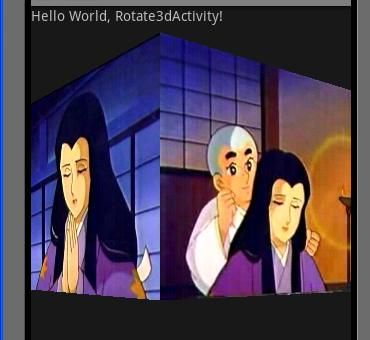
先上一个效果图:
这是你想要的吗?如果是就继续往下看吧。
其实,这个效果是用animation配合camera做出来的,相信大家在apidemo里面看过类似的。
那么先写一个继承animation的类:Rotate3d
public class Rotate3d extends Animation {
	private float mFromDegree;
	private float mToDegree;
	private float mCenterX;
	private float mCenterY;
	private float mLeft;
	private float mTop;
	private Camera mCamera;
	private static final String TAG = "Rotate3d";

	public Rotate3d(float fromDegree, float toDegree, float left, float top,
			float centerX, float centerY) {
		this.mFromDegree = fromDegree;
		this.mToDegree = toDegree;
		this.mLeft = left;
		this.mTop = top;
		this.mCenterX = centerX;
		this.mCenterY = centerY;

	}

	@Override
	public void initialize(int width, int height, int parentWidth,
			int parentHeight) {
		super.initialize(width, height, parentWidth, parentHeight);
		mCamera = new Camera();
	}

	@Override
	protected void applyTransformation(float interpolatedTime, Transformation t) {
		final float FromDegree = mFromDegree;
		float degrees = FromDegree + (mToDegree - mFromDegree)
				* interpolatedTime;
		final float centerX = mCenterX;
		final float centerY = mCenterY;
		final Matrix matrix = t.getMatrix();

		if (degrees <= -76.0f) {
			 degrees = -90.0f;
			 mCamera.save();
			 mCamera.rotateY(degrees);
			 mCamera.getMatrix(matrix);
			 mCamera.restore();
		} else if(degrees >=76.0f){
			degrees = 90.0f;
			mCamera.save();
			mCamera.rotateY(degrees);
			mCamera.getMatrix(matrix);
			mCamera.restore();
		}else{
			mCamera.save();
                       //这里很重要哦。
			mCamera.translate(0, 0, centerX);
			mCamera.rotateY(degrees);
			mCamera.translate(0, 0, -centerX);
			mCamera.getMatrix(matrix);
			mCamera.restore();
		}

		matrix.preTranslate(-centerX, -centerY);
		matrix.postTranslate(centerX, centerY);
	}
}
有了这个类一切都会变得简单的,接着只要在activity中写两个Rotate3d的对象,让两个view,分别做这两个对象的animation就好了。(![]() 原来就这么简单啊!无语)
原来就这么简单啊!无语)
//下面两句很关键哦,呵呵,心照不宣。
    	Rotate3d leftAnimation = new Rotate3d(-0, -90, 0, 0, mCenterX, mCenterY);
        Rotate3d rightAnimation = new Rotate3d(-0+90, -90+90, 0.0f, 0.0f, mCenterX, mCenterY);

        leftAnimation.setFillAfter(true);
        leftAnimation.setDuration(1000);
        rightAnimation.setFillAfter(true);
        rightAnimation.setDuration(1000);

        mImageView1.startAnimation(leftAnimation);
        mImageView2.startAnimation(rightAnimation);
还要写一下mImageView1,mImageView2的xml,
<?xml version="1.0" encoding="utf-8"?>
<LinearLayout xmlns:android="http://schemas.android.com/apk/res/android"
    android:orientation="vertical"
    android:layout_width="fill_parent"
    android:layout_height="wrap_content"
    >

    <FrameLayout
        android:layout_width="fill_parent"
        android:layout_height="fill_parent">

                   <ImageView
	    			android:id="@+id/image1"
	    			android:layout_gravity="center_horizontal"
	    			android:layout_width="fill_parent"
	    			android:layout_height="wrap_content"
	    			android:src="@drawable/image1"
	    			/>
                   <ImageView
	    			android:id="@+id/image2"
	    			android:background="#ffff0000"
	    			android:layout_gravity="center_horizontal"
	    			android:layout_width="fill_parent"
	    			android:layout_height="wrap_content"
	    			android:src="@drawable/image2"
	    			/>

    </FrameLayout>
</LinearLayout>
写完收工。如果有不足之处,还请朋友们不吝指教。
