【Boost】 1. 在Windows下编译Boost
这系列文章将逐一介绍Boost库的具体内容。首先我们从Boost在Windows下编译开始讲解。
对于大部分Boost应用来说,它是不用编译的,直接包含头文件就可使用,如:
只有少部分需要编译成库文件,需要编译的库如下:
要完全编译boost库需要先准备一些第三方库:
1. Regex所需Unicode支持类库 -- ICU
编译ICU较为简单,解开ICU包之后,在其目录下可以找到一个叫"allinone"的目录,用Visual studio或者visual studio express打开里面的allinone.sln,选择release,即可以编译完成,编译之后,将include目录和release目录下的库文件拷贝出来,分别放在C:\icu\include和C:\icu\lib.
2. Graph所需的Xml处理类库 -- Expat, 将该自解压文件解压到C:\expat即可。
3.Boost.MPI所需MPI类库 -- Boost的官方站点说需要MPICH或OpenMPI之类的支持,事实上在Windows下总是会提示需要MPIC++,事实上你需要的是 Microsoft Cluster Pack SDK,下载并默认安装在c:\Program Files\Microsoft Compute Cluster Pack下。
这里我遇到两个问题,一并说一下:
如果下载的是Microsoft HPC Pack 2008 SDK,或者Microsoft Compute ClusterPack不是装到默认的路径下,那bjam就会抓瞎,找不到mpic++的路径,这时候可以修改一下mpi.jam(在tools\build\v2\tools):
现在完全编译Boost所需要的类库都准备好了。
下载Boost并解压到C:\boost.src,进入Visual studio prompt,然后运行boost.src目录下的bootstrap.bat,这个脚本会帮你生成编译所需的bjam.exe文件。
如果你机器上同时有多个不同版本的VC++存在,先修改project-config.jam,将
"using msvc ;"改为诸如" using msvc : 9.0 ;"
要支持mpi,你可以建立一个user-config.jam文件,然后添加一行“using mpi ;”即可
接下来的工作,我写了个小脚本boost.bat
编译后会得到debug和release两个版本的boost,至此Boost编译完成。现在我们开始配置visual studio以方便以后使用Boost类库。
先设置一个环境变量
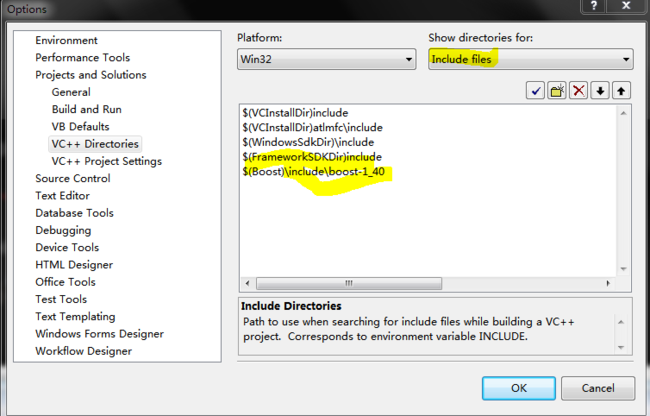
接着打开Visual studio的菜单 tools-->Options...->projects and solutions-->VC++ directories 如图添加Boost类库的头文件和库文件的路径。

下面这一小段代码用于测试设置是否正确:
如无差错,这段代码应该可以正确编译并链接。这时候可以删除boost.src。
对于大部分Boost应用来说,它是不用编译的,直接包含头文件就可使用,如:
any
array
asio
conversion
crc
bind/mem_fn
enable_if
function
lambda
mpl
smart_pt
只有少部分需要编译成库文件,需要编译的库如下:
date_time
filesystem
function_types
graph
iostreams
math
mpi
program_options
python
regex
serialization
signals
system
test
thread
wave
要完全编译boost库需要先准备一些第三方库:
1. Regex所需Unicode支持类库 -- ICU
编译ICU较为简单,解开ICU包之后,在其目录下可以找到一个叫"allinone"的目录,用Visual studio或者visual studio express打开里面的allinone.sln,选择release,即可以编译完成,编译之后,将include目录和release目录下的库文件拷贝出来,分别放在C:\icu\include和C:\icu\lib.
2. Graph所需的Xml处理类库 -- Expat, 将该自解压文件解压到C:\expat即可。
3.Boost.MPI所需MPI类库 -- Boost的官方站点说需要MPICH或OpenMPI之类的支持,事实上在Windows下总是会提示需要MPIC++,事实上你需要的是 Microsoft Cluster Pack SDK,下载并默认安装在c:\Program Files\Microsoft Compute Cluster Pack下。
这里我遇到两个问题,一并说一下:
如果下载的是Microsoft HPC Pack 2008 SDK,或者Microsoft Compute ClusterPack不是装到默认的路径下,那bjam就会抓瞎,找不到mpic++的路径,这时候可以修改一下mpi.jam(在tools\build\v2\tools):
local cluster_pack_path_native = "你的路径" ;
现在完全编译Boost所需要的类库都准备好了。
下载Boost并解压到C:\boost.src,进入Visual studio prompt,然后运行boost.src目录下的bootstrap.bat,这个脚本会帮你生成编译所需的bjam.exe文件。
如果你机器上同时有多个不同版本的VC++存在,先修改project-config.jam,将
"using msvc ;"改为诸如" using msvc : 9.0 ;"
要支持mpi,你可以建立一个user-config.jam文件,然后添加一行“using mpi ;”即可
接下来的工作,我写了个小脚本boost.bat
@echo Making all Boost library -- By Ray Linn
set EXPAT_INCLUDE=C:\USR\INCLUDE
set EXPAT_LIBPATH=C:\USR\
set INCLUDE=%INCLUDE%;C:\Program Files\Microsoft Compute Cluster Pack\include;C:\Program Files\Microsoft Compute Cluster Pack\Include\amd64;
set LIBPATH=%LIBPATH%;C:\Program Files\Microsoft Compute Cluster Pack\Lib\amd64;

echo adding -a to force rebuild
:debug

bjam -s HAVE_ICU=1 -s ICU_PATH=C:\usr threading=multi link=static runtime-link=shared variant=debug  -s BZIP2_SOURCE="C:\win32_utils\bzip2-1.0.5" -s ZLIB_SOURCE="C:\win32_utils\zlib-1.2.5" --user-config="./user-config.jam" --prefix="C:\boost" install

:release

bjam -s HAVE_ICU=1 -s ICU_PATH=C:\usr threading=multi link=static runtime-link=shared variant=release  -s BZIP2_SOURCE="C:\win32_utils\bzip2-1.0.5" -s ZLIB_SOURCE="C:\win32_utils\zlib-1.2.5" --user-config="./user-config.jam" --prefix="C:\boost" install
编译后会得到debug和release两个版本的boost,至此Boost编译完成。现在我们开始配置visual studio以方便以后使用Boost类库。
先设置一个环境变量
set Boost=C:\boost
接着打开Visual studio的菜单 tools-->Options...->projects and solutions-->VC++ directories 如图添加Boost类库的头文件和库文件的路径。

下面这一小段代码用于测试设置是否正确:
#include "stdafx.h"
#include <iostream>
#include <iterator>
#include <algorithm>
#include <string>
#include <boost/regex.hpp>

int _tmain(int argc, _TCHAR* argv[])
{
	std::string line;
	static const boost::regex pat("^Subject:(Re:|Aw:)*(.*)");
	while (std::cin)
	{
		std::getline(std::cin, line);
		boost::smatch matches;
		if(boost::regex_match(line, matches, pat))
			std::cout << matches[2] << std::endl;
	}
}
如无差错,这段代码应该可以正确编译并链接。这时候可以删除boost.src。