【WPF】创建基于模板的WPF控件
WPF可以创建两种控件,它们的名字也很容易让人混淆:用户控件(User Control)和定制控件(Customer Control),之所以如此命名,是因为用户控件更面向控件的“使用者”,以方面他们利用现成的控件组合成新的控件,而客户控件,更便于定制化(Customization),方便创建有别于现有控件的定制控件。
定制控件提供了行为和表现完全分离的开发模式,具有很高的灵活性,当然,也更难一些。这里我们通过创建个简单的搜索控件来看看如何开发定制控件:

首先我们创建一个WPF应用,在同一个solution里,再添加一个用户WPF控件库。
系统会自动在控件库里创建一个UserControl1.XAML,这个文件可以直接删除。在WPF控件库里添加一个新的项目,注意:应该选择定制控件而不是用户控件,如图:

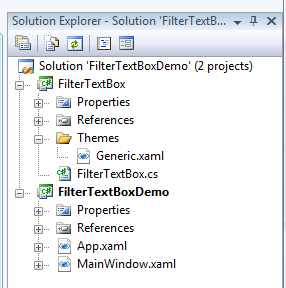
现在程序结构看起来应该像这样子:

定制控件的模板会为我们建立FilterTextBox.cs和Generic.xaml文件。
前者内容如下:
generic.xaml是定制控件的外观表现,默认在themes目录下
现在generic.xaml的border还是空的。
接下来,我们先为控件创建其行为。首先我们添加一个叫"Text"的依赖属性,这是用户输入的搜索文本。这儿我们创建了个Callback,这样属性改变时就会被调用。注意不要在CLR属性的getter和setter添加任何代码,因为在运行时,WPF会忽略这些属性而直接调用GetValue和SetValue.但是在xaml里使用属性时,你仍需要CLR属性。
接着我们还要暴露出一些事件,这样当文本被修改时,控件的用户就会被通知到,这儿为控件添加一个"TextChangeEvent"。
事件在OnTextChange方法里被触发:
到这里,关于控件行为的代码已经基本完成了,我们继续前进,为我们的控件创建一个外观。我们添加一个DockPanel,并在其中加入一个文本框和一个按钮。按钮Dock在右边。然后我们把文本框的Text属性和我们控件的Text属性绑定起来。同时设置UpdateSourceTrigge为TextChanged,这样每次用户在文本框输入点什么东西,就会触发我们写的TextChanged事件。注意,文本框没有border,因为这儿不需要2个Border。
特别要注意的是这些控件的名称。他们都以"PART_"开头,这是WPF的标准方法用来表示那些需要被替换的控件,当我们要修改控件的模板的时候。如果有人为你的控件编写模板,你需要验证所用的部件的类型是控件所必需的。可以通过TemplatePart Attribute,并添加部件的名称和类型。
我们还设想只有在文本框里有文本的时候,一个“清空”的按钮才显示出来。我们创建一个DataTriger来实现这个想法:
现在要处理的是当用户点击"清空"按钮时候的动作,可以通过重写OnApplyTemplate来实现。通过控件名调用GetTemplateChild可以得到控件的引用。当用户点击“清空”按钮时,我们想删除文本框里的所有文本。得到文本框的引用和上面的方法相同。
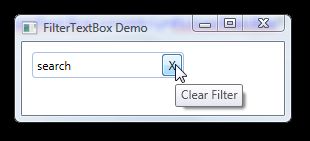
现在可以在WPF应用里跑一下了!
参考:
http://pavanpodila.spaces.live.com/blog/cns!9C9E888164859398!135.entry
定制控件提供了行为和表现完全分离的开发模式,具有很高的灵活性,当然,也更难一些。这里我们通过创建个简单的搜索控件来看看如何开发定制控件:

首先我们创建一个WPF应用,在同一个solution里,再添加一个用户WPF控件库。
系统会自动在控件库里创建一个UserControl1.XAML,这个文件可以直接删除。在WPF控件库里添加一个新的项目,注意:应该选择定制控件而不是用户控件,如图:

现在程序结构看起来应该像这样子:

定制控件的模板会为我们建立FilterTextBox.cs和Generic.xaml文件。
前者内容如下:
public class FilterTextBox : Control{
   static FilterTextBox()
    {
        DefaultStyleKeyProperty.OverrideMetadata(typeof(FilterTextBox),
           new FrameworkPropertyMetadata(typeof(FilterTextBox)));
    }}
generic.xaml是定制控件的外观表现,默认在themes目录下
<Style TargetType="{x:Type local:FilterTextBox}">
  <Setter Property="Template">
    <Setter.Value>
      <ControlTemplate TargetType="{x:Type local:FilterTextBox}">
        <Border Background="{TemplateBinding Background}"
               BorderBrush="{TemplateBinding
BorderBrush}"
                BorderThickness="{TemplateBinding BorderThickness}">
        </Border>
      </ControlTemplate>
    </Setter.Value>
  </Setter>
</Style>
现在generic.xaml的border还是空的。
接下来,我们先为控件创建其行为。首先我们添加一个叫"Text"的依赖属性,这是用户输入的搜索文本。这儿我们创建了个Callback,这样属性改变时就会被调用。注意不要在CLR属性的getter和setter添加任何代码,因为在运行时,WPF会忽略这些属性而直接调用GetValue和SetValue.但是在xaml里使用属性时,你仍需要CLR属性。
        public static readonly DependencyProperty TextProperty =
            DependencyProperty.Register("Text",
                                        typeof(String),
                                        typeof(FilterTextBox),
                                        new UIPropertyMetadata(null,
                                        new PropertyChangedCallback(OnTextChanged),
                                        new CoerceValueCallback(OnCoerceText)));

        private static object OnCoerceText(DependencyObject o, Object value)
        {
            FilterTextBox filterTextBox = o as FilterTextBox;
            if (filterTextBox != null)
                return filterTextBox.OnCoerceText((String)value);
            else
                return value;
        }

        private static void OnTextChanged(DependencyObject o, DependencyPropertyChangedEventArgs e)
        {
            FilterTextBox filterTextBox = o as FilterTextBox;
            if (filterTextBox != null)
                filterTextBox.OnTextChanged((String)e.OldValue, (String)e.NewValue);
        }

        protected virtual String OnCoerceText(String value)
        {
            return value;
        }

        protected virtual void OnTextChanged(String oldValue, String newValue)
        {
        }

        public String Text
        {
            // IMPORTANT: To maintain parity between setting a property in XAML
            // and procedural code, do not touch the getter and setter inside
            // this dependency property!
            get
            {
                return (String)GetValue(TextProperty);
            }
            set
            {
                SetValue(TextProperty, value);
            }
        }
接着我们还要暴露出一些事件,这样当文本被修改时,控件的用户就会被通知到,这儿为控件添加一个"TextChangeEvent"。
        public static readonly RoutedEvent TextChangedEvent = EventManager.RegisterRoutedEvent("TextChanged", RoutingStrategy.Bubble, typeof(RoutedEventHandler), typeof(FilterTextBox));

        public event RoutedEventHandler TextChanged
        {
            add { AddHandler(TextChangedEvent, value); }
            remove { RemoveHandler(TextChangedEvent, value); }
        }
事件在OnTextChange方法里被触发:
        protected virtual void OnTextChanged(String oldValue, String newValue)
        {
            this.RaiseEvent(new RoutedEventArgs(FilterTextBox.TextChangedEvent, this));
        }
到这里,关于控件行为的代码已经基本完成了,我们继续前进,为我们的控件创建一个外观。我们添加一个DockPanel,并在其中加入一个文本框和一个按钮。按钮Dock在右边。然后我们把文本框的Text属性和我们控件的Text属性绑定起来。同时设置UpdateSourceTrigge为TextChanged,这样每次用户在文本框输入点什么东西,就会触发我们写的TextChanged事件。注意,文本框没有border,因为这儿不需要2个Border。
                <ControlTemplate TargetType="{x:Type local:FilterTextBox}">
                    <Border
                        Background="{TemplateBinding Background}"
                        BorderBrush="{TemplateBinding BorderBrush}"
                        BorderThickness="{TemplateBinding BorderThickness}"
                        CornerRadius="3">
                        <DockPanel
                            LastChildFill="True"
                            Margin="1">
                            <Button
                                x:Name="PART_ClearFilterButton"
                                Content="X"
                                Width="20"
                                ToolTip="Clear Filter"
                                DockPanel.Dock="Right" />
                            <TextBox
                                x:Name="PART_FilterTextBox"
                                Text="{Binding Path=Text,Mode=TwoWay,UpdateSourceTrigger=PropertyChanged,RelativeSource={RelativeSource TemplatedParent}}"
                                BorderBrush="{x:Null}"
                                BorderThickness="0"
                                VerticalAlignment="Center" />
                        </DockPanel>
                    </Border>
                </ControlTemplate>
特别要注意的是这些控件的名称。他们都以"PART_"开头,这是WPF的标准方法用来表示那些需要被替换的控件,当我们要修改控件的模板的时候。如果有人为你的控件编写模板,你需要验证所用的部件的类型是控件所必需的。可以通过TemplatePart Attribute,并添加部件的名称和类型。
[TemplatePart(Name = "PART_FilterTextBox", Type = typeof(TextBox))]
[TemplatePart(Name = "PART_ClearFilterButton", Type = typeof(Button))]
public class FilterTextBox : Control{
    ...
}
我们还设想只有在文本框里有文本的时候,一个“清空”的按钮才显示出来。我们创建一个DataTriger来实现这个想法:
<ControlTemplate TargetType="{x:Type local:FilterTextBox}">
  <Border>
    ...
  </Border>
 <ControlTemplate.Triggers>
    <DataTrigger Binding="{Binding Path=Text.Length, ElementName=PART_FilterTextBox}" Value="0">
      <Setter TargetName="PART_ClearFilterButton" Property="Visibility" Value="Collapsed" />
    </DataTrigger>
  </ControlTemplate.Triggers>
</ControlTemplate>
现在要处理的是当用户点击"清空"按钮时候的动作,可以通过重写OnApplyTemplate来实现。通过控件名调用GetTemplateChild可以得到控件的引用。当用户点击“清空”按钮时,我们想删除文本框里的所有文本。得到文本框的引用和上面的方法相同。
        public override void OnApplyTemplate()
        {
            base.OnApplyTemplate();
            Button clearFilterButton = base.GetTemplateChild("PART_ClearFilterButton") as Button;
            if (clearFilterButton != null)
            {
                clearFilterButton.Click += new RoutedEventHandler(ClearFilterButton_Click);
            }
        }

        private void ClearFilterButton_Click(Object sender, RoutedEventArgs e)
        {
            TextBox textBox = base.GetTemplateChild("PART_FilterTextBox") as TextBox;
            if (textBox != null)
            {
                textBox.Text = String.Empty;
            }
        }
现在可以在WPF应用里跑一下了!
参考:
http://pavanpodila.spaces.live.com/blog/cns!9C9E888164859398!135.entry