利用MyBatis Generator自动创建代码
功能:创建数据库表后,利用MyBatis Generator自动创建代码(xml,interface,model)。
一、安装myeclipse插件
1 下载http://mybatis.googlecode.com/svn/sub-projects/generator/trunk/eclipse/UpdateSite/下features和plugins文件夹内容。
2 在myeclipse10安装目录的dropins文件夹下新建mybaits-gen(名字随意),将features和plugins拷贝其下,插件即安装成功。如果是myeclipse以前版本,用link方式链接。
二、自动创建代码
1 利用插件创建generatorConfig.xml.
new--other--mybatis--mybatis generator configuration file

2 打开generatorConfig.xml
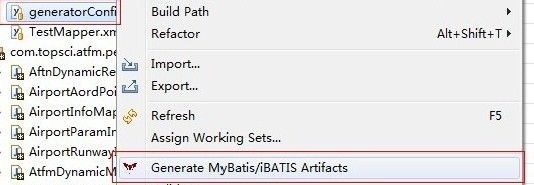
3 对generatorConfig.xml右键--generator mybatis,即生成。

其他属性说明:
以下配置可以不生成example这个类
[xml]
<table schema="数据库名" tableName="表名" domainObjectName="给生成的类重命名,不要既跟表名一样" enableSelectByPrimaryKey="true" enableSelectByExample="false" enableDeleteByExample="false"
enableCountByExample="false" enableUpdateByExample="false">
<property name="useActualColumnNames" value="false" />
</table>
[/xml]
一、安装myeclipse插件
1 下载http://mybatis.googlecode.com/svn/sub-projects/generator/trunk/eclipse/UpdateSite/下features和plugins文件夹内容。
2 在myeclipse10安装目录的dropins文件夹下新建mybaits-gen(名字随意),将features和plugins拷贝其下,插件即安装成功。如果是myeclipse以前版本,用link方式链接。
二、自动创建代码
1 利用插件创建generatorConfig.xml.
new--other--mybatis--mybatis generator configuration file

2 打开generatorConfig.xml
<generatorConfiguration >

 <classPathEntry location="D:\mysql-connector-java-5.1.15-bin.jar" />

  <context id="context1" >
    <jdbcConnection driverClass="com.mysql.jdbc.Driver" connectionURL="jdbc:mysql://192.168.1.118:3306/qhxdb" userId="root" password="root" />
    <javaModelGenerator targetPackage="需要生成的包名" targetProject="项目名" />
    <sqlMapGenerator targetPackage="需要生成的包名" targetProject="项目名" />
    <javaClientGenerator targetPackage=需要生成的包名" targetProject="项目名" type="XMLMAPPER" />

    <table schema="数据库名" tableName="表名" ></table>
  </context>
</generatorConfiguration>
3 对generatorConfig.xml右键--generator mybatis,即生成。

其他属性说明:
以下配置可以不生成example这个类
[xml]
<table schema="数据库名" tableName="表名" domainObjectName="给生成的类重命名,不要既跟表名一样" enableSelectByPrimaryKey="true" enableSelectByExample="false" enableDeleteByExample="false"
enableCountByExample="false" enableUpdateByExample="false">
<property name="useActualColumnNames" value="false" />
</table>
[/xml]