MyEclipse8.6整合Axis2插件
1.下载axis2的eclipse插件.
点击附件即可,不要到其他地方下载。

2.把下好的两个插件包解压后放置myeclipse8.6安装目录下的dropins文件夹中。
笔者本机的实例目录: D:\Genuitec\MyEclipse-8.6\dropins
Axis2_Service_Archiver_1.3.0和 Axis2_Codegen_Wizard_1.3.0要直接放在
D:\Genuitec\MyEclipse-8.6\dropins目录下,不要把 axis2-eclipse-codegen-wizard和 axis2-eclipse-service-archiver-wizard目录放在 D:\Genuitec\MyEclipse-8.6\dropins下面。

[img][/img]
3.重启MyEclipse8.6后 File->New->Other

到此Axis2插件安装完毕。
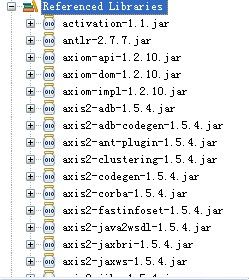
用MyEclipse8.6建立Web Project工程,建完工程后要把axis2-1.5.4-bin.zip目录的lib目录下的所有jar文件加载到工程里。
并创建HelloServer.java文件:

File->New->Other->Axis2 Wizards

选中Axis2 Code Generator

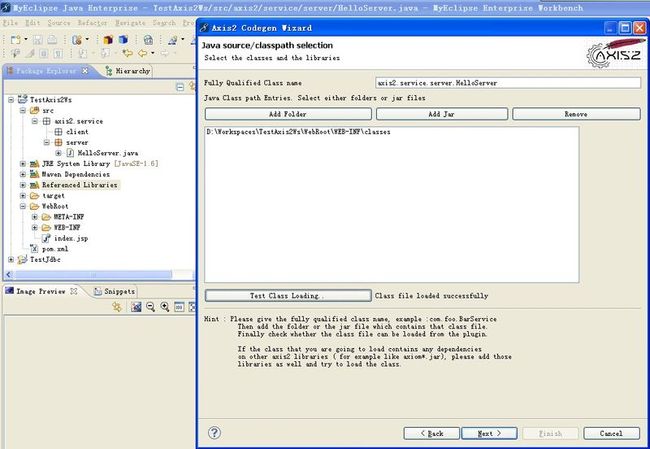
在Fully Qualified Class Name处填写服务端的Java类全路径。
单击Add Folder按钮,选择到工程的classes目录,然后单击Test Class Loading按钮,如果显示为Class file loaded successfully则成功了。
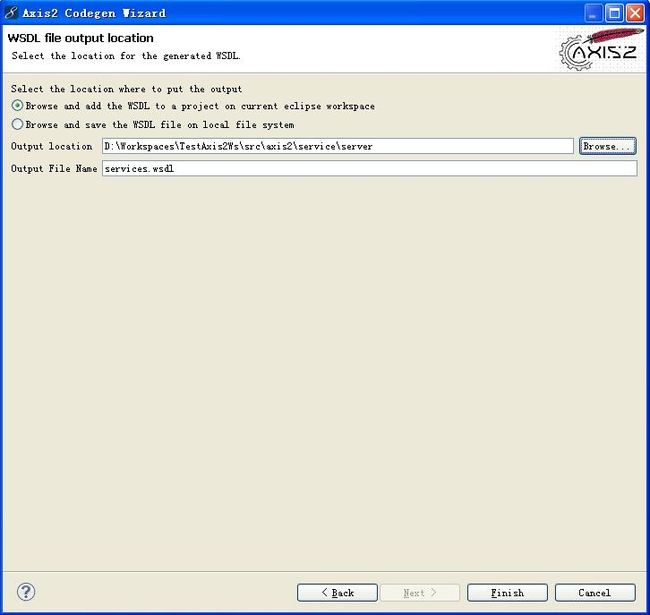
选择在工程里添加WSDL文件并在Output location处填写生成wsdl文件的路径,Output file name为wsdl文件的名字。
然后刷新工程的src目录,这时会看见在Output location目录下会出现wsdl文件。
右键单击工程名字 New-Other

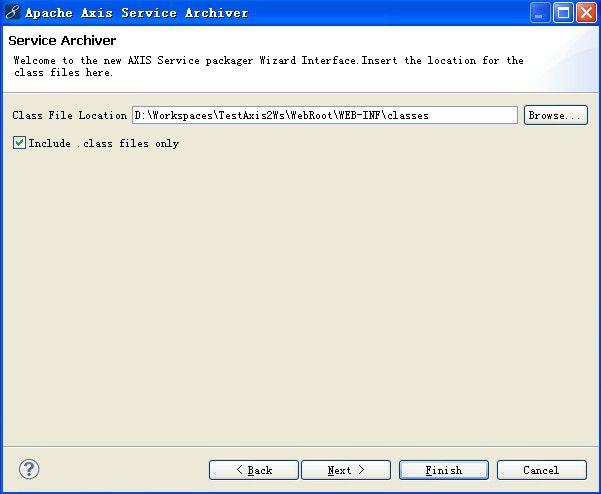


 这个地方填写完Class name后面的
axis2.service.server.HelloServer后单击Load按钮可能会报找不到
axis2.service.server.HelloServer, 这个地方要等一下下, 等长一点儿时间再重新单击一次Load按钮就会好的。
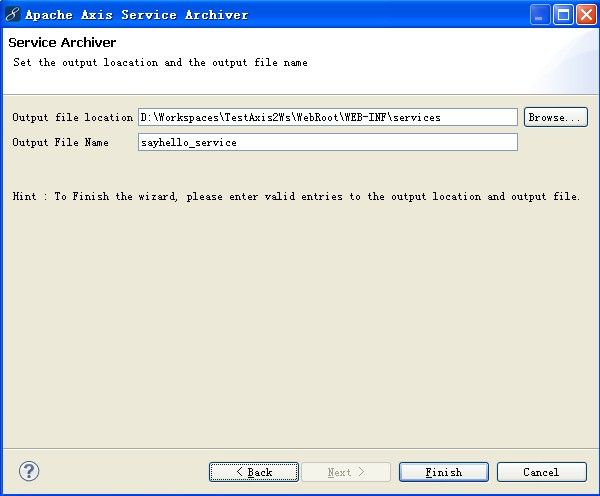
单击Finish完成,好了,刷新一下项目,可以看到结构图如下:
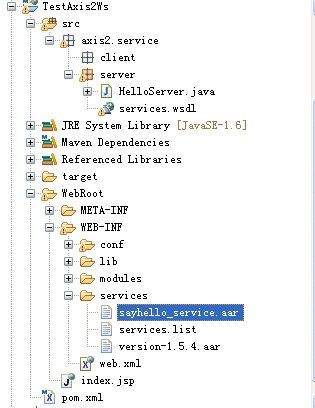
可以看到在services目录下多了个sayhello_service.aar包。
编辑web.xml加入如下代码:
用MyEclipse8.6把工程发布到Tomcat下面, 这里笔者用的是Tomcat7.0。
启动Tomcat7.0后访问工程:
http://localhost:8081/TestAxis2Ws/services/HelloService?wsdl
点击附件即可,不要到其他地方下载。
2.把下好的两个插件包解压后放置myeclipse8.6安装目录下的dropins文件夹中。
笔者本机的实例目录: D:\Genuitec\MyEclipse-8.6\dropins
Axis2_Service_Archiver_1.3.0和 Axis2_Codegen_Wizard_1.3.0要直接放在
D:\Genuitec\MyEclipse-8.6\dropins目录下,不要把 axis2-eclipse-codegen-wizard和 axis2-eclipse-service-archiver-wizard目录放在 D:\Genuitec\MyEclipse-8.6\dropins下面。

[img][/img]
3.重启MyEclipse8.6后 File->New->Other

到此Axis2插件安装完毕。
用MyEclipse8.6建立Web Project工程,建完工程后要把axis2-1.5.4-bin.zip目录的lib目录下的所有jar文件加载到工程里。
并创建HelloServer.java文件:
package axis2.service.server;

public class HelloServer {

	public String sayHello(String name){
		return "Hello, " + name + "!";
	}
}


File->New->Other->Axis2 Wizards

选中Axis2 Code Generator

在Fully Qualified Class Name处填写服务端的Java类全路径。
单击Add Folder按钮,选择到工程的classes目录,然后单击Test Class Loading按钮,如果显示为Class file loaded successfully则成功了。

选择在工程里添加WSDL文件并在Output location处填写生成wsdl文件的路径,Output file name为wsdl文件的名字。

然后刷新工程的src目录,这时会看见在Output location目录下会出现wsdl文件。
右键单击工程名字 New-Other


 这个地方填写完Class name后面的
axis2.service.server.HelloServer后单击Load按钮可能会报找不到
axis2.service.server.HelloServer, 这个地方要等一下下, 等长一点儿时间再重新单击一次Load按钮就会好的。

单击Finish完成,好了,刷新一下项目,可以看到结构图如下:

可以看到在services目录下多了个sayhello_service.aar包。
编辑web.xml加入如下代码:
<servlet>
        <servlet-name>AxisServlet</servlet-name>
        <servlet-class>org.apache.axis2.transport.http.AxisServlet</servlet-class>
        <load-on-startup>1</load-on-startup>
</servlet>
<servlet-mapping>
        <servlet-name>AxisServlet</servlet-name>
        <url-pattern>/services/*</url-pattern>
</servlet-mapping>
用MyEclipse8.6把工程发布到Tomcat下面, 这里笔者用的是Tomcat7.0。
启动Tomcat7.0后访问工程:
http://localhost:8081/TestAxis2Ws/services/HelloService?wsdl
<?xml version="1.0" encoding="UTF-8" ?>
- <wsdl:definitions xmlns:wsdl="http://schemas.xmlsoap.org/wsdl/" xmlns:ns1="http://org.apache.axis2/xsd" xmlns:ns="http://server.service.axis2" xmlns:wsaw="http://www.w3.org/2006/05/addressing/wsdl" xmlns:http="http://schemas.xmlsoap.org/wsdl/http/" xmlns:xs="http://www.w3.org/2001/XMLSchema" xmlns:mime="http://schemas.xmlsoap.org/wsdl/mime/" xmlns:soap="http://schemas.xmlsoap.org/wsdl/soap/" xmlns:soap12="http://schemas.xmlsoap.org/wsdl/soap12/" targetNamespace="http://server.service.axis2">
  <wsdl:documentation>HelloService</wsdl:documentation>
- <wsdl:types>
- <xs:schema attributeFormDefault="qualified" elementFormDefault="qualified" targetNamespace="http://server.service.axis2">
- <xs:element name="sayHello">
- <xs:complexType>
- <xs:sequence>
  <xs:element minOccurs="0" name="name" nillable="true" type="xs:string" />
  </xs:sequence>
  </xs:complexType>
  </xs:element>
- <xs:element name="sayHelloResponse">
- <xs:complexType>
- <xs:sequence>
  <xs:element minOccurs="0" name="return" nillable="true" type="xs:string" />
  </xs:sequence>
  </xs:complexType>
  </xs:element>
  </xs:schema>
  </wsdl:types>
- <wsdl:message name="sayHelloRequest">
  <wsdl:part name="parameters" element="ns:sayHello" />
  </wsdl:message>
- <wsdl:message name="sayHelloResponse">
  <wsdl:part name="parameters" element="ns:sayHelloResponse" />
  </wsdl:message>
- <wsdl:portType name="HelloServicePortType">
- <wsdl:operation name="sayHello">
  <wsdl:input message="ns:sayHelloRequest" wsaw:Action="urn:sayHello" />
  <wsdl:output message="ns:sayHelloResponse" wsaw:Action="urn:sayHelloResponse" />
  </wsdl:operation>
  </wsdl:portType>
- <wsdl:binding name="HelloServiceSoap11Binding" type="ns:HelloServicePortType">
  <soap:binding transport="http://schemas.xmlsoap.org/soap/http" style="document" />
- <wsdl:operation name="sayHello">
  <soap:operation soapAction="urn:sayHello" style="document" />
- <wsdl:input>
  <soap:body use="literal" />
  </wsdl:input>
- <wsdl:output>
  <soap:body use="literal" />
  </wsdl:output>
  </wsdl:operation>
  </wsdl:binding>
- <wsdl:binding name="HelloServiceSoap12Binding" type="ns:HelloServicePortType">
  <soap12:binding transport="http://schemas.xmlsoap.org/soap/http" style="document" />
- <wsdl:operation name="sayHello">
  <soap12:operation soapAction="urn:sayHello" style="document" />
- <wsdl:input>
  <soap12:body use="literal" />
  </wsdl:input>
- <wsdl:output>
  <soap12:body use="literal" />
  </wsdl:output>
  </wsdl:operation>
  </wsdl:binding>
- <wsdl:binding name="HelloServiceHttpBinding" type="ns:HelloServicePortType">
  <http:binding verb="POST" />
- <wsdl:operation name="sayHello">
  <http:operation location="HelloService/sayHello" />
- <wsdl:input>
  <mime:content type="text/xml" part="sayHello" />
  </wsdl:input>
- <wsdl:output>
  <mime:content type="text/xml" part="sayHello" />
  </wsdl:output>
  </wsdl:operation>
  </wsdl:binding>
- <wsdl:service name="HelloService">
- <wsdl:port name="HelloServiceHttpSoap11Endpoint" binding="ns:HelloServiceSoap11Binding">
  <soap:address location="http://localhost:8081/TestAxis2Ws/services/HelloService.HelloServiceHttpSoap11Endpoint/" />
  </wsdl:port>
- <wsdl:port name="HelloServiceHttpSoap12Endpoint" binding="ns:HelloServiceSoap12Binding">
  <soap12:address location="http://localhost:8081/TestAxis2Ws/services/HelloService.HelloServiceHttpSoap12Endpoint/" />
  </wsdl:port>
- <wsdl:port name="HelloServiceHttpEndpoint" binding="ns:HelloServiceHttpBinding">
  <http:address location="http://localhost:8081/TestAxis2Ws/services/HelloService.HelloServiceHttpEndpoint/" />
  </wsdl:port>
  </wsdl:service>
  </wsdl:definitions>