二、开发集成。
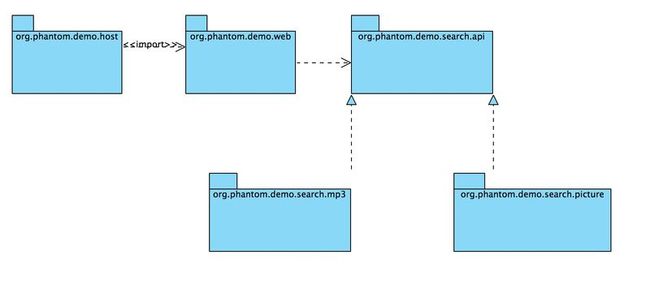
配置好Maven和Virgo后,我们动手写一个demo。demo的场景是页面有一个搜索框,输入搜索条件,显示出匹配项。为了体现OSGI的特性,我们搜索内容分为图片和MP3两个bundle,他们拥有共同的接口。bundle依赖关系如下:
host和web两个bundle是web包,其他的是应用包。
说到包的拆分,或者模块的拆分,我这里稍微卖弄一下,大神勿喷!看到我的包依赖结构,有人也许会问,OSGI不就是模块化吗?不应该是一个模块一个包吗? 假如我有user和role两个模块,那就应该有两个包啊。如果这么认为那就错了,我只能说你还没有理解OSGI提出的面向服务的架构体系。页面只是表现 层,页面-controller-service-dao,这是传统的分层,将应用按功能垂直的拆分。在OSGI领域中,提出另一个概念,就是模块化,模 块化要求bundle和bundle之间隔离,一个bundle是一个物理单元,通过服务交互。那这里的服务应该怎么体现呢?通过接口。接口怎么设计?什 么地方应该放扩展点?是在做OSGI应用设计的时候要考虑的。demo中,页面输入关键字来搜索,用户不知道能搜到什么结果,结果在服务端进行控制。服务 端如何控制结果?就是留下一个扩展点。现在能搜MP3和图片,过段时间,业务扩展后,能搜人和新闻.......所以,这就是为什么MP3和图片分成不同 的bundle进行开发的原因。OSGI的另外一个特性就是动态性,插件机制,即插即用,即删即无。在程序运行的时候,前一分钟只能搜MP3和图片,服务 端动态启动一个搜新闻的实现,后一分钟就能搜到新闻了。这就是OSGI的魔力所在。刚接触的时候会感觉很麻烦,感觉带来了复杂度。等你真正熟悉后,在合适 的项目中,发挥它的最大优势。
1.host
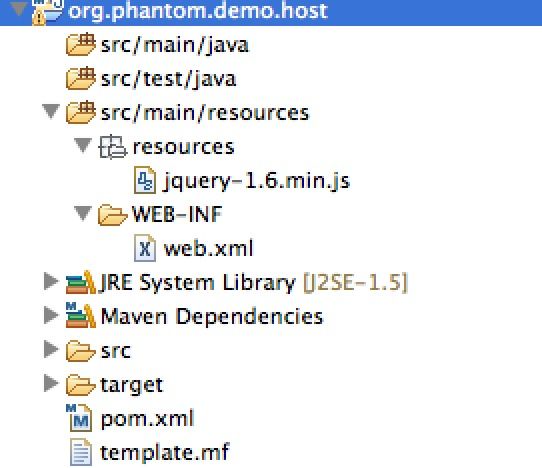
首先我们来开发host。在eclipse中创建Maven Project。Archetype选择为quickstart。host比较简单,没有java代码,最多我们放jQuery进去。一般做法是,全局的资源文件放在host中,供其他bundle调用。原则上,bundle之间是物理隔离的。
没有太多内容很简单,重点是pom中的打包规则和等下要介绍的bundlor插件.以及templat.mf文件的用处
在OSGI中,都是jar包,即使是web应用。所以将host工程打包成OSGI中的bundle,就需要在pom中需要定义打包规则:
	<build>
		<pluginManagement>
			<plugins>
				<plugin>
					<groupId>org.apache.maven.plugins</groupId>
					<artifactId>maven-compiler-plugin</artifactId>
					<version>2.3.2</version>
					<configuration>
						<source>1.6</source>
						<target>1.6</target>
					</configuration>
				</plugin>

				<plugin>
					<groupId>org.apache.maven.plugins</groupId>
					<artifactId>maven-resources-plugin</artifactId>
					<version>2.5</version>
					<executions>
						<execution>
							<id>copy-resources</id>
							<phase>prepare-package</phase>
							<goals>
								<goal>copy-resources</goal>
							</goals>
							<configuration>
								<overwrite>true</overwrite>
								<outputDirectory>${project.build.outputDirectory}/WEB-INF/classes</outputDirectory>
							<resources>
								<resource>
									<directory>${project.build.outputDirectory}</directory>
									<includes>
										<include>**/*.class</include>
									</includes>
								</resource>
							</resources>
						</configuration>
				</execution>
		</executions>
      </plugin>


				<plugin>
					<groupId>org.apache.maven.plugins</groupId>
					<artifactId>maven-surefire-plugin</artifactId>
					<version>2.9</version>
				</plugin>

			<plugin>
				<groupId>org.eclipse.virgo.bundlor</groupId>
				<artifactId>org.eclipse.virgo.bundlor.maven</artifactId>
				<version>1.1.1.RELEASE</version>
				<executions>
					<execution>
						<id>bundlor</id>
						<goals>
							<goal>bundlor</goal>
						</goals>
						<configuration>
						    <OSGiProfilePath>./virgo.profile</OSGiProfilePath>
						</configuration>
					</execution>
				</executions>
			</plugin>

			<plugin>
        		<groupId>org.apache.maven.plugins</groupId>
        		<artifactId>maven-source-plugin</artifactId>
        		<version>2.1.2</version>
        		<executions>
          			<execution>
            			<id>attach-sources</id>
            			<phase>verify</phase>
            			<goals>
              				<goal>jar-no-fork</goal>
            			</goals>
          			</execution>
        		</executions>
      		</plugin>

 			<plugin>
				<groupId>org.apache.maven.plugins</groupId>
				<artifactId>maven-jar-plugin</artifactId>
				<configuration>
					<includes>
						<include>WEB-INF/**/*</include>
						<include>META-INF/**/*</include>
						<include>resource*/**/*</include>
						<include>**/*.html</include>
						<include>**/*.js</include>
						<include>**/*.css</include>
						<include>**/*image*/**/*</include>
					</includes>
					<archive>
            			<manifestFile>${project.build.outputDirectory}/META-INF/MANIFEST.MF</manifestFile>
          			</archive>
				</configuration>
				<version>2.4</version>
			</plugin>
			</plugins>
		</pluginManagement>

  	<plugins>
  			<plugin>
				<groupId>org.apache.maven.plugins</groupId>
				<artifactId>maven-jar-plugin</artifactId>
			</plugin>
			<plugin>
				<groupId>org.eclipse.virgo.bundlor</groupId>
				<artifactId>org.eclipse.virgo.bundlor.maven</artifactId>
			</plugin>
			<plugin>
				<groupId>org.apache.maven.plugins</groupId>
				<artifactId>maven-compiler-plugin</artifactId>
			</plugin>
			<plugin>
				<groupId>org.apache.maven.plugins</groupId>
				<artifactId>maven-surefire-plugin</artifactId>
			</plugin>
			<plugin>
        		<groupId>org.apache.maven.plugins</groupId>
        		<artifactId>maven-source-plugin</artifactId>
      		</plugin>
			<plugin>
				<groupId>org.apache.maven.plugins</groupId>
				<artifactId>maven-resources-plugin</artifactId>
			</plugin>
  	</plugins>
	</build>
可以将这个规则做成一个maven父工程,其他用作web的bundle都可以继承这个parent。
然后来看一下template.mf:
Manifest-Version: 1.0
Bundle-ManifestVersion: 2
Bundle-Name: search demo
Bundle-SymbolicName: org.phantom.demo.host
Bundle-Version: 1.0.0.SNAPSHOT
Web-ContextPath: /demo
Import-Template: org.eclipse.virgo.*;version="[3.5.0,4)"
Excluded-Exports: resources.*
这里要说明的是Import-Template,Excluded-Exports,Excluded-Import这些东西。这些不是OSGI原生的东西,是Virgo特有的描述符。说到这里不得不介绍介绍一下org.eclipse.virgo.bundlor.maven这个插件。这个插件在打包时,会扫描所有java类、spring配置文件、web.xml的其他一些特定文件。然后结合template.mf文件,最终生成META- INF/MANIFEST.MF。假如你在java类中import了其他bundle的东西:import org.apache.ibatis.session.SqlSession;而你不用再去template.mf中手动维护Import- Package,bundlor会扫描到,在生成的时候,会在Import-Package中写入:Import-Package: org.apache.ibatis.session。另外还有个特性,bundlor会检查Import-Template,Excluded- Exports,Excluded-Import,根据描述项,对扫描到的依赖项进行填充。假设,你在template.mf中写到Import- Template: org.springframework.*;version="[3.5.0,4)",你在开发时中使用了spring的东西比如 DispatcherServlet,那么在最终生成的MANIFEST.MF中,就会有Import-Package: org.springframework.web.servlet;version=3.5.0。
最后看一下web.xml
<?xml version="1.0" encoding="UTF-8"?>
<web-app xmlns:xsi="http://www.w3.org/2001/XMLSchema-instance"
	xmlns="http://java.sun.com/xml/ns/javaee" xmlns:web="http://java.sun.com/xml/ns/javaee/web-app_2_5.xsd"
	xsi:schemaLocation="http://java.sun.com/xml/ns/javaee http://java.sun.com/xml/ns/javaee/web-app_2_5.xsd"
	version="2.5">

	<display-name>Search Host</display-name>

	<filter>
		<filter-name>host-filter</filter-name>
		<filter-class>org.eclipse.virgo.snaps.core.SnapHostFilter</filter-class>
	</filter>

	<filter-mapping>
		<filter-name>host-filter</filter-name>
		<url-pattern>/*</url-pattern>
		<dispatcher>INCLUDE</dispatcher>
		<dispatcher>FORWARD</dispatcher>
		<dispatcher>REQUEST</dispatcher>
	</filter-mapping>

	<filter>
		<filter-name>encodingFilter</filter-name>
		<filter-class>org.springframework.web.filter.CharacterEncodingFilter</filter-class>
		<init-param>
			<param-name>encoding</param-name>
			<param-value>UTF-8</param-value>
		</init-param>
	</filter>
	<filter-mapping>
		<filter-name>encodingFilter</filter-name>
		<url-pattern>/*</url-pattern>
	</filter-mapping>
</web-app>
这里需要介绍一下SnapHostFilter.这是Virgo对WAB(web application bundle)做的支持.我们在做OSGI-Web开始时,一般有很多模块.比如用户(user),角色(role).那么我们要请求用户或者角色下的资源时,我们的URL就是http://localhost:8080/demo/user/xxx.html或者http://localhost:8080/demo/role/xxx.html。这里的demo就上前面的配置“Web-ContextPath: /demo”,/demo是第一级路径,/user第二级路径是,即我们的"Snap-ContextPath: /search",这个后续的篇章会介绍./demo由web容器去分发,当tomcat接受到请求后,根据第一级路径决定分发到哪个应用。当进到某个应用后,SnapHostFilter会根据第二级路径决定分发到哪个bundle中。这就是SnapHostFilter的作用了。
2.api
OK,host已经完成,我们来开发api这个包.api中放两个接口,先来看一下结构.
SearchBean做为标识接口,没有任何代码.因为我们的接口不知道具体返回的MP3或者图片中包含什么属性.所以这里不定义任何属性.
SearchHandler只有简单的一个方法:
package org.phantom.demo.api;

import java.util.List;

public interface SearchHandler {
	List<? extends SearchBean> doSearch(String key);
}
然后来看应用类型的bundle应该如何打包.它也有自己的打包规则,而且跟web类的bundle不太一样,因为没有页面文件哪些东西。
	<build>
		<pluginManagement>
			<plugins>
				<plugin>
					<groupId>org.apache.maven.plugins</groupId>
					<artifactId>maven-compiler-plugin</artifactId>
					<version>2.3.2</version>
					<configuration>
						<source>1.6</source>
						<target>1.6</target>
					</configuration>
				</plugin>

				<plugin>
					<groupId>org.apache.maven.plugins</groupId>
					<artifactId>maven-surefire-plugin</artifactId>
					<version>2.9</version>
				</plugin>

			<plugin>
				<groupId>org.eclipse.virgo.bundlor</groupId>
				<artifactId>org.eclipse.virgo.bundlor.maven</artifactId>
				<version>1.1.1.RELEASE</version>
				<executions>
					<execution>
						<id>bundlor</id>
						<goals>
							<goal>bundlor</goal>
						</goals>
						<configuration>
						    <OSGiProfilePath>./virgo.profile</OSGiProfilePath>
						</configuration>
					</execution>
				</executions>
			</plugin>

			<plugin>
        		<groupId>org.apache.maven.plugins</groupId>
        		<artifactId>maven-source-plugin</artifactId>
        		<version>2.1.2</version>
        		<executions>
          			<execution>
            			<id>attach-sources</id>
            			<phase>verify</phase>
            			<goals>
              				<goal>jar-no-fork</goal>
            			</goals>
          			</execution>
        		</executions>
      		</plugin>

 			<plugin>
				<groupId>org.apache.maven.plugins</groupId>
				<artifactId>maven-jar-plugin</artifactId>
				<configuration>
					<archive>
            			<manifestFile>${project.build.outputDirectory}/META-INF/MANIFEST.MF</manifestFile>
          			</archive>
				</configuration>
				<version>2.4</version>
			</plugin>
			</plugins>
		</pluginManagement>

  	<plugins>
  			<plugin>
				<groupId>org.apache.maven.plugins</groupId>
				<artifactId>maven-jar-plugin</artifactId>
			</plugin>
			<plugin>
				<groupId>org.eclipse.virgo.bundlor</groupId>
				<artifactId>org.eclipse.virgo.bundlor.maven</artifactId>
			</plugin>
			<plugin>
				<groupId>org.apache.maven.plugins</groupId>
				<artifactId>maven-compiler-plugin</artifactId>
			</plugin>
			<plugin>
				<groupId>org.apache.maven.plugins</groupId>
				<artifactId>maven-surefire-plugin</artifactId>
			</plugin>
			<plugin>
        		<groupId>org.apache.maven.plugins</groupId>
        		<artifactId>maven-source-plugin</artifactId>
      		</plugin>
			<plugin>
				<groupId>org.apache.maven.plugins</groupId>
				<artifactId>maven-resources-plugin</artifactId>
			</plugin>
  	</plugins>
	</build>
相比较web-bundle的打包要简单一些。仍然可以做成一个parent项目,所有的应用类bundle去继承就OK了。