环境:Jdk版本1.6.0_03(如果你使用Jdk7也许会非常顺利,因此在这里有必要把jdk版本说明下)
CXF版本2.1
说明:版本不同,引入的jar包也相应的有所不同
cxf简单例子
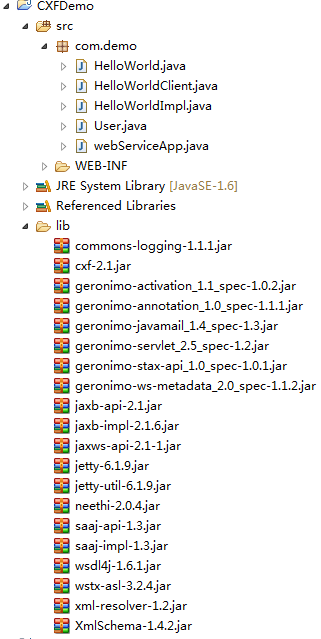
cxf java项目的目录结构以及jar包,如图
步骤:
1.接口HelloWorld.java
package com.demo;

import java.util.List;

import javax.jws.WebParam;
import javax.jws.WebService;


@WebService
public interface HelloWorld {
     String sayHi(@WebParam(name="text")String text);
     String sayHiToUser(User user);
     String[] SayHiToUserList(List<User> userList);
 }
2.实现HelloWorld接口,编写HelloWorldImpl.java
package com.demo;

import java.util.LinkedHashMap;
import java.util.List;
import java.util.Map;
import javax.jws.WebService;

@WebService(endpointInterface="com.demo.HelloWorld",serviceName="HelloWorld")
public class HelloWorldImpl implements HelloWorld {

           Map<Integer, User> users = new LinkedHashMap<Integer, User>();


           public String sayHi(String text) {
                       return "Hello " + text;
          }


          public String sayHiToUser(User user) {
                    users.put(users.size()+1, user);
                    return "Hello "+ user.getName();
          }

          public String[] SayHiToUserList(List<User> userList) {
                    String[] result = new String[userList.size()];
                    int i=0;
                    for(User u:userList){
                         result[i] = "Hello " + u.getName();
                         i++;
                    }
            return result;
          }
}
3.编写bean
package com.demo;

public class User {
	private String name;

	private String description;

	public String getName() {
		return name;
	}

	public void setName(String name) {
		this.name = name;
	}

	public String getDescription() {
		return description;
	}

	public void setDescription(String description) {
		this.description = description;
	}
}
4.编写服务端用于启动服务
package com.demo;
import javax.xml.ws.Endpoint;

public class webServiceApp {
           public static void main(String[] args) {

        	   System.out.println(System.getProperty("java.endorsed.dirs"));
                     System.out.println("web service start");
                     HelloWorldImpl implementor= new HelloWorldImpl();
                     String address="http://localhost:9000/helloWorld";
                     Endpoint.publish(address, implementor);
                     System.out.println("web service started");


            }
}
5.编写客户端用于测试
package com.demo;

import org.apache.cxf.jaxws.JaxWsProxyFactoryBean;
public class HelloWorldClient {
         public static void main(String[] args) {
                   JaxWsProxyFactoryBean svr = new JaxWsProxyFactoryBean();
                   svr.setServiceClass(HelloWorld.class);
                   svr.setAddress("http://localhost:9000/helloWorld");
                   HelloWorld hw = (HelloWorld) svr.create();//创建一个代理类

                   User user = new User();
                   user.setName("Tony");
                   user.setDescription("test");

                   System.out.println(hw.sayHiToUser(user));

         }
}
problem:在第4步启动服务是会报如下错误
Exception in thread "main" java.lang.LinkageError: JAXB 2.0 API is being loaded from the bootstrap classloader,
but this RI (from jar:file:/D:/eclipse4.4/workspace/CXFDemo/lib/jaxb-impl-2.1.6.jar!/com/sun/xml/bind/v2/model/impl/ModelBuilder.class)
needs 2.1 API. Use the endorsed directory mechanism to place jaxb-api.jar in the bootstrap classloader.(See http://java.sun.com/j2se/1.5.0/docs/guide/standards/)
翻译:Exception in thread "main" java.lang.LinkageError: 正在从引导类加载器加载 JAXB 2.1 API, 但此 RI (来自jar:file:/E:/jinwork/cxf/WebContent/WEB-INF/lib/jaxb-impl-2.2.6.jar! /com/sun/xml/bind/v2/model/impl/ModelBuilder.class) 需要 2.2 API。请使用授权目录机制将 jaxb-api.jar 放在引导类加载器中。(请参阅 http://java.sun.com/j2se/1.6.0/docs/guide/standards/)
解决办法:
1.首先获取到endorsed目录。
public class MainClass {
public static void main(String[] args) {
// TODO Auto-generated method stub
System.out.println(System.getProperty("java.endorsed.dirs"));
}
}
输出:D:\software\jdk1.6\jre\lib\endorsed
2.找到相应位置,将apache-cxf-2.1\lib下的jaxb-api-2.1.jar文件放到D:\software\jdk1.6\jre\lib\endorsed目录下即可。如果没有endorsed目录,则手动建立该目录。
