spring-security3 进级篇I
在上一篇入门中,简单介绍了spring security3的用法,但现实中,登录页面都是用户自己定义的,而不是spring security3生产的,这个时候,我们可以自定义用户登录页面。通过分析spring security3生成的登录页面,我们可以看到,它是一个表单,表单的action,userName 和 password的name分别为 j_spring_security_check, j_username,j_password。
(1)针对这个情况,我们自定义登录页面login.jsp,内容如下:
<%@ page language="java" contentType="text/html; charset=UTF-8"
    pageEncoding="UTF-8"%>
<!DOCTYPE html PUBLIC "-//W3C//DTD HTML 4.01 Transitional//EN" "http://www.w3.org/TR/html4/loose.dtd">
<html>
<head>
<meta http-equiv="Content-Type" content="text/html; charset=UTF-8">
<title>login interface</title>
</head>
<body>
	<h3>user login</h3>
	${sessionScope.SPRING_SECURITY_LAST_EXCEPTION.message}
	<form action="${pageContext.request.contextPath}/j_spring_security_check" method="post">
		userName:<input type="text" name="j_username"/><br/>
		password:<input type="password" name="j_password"/><br/>
		<input type="submit" value="登录">
	</form>
</body>
</html>
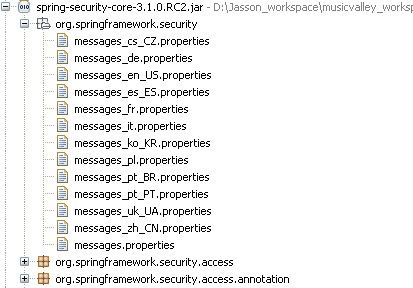
其中,${sessionScope.SPRING_SECURITY_LAST_EXCEPTION.message}为spring security框架自带的信息,通过配置国际化文件,实现信息的提示,展开spring security core 可以看到国际化的文件,用户可以修改其内容满足自己项目的需要,也可自定义自己的国际化文件,将spring security core 中的key-value中的value进行修改,如果采用spring自带的国际化文件,请在配置文件中写入如下的配置信息:
<?xml version="1.0" encoding="UTF-8"?>
<beans xmlns="http://www.springframework.org/schema/beans"
	xmlns:xsi="http://www.w3.org/2001/XMLSchema-instance" xmlns:aop="http://www.springframework.org/schema/aop"
	xmlns:tx="http://www.springframework.org/schema/tx" xmlns:context="http://www.springframework.org/schema/context"
	xmlns:jee="http://www.springframework.org/schema/jee"
	xsi:schemaLocation="
    http://www.springframework.org/schema/context http://www.springframework.org/schema/context/spring-context.xsd
    http://www.springframework.org/schema/beans http://www.springframework.org/schema/beans/spring-beans.xsd
    http://www.springframework.org/schema/tx http://www.springframework.org/schema/tx/spring-tx.xsd
    http://www.springframework.org/schema/aop http://www.springframework.org/schema/aop/spring-aop.xsd
    http://www.springframework.org/schema/jee http://www.springframework.org/schema/jee/spring-jee.xsd">

	<!--****************************************************************************************-->
	<!--**********************国际化支持信息配置*************************************************-->
	<!--****************************************************************************************-->
	<!-- 国际化支持 -->
	<!-- Bean id 必须是“messageSource”,因为Spring 在装配系统Bean 时会根据这个名字进行查找-->
 	<bean id="messageSource" class="org.springframework.context.support.ResourceBundleMessageSource">
       <property name="basename" value="org.springframework.security.messages"/>
     </bean>
</beans>
(2)修改spring-security配置文件满足自定义方式
<?xml version="1.0" encoding="UTF-8"?>
<beans xmlns="http://www.springframework.org/schema/beans"
  xmlns:security="http://www.springframework.org/schema/security"
  xmlns:xsi="http://www.w3.org/2001/XMLSchema-instance"
  xsi:schemaLocation="http://www.springframework.org/schema/beans
          http://www.springframework.org/schema/beans/spring-beans-3.0.xsd
          http://www.springframework.org/schema/security
          http://www.springframework.org/schema/security/spring-security-3.1.xsd">

    <!--对登录页面不进行拦截,在页面后面加*表示,该页面后面可能会带一些参数-->
	<security:http pattern="/login.jsp*" security="none"/>

	<!-- 保护应用程序的所有URL,只有拥有ROLE_USER才可以访问 -->
	<security:http auto-config="true">
		<!-- login-page: 指定登录页面-->
		<security:form-login login-page="/login.jsp"/>
		<security:intercept-url pattern="/**" access="ROLE_USER" />
	</security:http>

	<!--配置认证管理器,只有用户名为user,密码为opal的用户,角色为ROLE_USER可访问指定的资源 -->
	<security:authentication-manager>
		<security:authentication-provider>
				<security:user-service>
				<security:user name="user"  password="opal" authorities="ROLE_USER"/>
			</security:user-service>
		</security:authentication-provider>
	</security:authentication-manager>
</beans>
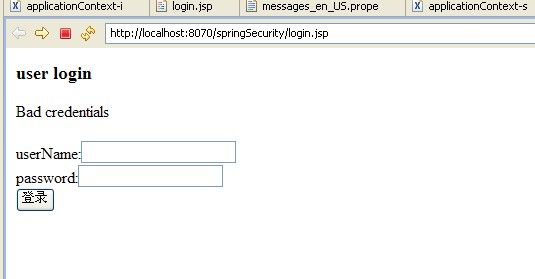
(3)运行该程序,系统自动跳到用户自定义的界面,输错代码,点击登录,错误信息提示如下:

(4)用户可以对密码进行加密,例如采用MD5的方式,假设用户密码为opal,其加密后为
22b5c9accc6e1ba628cedc63a72d57f8
此时,配置文件中的配置修改如下:
<?xml version="1.0" encoding="UTF-8"?>
<beans xmlns="http://www.springframework.org/schema/beans"
  xmlns:security="http://www.springframework.org/schema/security"
  xmlns:xsi="http://www.w3.org/2001/XMLSchema-instance"
  xsi:schemaLocation="http://www.springframework.org/schema/beans
          http://www.springframework.org/schema/beans/spring-beans-3.0.xsd
          http://www.springframework.org/schema/security
          http://www.springframework.org/schema/security/spring-security-3.1.xsd">

    <!--对登录页面不进行拦截,在页面后面加*表示,该页面后面可能会带一些参数-->
	<security:http pattern="/login.jsp*" security="none"/>

	<!-- 保护应用程序的所有URL,只有拥有ROLE_USER才可以访问 -->
	<security:http auto-config="true">
		<!-- login-page: 指定登录页面-->
		<security:form-login login-page="/login.jsp"/>
		<security:intercept-url pattern="/**" access="ROLE_USER" />
	</security:http>

	<!--配置认证管理器,只有用户名为user,密码为opal的用户,角色为ROLE_USER可访问指定的资源 -->
	<security:authentication-manager>
		<security:authentication-provider>
			<security:password-encoder hash="md5"/>
			<security:user-service>
				<security:user name="user"  password="22b5c9accc6e1ba628cedc63a72d57f8" authorities="ROLE_USER"/>
			</security:user-service>
		</security:authentication-provider>
	</security:authentication-manager>
</beans>
