【JAVA培训】Spring Security3简单使用(权限配置在数据库中)
1、权限配置在数据库中,典型的五张表。
1)t_user 用户表
2)t_role 角色表
3)t_user_role 用户-角色关联表
4)t_resource 资源表
5)t_role_resource 角色-资源关联表
2、建表语句
DROP TABLE IF EXISTS `t_resource`;
CREATE TABLE `t_resource` (
`id` int(11) NOT NULL AUTO_INCREMENT ,
`name` varchar(32) CHARACTER SET utf8 COLLATE utf8_general_ci NULL DEFAULT NULL ,
`url` varchar(200) CHARACTER SET utf8 COLLATE utf8_general_ci NULL DEFAULT NULL ,
PRIMARY KEY (`id`)
)
DROP TABLE IF EXISTS `t_role`;
CREATE TABLE `t_role` (
`id` int(11) NOT NULL AUTO_INCREMENT ,
`name` varchar(32) CHARACTER SET utf8 COLLATE utf8_general_ci NULL DEFAULT NULL ,
PRIMARY KEY (`id`)
)
DROP TABLE IF EXISTS `t_role_resource`;
CREATE TABLE `t_role_resource` (
`id` int(11) NOT NULL AUTO_INCREMENT ,
`role_id` int(11) NULL DEFAULT NULL ,
`resource_id` int(11) NULL DEFAULT NULL ,
PRIMARY KEY (`id`)
)
CREATE TABLE `t_user` (
`id` int(11) NOT NULL AUTO_INCREMENT ,
`account` varchar(20) CHARACTER SET utf8 COLLATE utf8_general_ci NULL DEFAULT NULL ,
`password` varchar(256) CHARACTER SET utf8 COLLATE utf8_general_ci NULL DEFAULT NULL ,
PRIMARY KEY (`id`)
)
DROP TABLE IF EXISTS `t_user_role`;
CREATE TABLE `t_user_role` (
`id` int(11) NOT NULL AUTO_INCREMENT ,
`user_id` int(11) NULL DEFAULT NULL ,
`role_id` int(11) NULL DEFAULT NULL ,
PRIMARY KEY (`id`)
)
3、对应的领域实体
1)用户
package cn.luxh.app.domain;
/**
* 用户
* @author Luxh
*/
public class User {
private Integer id;
/**帐号*/
private String account;
/**密**/
private String password;
@Override
public int hashCode() {
return account.hashCode();
}
@Override
public boolean equals(Object obj) {
User user = (User) obj;
return this.account.equals(user.getAccount());
}
//getter setter
//... }
2)角色
package cn.luxh.app.domain;
/**
* 角色
* @author Luxh
*/
public class Role {
private Integer id;
/**角色名称*/
private String name;
//getter setter
//...
}
3)用户-角色
package cn.luxh.app.domain;
/**
* 用户角色
* @author Luxh
*/
public class UserRole {
private Integer id;
/**用户id*/
private Integer userId;
/**角色id*/
private Integer roleId;
//getter setter
//...
}
4)资源
package cn.luxh.app.domain;
/**
* 资源
* @author Luxh
*/
public class Resource {
private Integer id;
/**资源名称*/
private String name;
/**访问地址*/
private String url;
//getter setter
}
5)角色-资源
package cn.luxh.app.domain;
/**
* 角色资源
* @author Luxh
*/
public class RoleResource {
private Integer id;
/**角色id*/
private Integer roleId;
/**资源id*/
private Integer resourceId;
//getter setter
}
4、配置文件
在web.xml文件中加上如下内容:
<!-- SpringSecurity权限框架 -->
<filter>
<filter-name>springSecurityFilterChain</filter-name>
<filter-class>
org.springframework.web.filter.DelegatingFilterProxy
</filter-class>
</filter>
<filter-mapping>
<filter-name>springSecurityFilterChain</filter-name>
<url-pattern>/*</url-pattern>
</filter-mapping>
<!-- 获取Spring Security session的生命周期-->
<listener>
<listener-class>
org.springframework.security.web.session.HttpSessionEventPublisher
</listener-class>
</listener>
当然配置spring监*器的时候得把springsecurity的权限配置文件给加载进去:
<!-- 配置Spring监*器 -->
<listener>
<listener-class>
org.springframework.web.context.ContextLoaderListener
</listener-class>
</listener>
<context-param>
<param-name>contextConfigLocation</param-name>
<param-value>classpath:applicationContext.xml,classpath:application-security.xml</param-value>
</context-param>
权限配置文件内容如下:
<?xml version="1.0" encoding="UTF-8"?>
<beans:beans xmlns="http://www.springframework.org/schema/security"
xmlns:beans="http://www.springframework.org/schema/beans"
xmlns:xsi="http://www.w3.org/2001/XMLSchema-instance"
xsi:schemaLocation="http://www.springframework.org/schema/beans
http://www.springframework.org/schema/beans/spring-beans-3.2.xsd
http://www.springframework.org/schema/security
http://www.springframework.org/schema/security/spring-security-3.1.xsd">
<http pattern="/login" security="none" />
<http pattern="/resources/**" security="none" />
<http auto-config="true" use-expressions="true" access-denied-page="/denied">
<!-- default-target-url 指定了从登录页面登录后进行跳转的页面 always-use-default-target true表示登录成功后强制跳转
authentication-failure-url 表示验证失败后进入的页面 login-processing-url 设置验证登录验证地址,如果不设置,默认是j_spring_security_check
username-parameter,password-parameter 设置登录用户名和密*的请求name,默认:j_username,j_password
default-target-url="/user/home" -->
<form-login login-page="/login"
always-use-default-target="true"
authentication-failure-url="/login?error=1"
authentication-success-handler-ref="successHandler" />
<logout logout-success-url="/login" />
<!-- error-if-maximum-exceeded 后登陆的账号会挤掉第一次登陆的账号
session-fixation-protection
防止伪造sessionid攻击. 用户登录成功后会销毁用户当前的session.
创建新的session,并把用户信息复制到新session中. -->
<session-management invalid-session-url="/login?error=3"
session-fixation-protection="none">
<concurrency-control max-sessions="1"
error-if-maximum-exceeded="true" expired-url="/login?error=2" /><!-- 阻止第二次登录 -->
</session-management>
<custom-filter ref="appInterceptor" before="FILTER_SECURITY_INTERCEPTOR"/>
</http>
<authentication-manager alias="appAuthenticationManager">
<authentication-provider user-service-ref="userDetailsService">
</authentication-provider>
</authentication-manager>
<beans:bean id="appInterceptor" class="cn.luxh.app.security.AppSecurityInterceptor">
<beans:property name="authenticationManager" ref="appAuthenticationManager"/>
<beans:property name="accessDecisionManager" ref="appAccessDescisionManager"/>
<beans:property name="securityMetadataSource" ref="appSecurityMetadataSource"/>
</beans:bean>
<beans:bean id="userDetailsService" class="cn.luxh.app.security.UserDetailsServiceImpl" />
<beans:bean id="appSecurityMetadataSource" class="cn.luxh.app.security.AppSecurityMetadataSource">
<beans:constructor-arg name="roleService" ref="roleService"></beans:constructor-arg>
<beans:constructor-arg name="resourceService" ref="resourceService"></beans:constructor-arg>
</beans:bean>
<beans:bean id="appAccessDescisionManager" class="cn.luxh.app.security.AppAccessDescisionManager"/>
<beans:bean id="roleService" class="cn.luxh.app.service.RoleServiceImpl"/>
<beans:bean id="resourceService" class="cn.luxh.app.service.ResourceServiceImpl"/>
<!-- 登录成功业务处理 -->
<beans:bean id="successHandler"
class="cn.luxh.app.security.LoginAuthenticationSuccessHandler">
<beans:property name="url" value="/index"></beans:property>
</beans:bean>
</beans:beans>
5、权限配置文件中的关键类
1)UserDetailsServiceImpl
package cn.luxh.app.security;
import java.util.Collection;
import java.util.HashSet;
import java.util.List;
import java.util.Set;
import org.slf4j.Logger;
import org.slf4j.LoggerFactory;
import org.springframework.beans.factory.annotation.Autowired;
import org.springframework.security.core.GrantedAuthority;
import org.springframework.security.core.authority.SimpleGrantedAuthority;
import org.springframework.security.core.userdetails.UserDetails;
import org.springframework.security.core.userdetails.UserDetailsService;
import org.springframework.security.core.userdetails.UsernameNotFoundException;
import cn.luxh.app.domain.Role;
import cn.luxh.app.domain.User;
import cn.luxh.app.exception.UserException;
import cn.luxh.app.persistence.RoleMapper;
import cn.luxh.app.persistence.UserMapper;
public class UserDetailsServiceImpl implements UserDetailsService{
private static Logger log = LoggerFactory.getLogger(UserDetailsServiceImpl.class);
@Autowired
private UserMapper userMapper;
@Autowired
private RoleMapper roleMapper;
/**
* @param account 登录帐号
*/
public UserDetails loadUserByUsername(String account)
throws UsernameNotFoundException {
log.info("登录账号:"+account);
org.springframework.security.core.userdetails.User userDetails = null;
try {
User user = userMapper.selectByAccount(account);
if(user == null) {
throw new UserException("帐号:"+account+" 不存在!");
}
Collection<GrantedAuthority> grantedAuthorities = getGrantedAuthorities(user);
boolean enables = true;
boolean accountNonExpired = true;
boolean credentialsNonExpired = true;
boolean accountNonLocked = true;
userDetails = new org.springframework.security.core.userdetails.User(user.getAccount(), user.getPassword(), enables, accountNonExpired, credentialsNonExpired, accountNonLocked, grantedAuthorities);
}catch(Exception e) {
log.error(e.getMessage());
e.printStackTrace();
}
return userDetails;
}
/**
* 根据用户获取该用户拥有的角色
* @param user
* @return
*/
private Set<GrantedAuthority> getGrantedAuthorities(User user) {
Set<GrantedAuthority> grantedAuthorities = new HashSet<GrantedAuthority>();
List<Role> roles = roleMapper.selectByUserId(user.getId());
if(roles != null) {
for(Role role : roles) {
grantedAuthorities.add(new SimpleGrantedAuthority(role.getName()));
}
}
return grantedAuthorities;
}
}
2)AppSecurityInterceptor
View Code
3)AppAccessDescisionManager
View Code
4)AppSecurityMetadataSource
View Code
5)LoginAuthenticationSuccessHandler
View Code
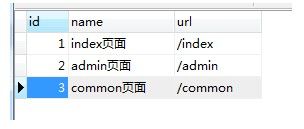
6、其中资源表内容如下
7、源*,含数据库文件和初始化值
http://files.cnblogs.com/luxh/app4.rar
8、在页面上的控制权限
1)引入标签: <%@ taglib prefix="sec" uri="http://www.springframework.org/security/tags" %>
2)使用标签:如下,审核*作时具有"ROLE_ADM"权限才可以看到。
<sec:authorize ifAnyGranted="ROLE_ADM">
<li><a href="javascript:auditPage('${ctx}/task/auditPage?taskId=${task.taskId}')">审核</a></li>
</sec:authorize>
转自:http://www.nbtarena.com/Html/soft/201305/2098.html