Apache POI组件操作Excel,制作报表(二)
现在来看看Excel的基本设置问题,以2007为例,先从工作簿来说,设置列宽,因为生成表格列应该固定,而行是遍历生成的,所以可以在工作簿级别来设置列宽,那么可以如下来进行。
首先是创建工作簿和工作表了:
- // 创建Excel2007工作簿对象
- XSSFWorkbook workbook2007 = new XSSFWorkbook();
- // 创建工作表对象并命名
- XSSFSheet sheet = workbook2007.createSheet("学生信息统计表" );
- 之后是设置格式:
- // 设置行列的默认宽度和高度
- sheet.setColumnWidth(0 , 32 * 80 ); // 对A列设置宽度为80像素
- sheet.setColumnWidth(1 , 32 * 80 );
- sheet.setColumnWidth(2 , 32 * 80 );
- sheet.setColumnWidth(3 , 32 * 80 );
- sheet.setColumnWidth(4 , 32 * 80 );
		// 创建Excel2007工作簿对象
		XSSFWorkbook workbook2007 = new XSSFWorkbook();
		// 创建工作表对象并命名
		XSSFSheet sheet = workbook2007.createSheet("学生信息统计表");
之后是设置格式:
		// 设置行列的默认宽度和高度
		sheet.setColumnWidth(0, 32 * 80);// 对A列设置宽度为80像素
		sheet.setColumnWidth(1, 32 * 80);
		sheet.setColumnWidth(2, 32 * 80);
		sheet.setColumnWidth(3, 32 * 80);
		sheet.setColumnWidth(4, 32 * 80);
在这之前要先创建一个工作表sheet,然后就可以对每列设置列宽了。而行高一般针对不同的行有不同的设置,比如表头行,合计行,数据行等,那么分别设置 会比较好。设置完列宽和行高,剩下就是对单元格的设置,比如居中,边框,字体等。设置好样式后将样式应用于所需要的单元格,就得到了整体的效果,比如:
- // 创建样式
- XSSFFont font = workbook2007.createFont();
- XSSFCellStyle headerStyle = workbook2007.createCellStyle();
- // 设置垂直居中
- headerStyle.setAlignment(HorizontalAlignment.CENTER);
- headerStyle.setVerticalAlignment(VerticalAlignment.CENTER);
- // 设置边框
- headerStyle.setBorderTop(BorderStyle.THIN);
- headerStyle.setBorderBottom(BorderStyle.THIN);
- headerStyle.setBorderLeft(BorderStyle.THIN);
- headerStyle.setBorderRight(BorderStyle.THIN);
- // 字体加粗
- font.setBold(true );
- // 设置长文本自动换行
- headerStyle.setWrapText(true );
- headerStyle.setFont(font);
// 创建样式
		XSSFFont font = workbook2007.createFont();
		XSSFCellStyle headerStyle = workbook2007.createCellStyle();
		// 设置垂直居中
		headerStyle.setAlignment(HorizontalAlignment.CENTER);
		headerStyle.setVerticalAlignment(VerticalAlignment.CENTER);
		// 设置边框
		headerStyle.setBorderTop(BorderStyle.THIN);
		headerStyle.setBorderBottom(BorderStyle.THIN);
		headerStyle.setBorderLeft(BorderStyle.THIN);
		headerStyle.setBorderRight(BorderStyle.THIN);
		// 字体加粗
		font.setBold(true);
		// 设置长文本自动换行
		headerStyle.setWrapText(true);
		headerStyle.setFont(font);
这里我们定义的是表头的样式,其中垂直居中时的设置要设置两次,而且方法名不同,要注意。边框就很简单了,上下左右设置四次,字体加粗就是布尔值设定了,之后是文本自动换行,意思就是在固定单元格长度不变时是否自动折行。然后将字体样式加入到单元格样式中即可。
下面针对之前的例子设计表头,如下:
- // 创建表头
- XSSFRow headerRow = sheet.createRow(0 );
- headerRow.setHeightInPoints(25f);// 设置行高度
- XSSFCell nameHeader = headerRow.createCell(0 );
- nameHeader.setCellValue("姓名" );
- nameHeader.setCellStyle(headerStyle);
- XSSFCell genderHeader = headerRow.createCell(1 );
- genderHeader.setCellValue("性别" );
- genderHeader.setCellStyle(headerStyle);
- XSSFCell ageHeader = headerRow.createCell(2 );
- ageHeader.setCellValue("年龄" );
- ageHeader.setCellStyle(headerStyle);
- XSSFCell classHeader = headerRow.createCell(3 );
- classHeader.setCellValue("班级" );
- classHeader.setCellStyle(headerStyle);
- XSSFCell scoreHeader = headerRow.createCell(4 );
- scoreHeader.setCellValue("成绩" );
- scoreHeader.setCellStyle(headerStyle);
// 创建表头
		XSSFRow headerRow = sheet.createRow(0);
		headerRow.setHeightInPoints(25f);// 设置行高度
		XSSFCell nameHeader = headerRow.createCell(0);
		nameHeader.setCellValue("姓名");
		nameHeader.setCellStyle(headerStyle);
		XSSFCell genderHeader = headerRow.createCell(1);
		genderHeader.setCellValue("性别");
		genderHeader.setCellStyle(headerStyle);
		XSSFCell ageHeader = headerRow.createCell(2);
		ageHeader.setCellValue("年龄");
		ageHeader.setCellStyle(headerStyle);
		XSSFCell classHeader = headerRow.createCell(3);
		classHeader.setCellValue("班级");
		classHeader.setCellStyle(headerStyle);
		XSSFCell scoreHeader = headerRow.createCell(4);
		scoreHeader.setCellValue("成绩");
		scoreHeader.setCellStyle(headerStyle);
这里的代码会有大段的重复,因为都是一个套路下来的,最后别忘加入样式就行了,这样表格头部就做好了。剩下的是遍历数据出行。
- for ( int i = 0 ; i < studentList.size(); i++) {
- XSSFRow row = sheet.createRow(i + 1 );
- row.setHeightInPoints(20f);
- Student student = studentList.get(i);
- XSSFCell nameCell = row.createCell(0 );
- nameCell.setCellValue(student.getName());
- nameCell.setCellStyle(cellStyle);
- XSSFCell genderCell = row.createCell(1 );
- genderCell.setCellValue(student.getGender());
- genderCell.setCellStyle(cellStyle);
- XSSFCell ageCell = row.createCell(2 );
- ageCell.setCellValue(student.getAge());
- ageCell.setCellStyle(cellStyle);
- XSSFCell classCell = row.createCell(3 );
- classCell.setCellValue(student.getSclass());
- classCell.setCellStyle(cellStyle);
- XSSFCell scoreCell = row.createCell(4 );
- scoreCell.setCellValue(student.getScore());
- scoreCell.setCellStyle(cellStyle);
- }
for (int i = 0; i < studentList.size(); i++) {
			XSSFRow row = sheet.createRow(i + 1);
			row.setHeightInPoints(20f);
			Student student = studentList.get(i);
			XSSFCell nameCell = row.createCell(0);
			nameCell.setCellValue(student.getName());
			nameCell.setCellStyle(cellStyle);
			XSSFCell genderCell = row.createCell(1);
			genderCell.setCellValue(student.getGender());
			genderCell.setCellStyle(cellStyle);
			XSSFCell ageCell = row.createCell(2);
			ageCell.setCellValue(student.getAge());
			ageCell.setCellStyle(cellStyle);
			XSSFCell classCell = row.createCell(3);
			classCell.setCellValue(student.getSclass());
			classCell.setCellStyle(cellStyle);
			XSSFCell scoreCell = row.createCell(4);
			scoreCell.setCellValue(student.getScore());
			scoreCell.setCellStyle(cellStyle);
		}
用for循环就可以完成任务,需要注意的是循环变量仍然从0开始走,这是为了遍历集合的方便,而创建行就是从i+1开始走了,因为0行是表头,已经占用了。下面就是先设定行高,之后开始取值,赋值,设定格式,结构也很统一。
完成遍历后,来看看合并,Excel中的合并单元格也是很常用的操作,比如本例中,将班级都设置成一班后,那么就想让班级这列合并,该如何操作呢?
- // 合并班级
- sheet.addMergedRegion(new CellRangeAddress( 1 , 4 , 3 , 3 ));
		// 合并班级
		sheet.addMergedRegion(new CellRangeAddress(1, 4, 3, 3));
这是对sheet级别的操作,因为是在sheet上合并单元格,就是加一个合并的区域,这个区域接收四个参数,就是开始的行,结束的行,开始的列,结束的 列,这个位置一般比较确定,或者用循环变量计算得出。班级,从第二行开始,第五行结束,对应索引是1,4,而列不变,就是在列上合并,就都是3即可。
至此我们已经将数据遍历得出生成了Excel表格,设置了单元格样式也进行了合并,那么还有合计没有说,用合计可以直接设置公式,也可以程序计算好后直接 填充,后者一般用于比较复杂的报表,就不用在POI中设置合并的位置,减少复杂度。结合本例,我们来计算平均年龄和成绩之和。如下:
- // 数据分析行
- int dadaRowNum = sheet.getLastRowNum();
- XSSFRow totalRow = sheet.createRow(dadaRowNum + 1 ); // 获取已有的行数,加1再出新行
- totalRow.setHeightInPoints(25f);
- XSSFCell analyticsCell = totalRow.createCell(0 );
- analyticsCell.setCellValue("数据分析" );
- analyticsCell.setCellStyle(headerStyle);
- XSSFCell avgAgeCell = totalRow.createCell(1 );
- avgAgeCell.setCellValue("平均年龄" );
- avgAgeCell.setCellStyle(headerStyle);
- XSSFCell avgAgeValueCell = totalRow.createCell(2 );
- avgAgeValueCell.setCellStyle(headerStyle);
- avgAgeValueCell.setCellFormula("AVERAGE(C2:C" + (dadaRowNum + 1 ) + ")" );
- XSSFCell sumScoreCell = totalRow.createCell(3 );
- sumScoreCell.setCellValue("总成绩" );
- sumScoreCell.setCellStyle(headerStyle);
- XSSFCell sumScoreValueCell = totalRow.createCell(4 );
- sumScoreValueCell.setCellStyle(headerStyle);
- sumScoreValueCell.setCellFormula("SUM(E2:E" + (dadaRowNum + 1 ) + ")" );
// 数据分析行
		int dadaRowNum = sheet.getLastRowNum();
		XSSFRow totalRow = sheet.createRow(dadaRowNum + 1);// 获取已有的行数,加1再出新行
		totalRow.setHeightInPoints(25f);
		XSSFCell analyticsCell = totalRow.createCell(0);
		analyticsCell.setCellValue("数据分析");
		analyticsCell.setCellStyle(headerStyle);
		XSSFCell avgAgeCell = totalRow.createCell(1);
		avgAgeCell.setCellValue("平均年龄");
		avgAgeCell.setCellStyle(headerStyle);
		XSSFCell avgAgeValueCell = totalRow.createCell(2);
		avgAgeValueCell.setCellStyle(headerStyle);
		avgAgeValueCell.setCellFormula("AVERAGE(C2:C" + (dadaRowNum + 1) + ")");
		XSSFCell sumScoreCell = totalRow.createCell(3);
		sumScoreCell.setCellValue("总成绩");
		sumScoreCell.setCellStyle(headerStyle);
		XSSFCell sumScoreValueCell = totalRow.createCell(4);
		sumScoreValueCell.setCellStyle(headerStyle);
		sumScoreValueCell.setCellFormula("SUM(E2:E" + (dadaRowNum + 1) + ")");
这里使用Excel函数的时候我们已经知道数据所在的位置,就直接使用了单元格的代号进行运算了,要注意使用公式时的方法中不用写=号,POI会自动为我 们添加进去,这里就直接写公式的内容即可。在实际中可能会有动态计算的任务,那么就根据业务复杂度来选择是用Excel公式进行运算还是程序运算好后直接 赋值显示。
最后是生成文件的步骤,这已经介绍过了,都很简单:
- // 生成文件
- File file = new File(filePath);
- OutputStream os = null ;
- try {
- os = new FileOutputStream(file);
- workbook2007.write(os);
- } catch (IOException e) {
- e.printStackTrace();
- } finally {
- if (os != null ) {
- try {
- os.close();
- } catch (IOException e) {
- }
- }
- }
				// 生成文件
		File file = new File(filePath);
		OutputStream os = null;
		try {
			os = new FileOutputStream(file);
			workbook2007.write(os);
		} catch (IOException e) {
			e.printStackTrace();
		} finally {
			if (os != null) {
				try {
					os.close();
				} catch (IOException e) {
				}
			}
		}
最后是执行测试了,写个主函数来运行:
- public static void main(String[] args) {
- long start = System.currentTimeMillis();
- generateExcel2007(xlsx2007);
- long end = System.currentTimeMillis();
- System.out.println((end - start) + " ms done!" );
- }
public static void main(String[] args) {
		long start = System.currentTimeMillis();
		generateExcel2007(xlsx2007);
		long end = System.currentTimeMillis();
		System.out.println((end - start) + " ms done!");
	}
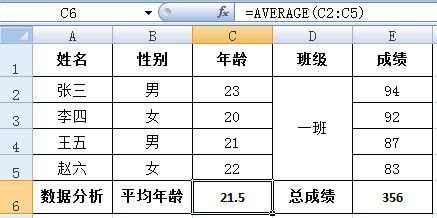
将以上所有内容封装在静态方法generateExcel2007(String filePath)中,执行即可得到生成的Excel报表了,我们得到了这样的一个报表: 
这就是最终得到的结果了。POI操作Excel的基本设置就基本涵盖了,剩下的就是灵活运用,生成符合自己需求的报表了。
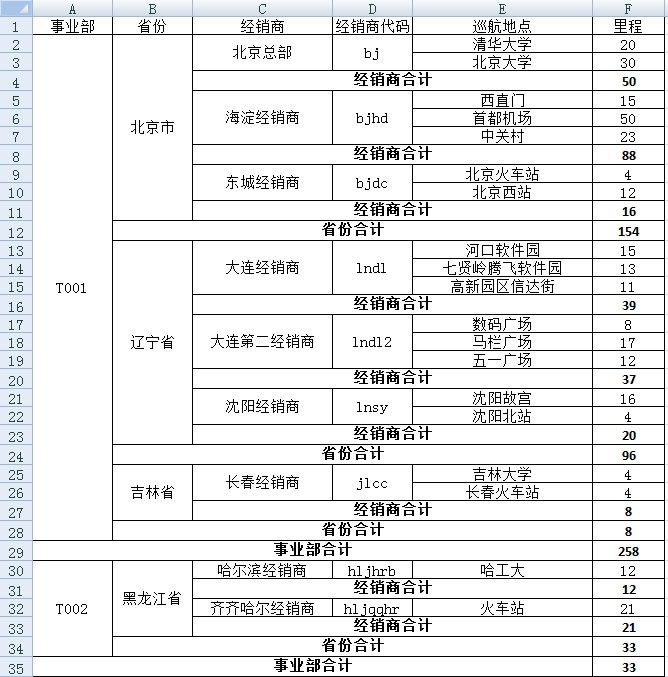
下一篇将结合一个具体实例来介绍复杂报表的分析和制作,完成如下图所示的报表: 